jQuery EasyUI App - Create a CRUD app that expands row detail editing forms
May 08, 2021 jQuery EasyUI
Table of contents
jQuery EasyUI app - Create a CRUD app that expands row detail editing forms
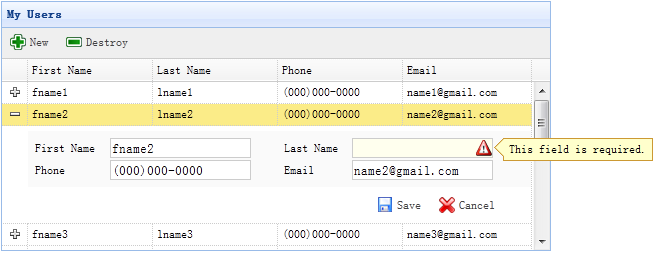
The user can expand a row by switching the datagrid view to 'detailview', and the details of the row are displayed below the expanded row. This feature allows you to provide some appropriate layout to prevent editing forms in the detail line panel.
In this section, we use the datagrid component to reduce the space occupied by editing forms.
Step 1: Define a data grid in an HTML tag (DataGrid)
<table id="dg" title="My Users" style="width:550px;height:250px"  url="get_users.php"
                  toolbar="#toolbar" 	fitColumns="true" singleSelect="true">
	<thead>
		<tr>
			<th field="firstname" width="50">First Name</th>
			<th field="lastname" width="50">Last Name</th>
			<th field="phone" width="50">Phone</th>
			<th field="email" width="50">Email</th>
		</tr>
	</thead>
</table>
<div id="toolbar">
	<a href="#" class="easyui-linkbutton" iconCls="icon-add" plain="true" onclick="newItem()">New</a>
	<a href="#" class="easyui-linkbutton" iconCls="icon-remove" plain="true" onclick="destroyItem()">Destroy</a>
</div>
Step 2: Apply a detail view to the data grid
$('#dg').datagrid({
	view: detailview,
	detailFormatter:function(index,row){
		return '<div class="ddv"></div>';
	},
	onExpandRow: function(index,row){
		var ddv = $(this).datagrid('getRowDetail',index).find('div.ddv');
		ddv.panel({
			border:false,
			cache:true,
			href:'show_form.php?index='+index,
			onLoad:function(){
				$('#dg').datagrid('fixDetailRowHeight',index);
				$('#dg').datagrid('selectRow',index);
				$('#dg').datagrid('getRowDetail',index).find('form').form('load',row);
			}
		});
		$('#dg').datagrid('fixDetailRowHeight',index);
	}
});
In order to apply a detail view to the DataGrid, you need to introduce a 'datagrid-detailview' file at the head of .js html page.
We use the 'detailFormatter' function to generate line details. I n this case, we return an empty slt;div that is used to place the edit form. W hen the user clicks the line-expand button, the 'onExpandRow' event is triggered and we load the edit form through ajax. C all the 'getRowDetail' method to get the row detail container, so we can find the row detail panel. Create a panel in the line detail and load the edit form show_form.php 'the 'page' returned.
Tip: For the use of ajax, you can refer to this site's "AJAX Tutorial"!
Step 3: Create an edit form
The edit form is loaded from the server.
<form method="post">
	<table class="dv-table" style="width:100%;background:#fafafa;padding:5px;margin-top:5px;">
		<tr>
			<td>First Name</td>
			<td><input name="firstname" class="easyui-validatebox" required="true"></input></td>
			<td>Last Name</td>
			<td><input name="lastname" class="easyui-validatebox" required="true"></input></td>
		</tr>
		<tr>
			<td>Phone</td>
			<td><input name="phone"></input></td>
			<td>Email</td>
			<td><input name="email" class="easyui-validatebox" validType="email"></input></td>
		</tr>
	</table>
	<div style="padding:5px 0;text-align:right;padding-right:30px">
		<a href="#" class="easyui-linkbutton" iconCls="icon-save" plain="true" onclick="saveItem(<?php echo $_REQUEST['index'];?>)">Save</a>
		<a href="#" class="easyui-linkbutton" iconCls="icon-cancel" plain="true" onclick="cancelItem(<?php echo $_REQUEST['index'];?>)">Cancel</a>
	</div>
</form>
Step 4: Save or cancel the edit
Call the 'saveItem' function to save a user or the 'cancelItem' function to cancel the edit.
function saveItem(index){
	var row = $('#dg').datagrid('getRows')[index];
	var url = row.isNewRecord ? 'save_user.php' : 'update_user.php?id='+row.id;
	$('#dg').datagrid('getRowDetail',index).find('form').form('submit',{
		url: url,
		onSubmit: function(){
			return $(this).form('validate');
		},
		success: function(data){
			data = eval('('+data+')');
			data.isNewRecord = false;
			$('#dg').datagrid('collapseRow',index);
			$('#dg').datagrid('updateRow',{
				index: index,
				row: data
			});
		}
	});
}
Determine the URL to pass back, then look for the form object, and call the 'submit' method to submit the form data. When the data is saved successfully, the row data is collapsed and updated.
function cancelItem(index){
	var row = $('#dg').datagrid('getRows')[index];
	if (row.isNewRecord){
		$('#dg').datagrid('deleteRow',index);
	} else {
		$('#dg').datagrid('collapseRow',index);
	}
}
When you cancel the edit action, if the row is new and has not been saved, delete the row directly, otherwise the row is collapsed.