Cordova camera
May 21, 2021 Cordova
Table of contents
1. Step 1 - Install the camera plug-in
2. Step 2 - Add buttons and images
3. Step 3 - Add an event listener
This plug-in is used to take photos or use files from the image library.
Step 1 - Install the camera plug-in
Run the following code in the command prompt window to install the plug-in.
C:\Users\username\Desktop\CordovaProject>cordova plugin add cordova-plugin-camera
Step 2 - Add buttons and images
In this step, we'll create a button to call the camera and an img that will display the image after shooting. /b10> Add it to the .html the index in the .html.
<button id = "cameraTakePicture">TAKE PICTURE</button>
<img id = "myImage"></img>
Step 3 - Add an event listener
The event listener is added to the onDeviceReady function to ensure that Cordova loads before we start using it.
document.getElementById("cameraTakePicture").addEventListener
   ("click", cameraTakePicture);
Step 4 - Add a feature (take a picture)
We are creating the cameraTakePicture function, which is passed to our event listener as a callback. /b10> When a button is clicked, it is triggered. /b11> In this function, we call the navigator.camera global object provided by the plug-in API. /b12> If the shot is successful, the data is sent to the onSuccess callback function, and if not, an alert with an error message is displayed. We put this code at the bottom .js index code
function cameraTakePicture() {
   navigator.camera.getPicture(onSuccess, onFail, {
      quality: 50,
      destinationType: Camera.DestinationType.DATA_URL
   });

   function onSuccess(imageData) {
      var image = document.getElementById('myImage');
      image.src = "data:image/jpeg;base64," + imageData;
   }

   function onFail(message) {
      alert('Failed because: ' + message);
   }
}
When we run the application and press the button, the camera will be triggered.
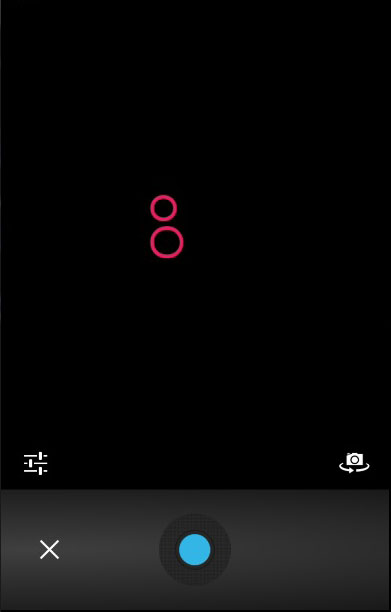
When we take and save a picture, it will appear on the screen.

The same procedure can be used to get images from the local file system. /b10> The only difference is the function created at the last step. /b11> You can see that sourceType optional parameters have been added.
Step 1
C:\Users\username\Desktop\CordovaProject>cordova plugin add cordova-plugin-camera
Step 2
<button id = "cameraGetPicture">GET PICTURE</button>
Step 3
document.getElementById("cameraGetPicture").addEventListener("click", cameraGetPicture);
Step 4
function cameraGetPicture() {
   navigator.camera.getPicture(onSuccess, onFail, { quality: 50,
      destinationType: Camera.DestinationType.DATA_URL,
      sourceType: Camera.PictureSourceType.PHOTOLIBRARY
   });

   function onSuccess(imageURL) {
      var image = document.getElementById('myImage');
      image.src = imageURL;
   }

   function onFail(message) {
      alert('Failed because: ' + message);
   }

}
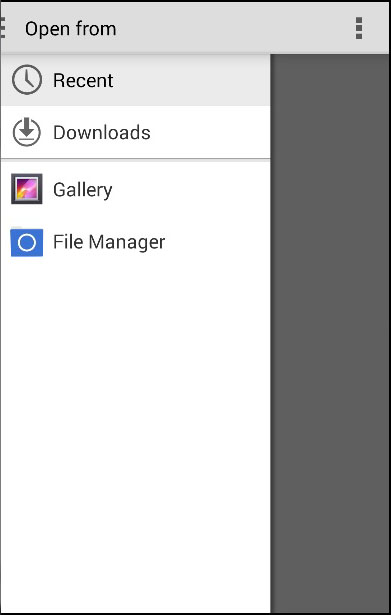
When we press the second button, the file system opens instead of the camera, so we can select the image we want to display.
This plug-in provides many optional parameter customizations.
| Serial number | Parameters and descriptions |
|---|---|
| 1 |
quality Image quality is in the range of 0-100. /b10> The default is 50. |
| 2 |
destinationType DATA_URL or 0 returns the base64 encoded string. FILE_URI or 1 returns the picture file URI. NATIVE_URI or 2 returns the picture-based URI. |
| 3 |
sourceType PHOTOLIBRARY or 0 Open Photo Gallery. CAMERA or 1 Turn on the camera. SAVEPHOTOALBUM or 2 Open saved albums. |
| 4 |
allowEdit Allow image editing. |
| 5 |
encodingType JPEG or 0 returns JPEG encoded images. PNG or 1 returns the PNG encoded picture. |
| 6 |
targetWidth The width of the picture zoom, in pixels. |
| 7 |
targetHeight The height of the picture zoom, in pixels. |
| 8 |
mediaType PICTURE or 0 allows only pictures to be selected. VIDEO or 1 allows video selection only. ALLMEDIA or 2 allows you to select all media types. |
| 9 |
correctOrientation The orientation used to correct the image. |
| 10 |
saveToPhotoAlbum Used to save an image to an album. |
| 11 |
popoverOptions Used to set the popover position on the IOS. |
| 12 |
cameraDirection FRONT or 0 front camera. Return to the or 1 rear camera. ALLMEDIA |