Cloud Development Try using the CLI to develop a project
May 27, 2021 A minimalist getting started manual for cloud development serverless
Table of contents
In the previous chapter we used the console to write code and manage our content.
Start this section with
the Command Line Tool CLI
for development.
First we need to install the CLI tool.
The Node system needs to be installed before the cloud development CLI .js. I f the node .js is not installed, download the bino files directly from the Node.js website and recommend that you select the LTS version, which must be 8.6.0 plus.
Installation
You can use npm to install and enter the following command on the command line:
npm i -g @cloudbase/cli
If you encounter an insufficient prompt permission, add the sudo command as follows:
sudo npm i -g @cloudbase/cli
If prompted to enter a password, enter the power-on password of the current user of the machine.
To test whether the installation was successful, you can use the -v command as follows:
cloudbase -v
If the version number is returned correctly, the installation is successful.
That's when you find that cloudbase is so long, nine letters long and hard to spell, you can actually use tcb instead of cloudbase, for example:
tcb -v
CLI, what does the console have to do with it?
Understandably, the console is a platform where you can write code using a Web IDE (cloud studio) or manage configurations such as secure domain names, stand-alone domain name settings, file management, and so on. B ut there are some operations that can actually be put on the command line, such as static site deployment can be a line of commands, you can upload files. S o:
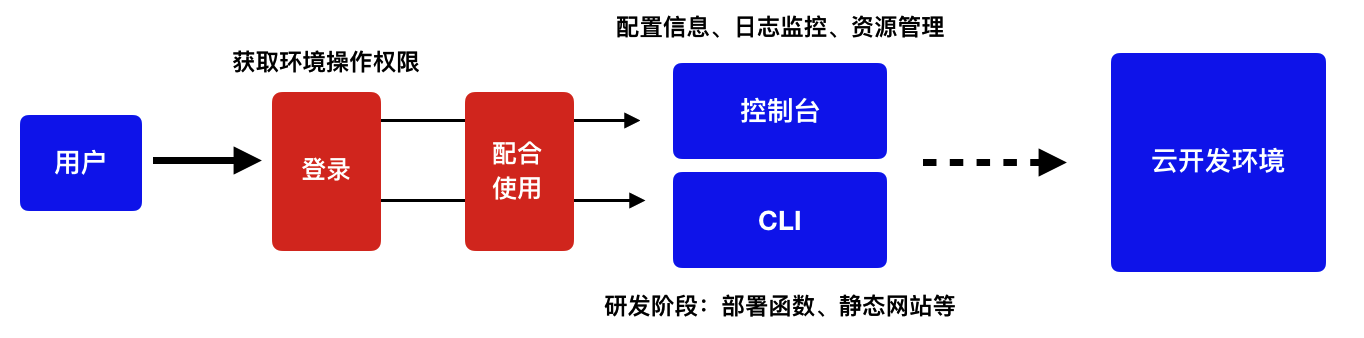
- The CLI provides simple commands for development tool scheduling, such as integrating hosting (static site hosting) commands in Vuepress package.json;
- The console contains more configuration information, resource information, generally belongs to low-frequency operation;
- Whether it's the console or the CLI, the first thing is to log in, otherwise you can't manage your own resources, which is understandable.
Deploy static sites
In How to play with static site deployment, it is mentioned that static files can be deployed through the console. I n fact, the CLI also supports deployment commands. F or example????, files under the directory where Vuepress generates dist can be deployed to static site hosting. W e can add a command to the package.json of the Vuepress project:
{ "scripts": { "dev": "vuepress dev docs", "build": "vuepress build docs", "deploy": "tcb hosting:deploy docs/.vuepress/dist/ -e 你的环境 ID" }, "dependencies": { "vuepress": "*" }}
The login command is executed first, and authentication is obtained in order to operate on the environment and resources:
tcb login
It can then be executed
tcb hosting:deploy docs/.vuepress/dist/ -e 你的环境 ID
If you are configured as above to package.json, you can also perform:
npm run deploy
You can then see the entire upload process and status, such as the deployment of the current site as follows:
LEEHUAWANG-MB0:vuepress wanglihua$ npm run deploy> @ deploy /Users/wanglihua/code/cloud-developer/vuepress> tcb hosting:deploy docs/.vuepress/dist/ -e 你的环境 ID文件传输中 [=========================================] 100% 0.0s✔ 部署完成 ???? https://open-cloud-5d89b0-1300954686.tcloudbaseapp.com✔ 文件共计 43 个✔ 文件上传成功 43 个┌──────┬──────────────────────────────────┐│ 状态 │ 文件 │├──────┼──────────────────────────────────┤│ ✔ │ 404.html │├──────┼──────────────────────────────────┤│ ✔ │ index.html │├──────┼──────────────────────────────────┤│ ✔ │ posts/01.html │├──────┼──────────────────────────────────┤│ ✔ │ posts/03.html │├──────┼──────────────────────────────────┤│ ✔ │ posts/04.html │├──────┼──────────────────────────────────┤│ ✔ │ posts/02.html │├──────┼──────────────────────────────────┤│ ✔ │ assets/img/search.83621669.svg │├──────┼──────────────────────────────────┤│ ✔ │ assets/css/0.styles.5eaf5755.css │├──────┼──────────────────────────────────┤│ ✔ │ assets/js/10.97930671.js │├──────┼──────────────────────────────────┤│ ✔ │ assets/js/12.ae757b08.js │├──────┼──────────────────────────────────┤│ ✔ │ assets/js/app.840f7c0a.js │└──────┴──────────────────────────────────┘✖ 文件上传失败 0 个
What is used here is
tcb hosting:deploy
command, the first parameter of your directory address, -e followed by your environment ID.
Of course, not only can you use Vuepress, but any page or content that needs to be
tcb hosting:deploy
command.
tcb hosting
command is a collection of more than one deploy, as well as sub-commands such as delete and view file lists,
see CLI-static hosting
Create and deploy cloud functions
A command handles the deployment of the entire static site, and of course the cloud function is not in the words.
<span style="color:#1336EE;
Step 0: tcb login-lt;/span-gt;
The same is the login, only logged in to get the operating rights of the environment, this truth is understood.
tcb login
<span style="color:#1336EE;
Step 1: tcb init;/span>
Select the environment and initialize the function template
tcb init
In the following image, press the upper and lower keys to select the environment:

Then select the language and template, and here you .js simple template for Node and cloud functions:
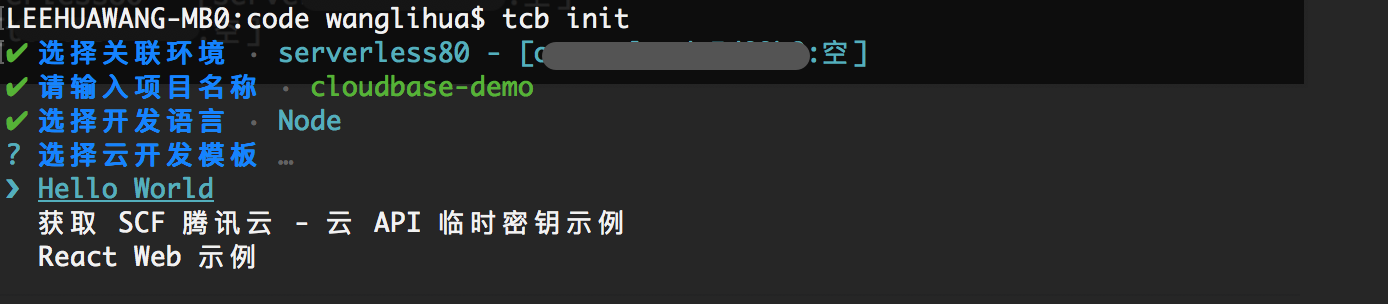
The results of the execution are as follows:
LEEHUAWANG-MB0:code wanglihua$ tcb init✔ 选择关联环境 · serverless80 - [你的环境 ID]✔ 请输入项目名称 · cloudbase-demo✔ 选择开发语言 · Node✔ 选择云开发模板 · Hello World✔ 已存在同名文件夹:cloudbase-demo,是否覆盖? (y/N) · true✔ 创建项目 cloudbase-demo 成功!???? 执行命令 cd cloudbase-demo 进入项目文件夹!???? 执行命令 cloudbase functions:deploy app 部署云函数
The project catalog you created is as follows:
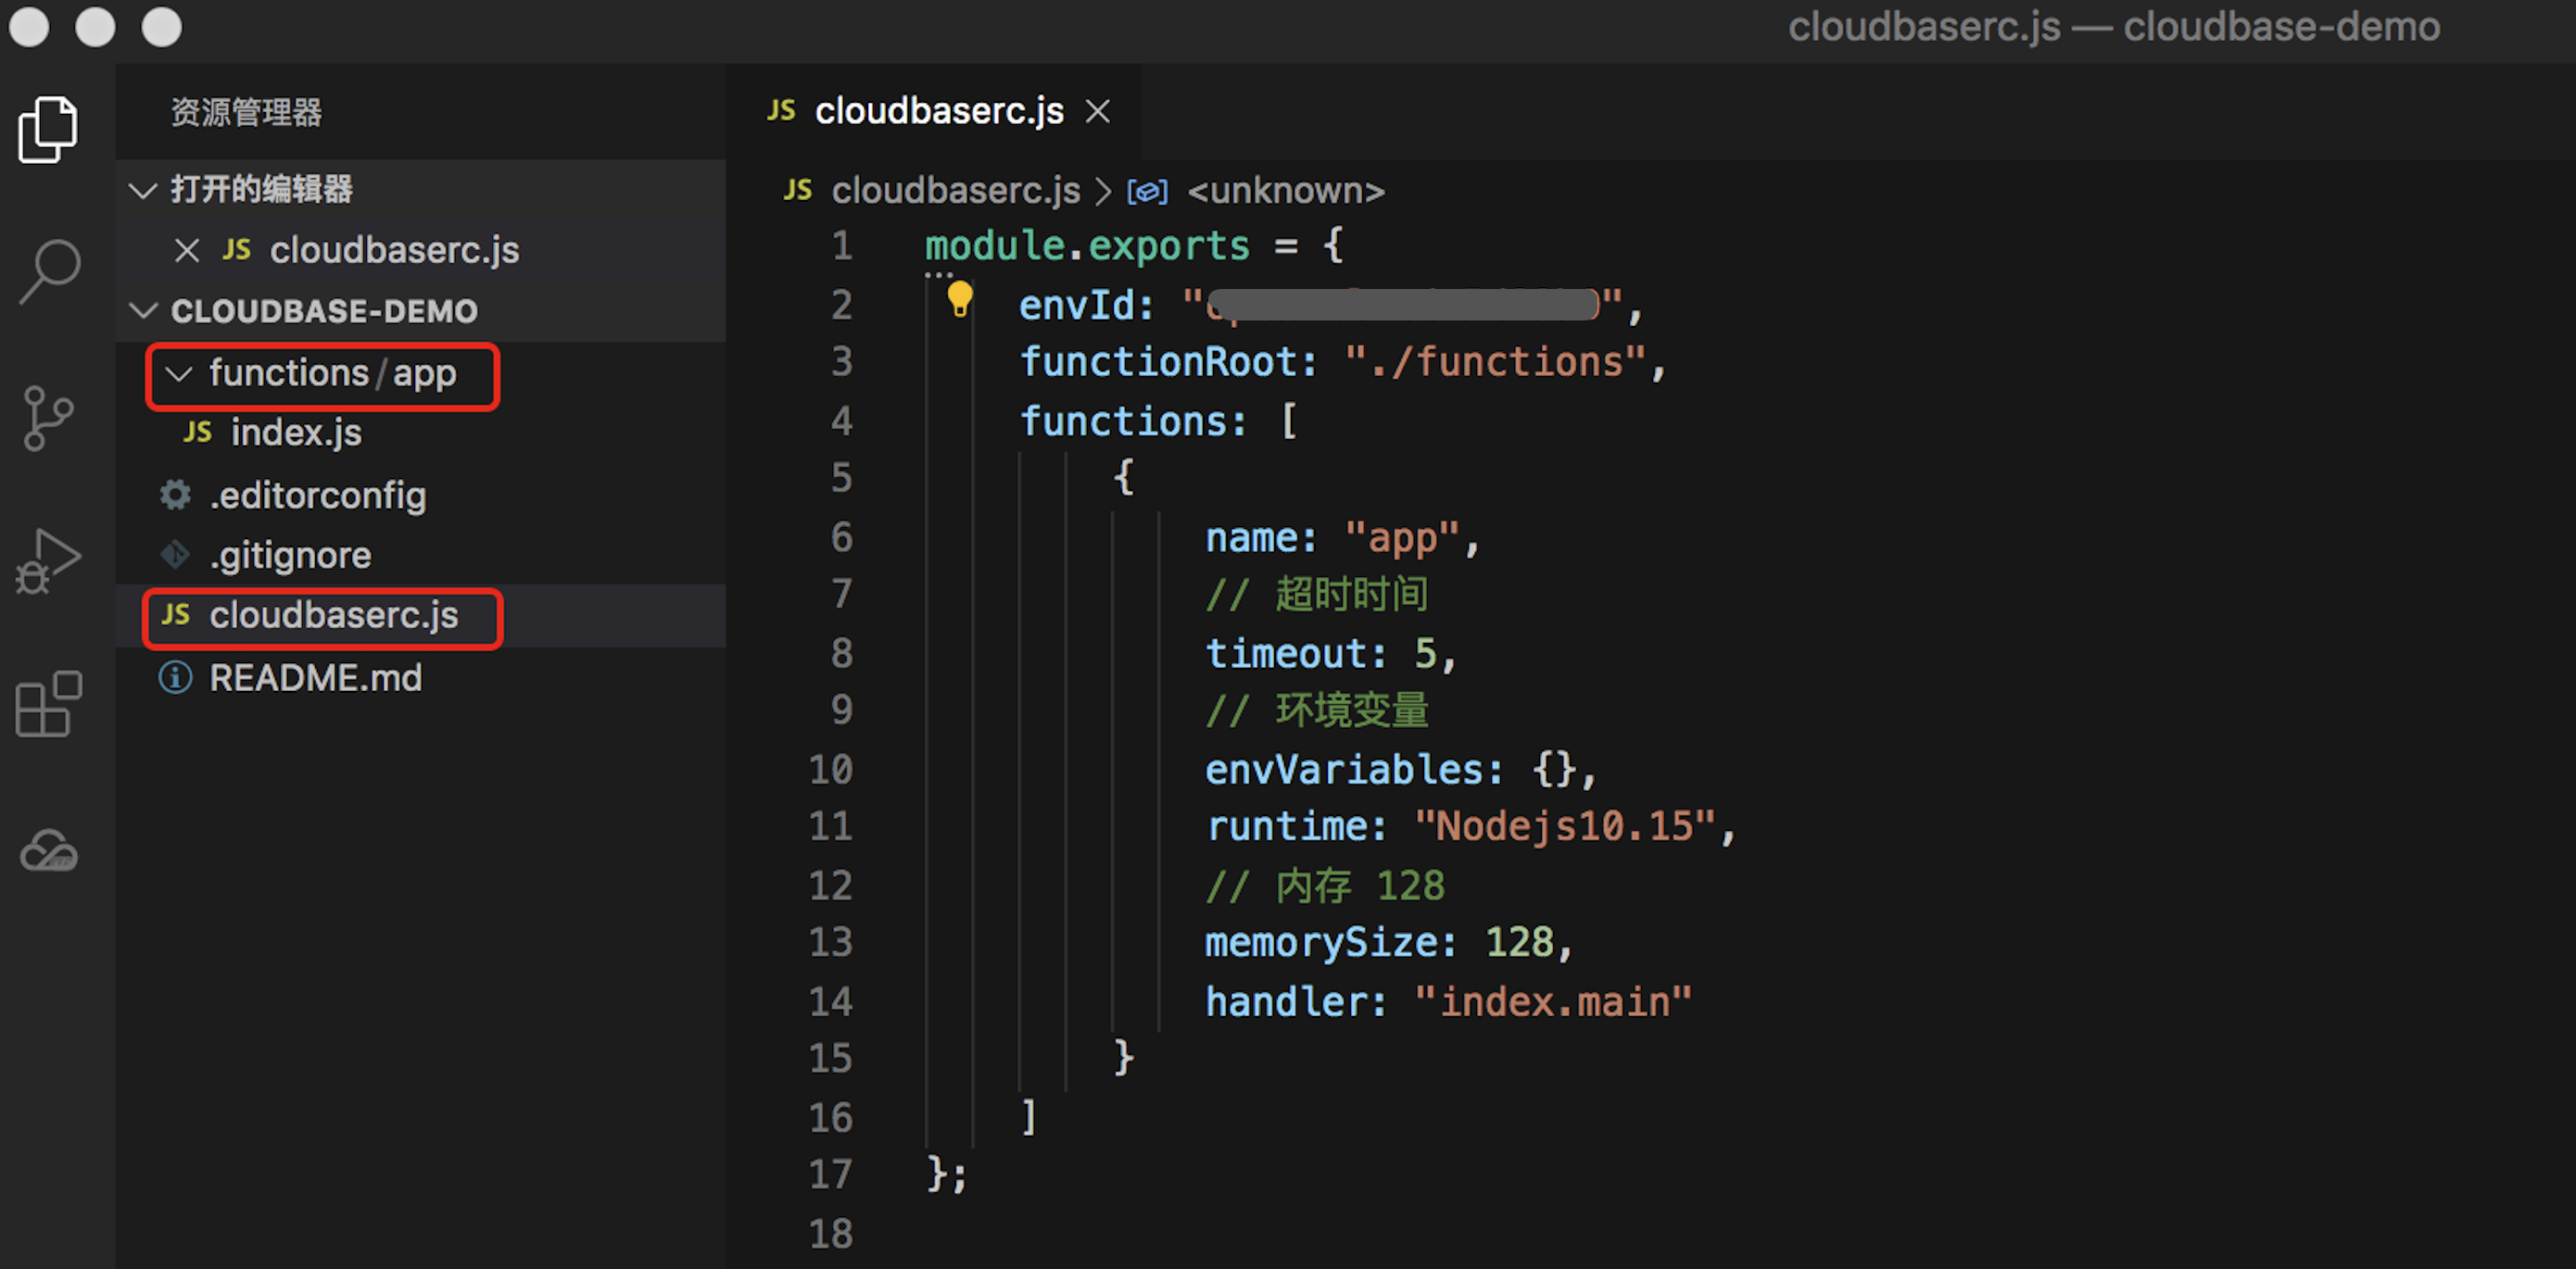
The most central file in the entire
cloudbaserc.js
which is the configuration of the entire project. L
ike what:
- envId: The envId indicates which environment, a developer has multiple environments, code to be accurately uploaded to the specified environment;
- functionRoot: The directory where the cloud functions are stored, so that all functions can be deployed with one command;
- functions: An array of functions that indicate the configuration of each function because each function may be configured differently;
For example, in the functions directory, there is an app directory, that is, the name of the function is the app, and its configuration information is:
- Time-out time of 5 seconds, up to a maximum of 60 seconds;
- Perform the function .js node's v10.15 environment;
- 128 MB of memory, currently a minimum of 128 MB;
<span style="color:#1336EE;
Step 2: tcb functions: deploy</span>
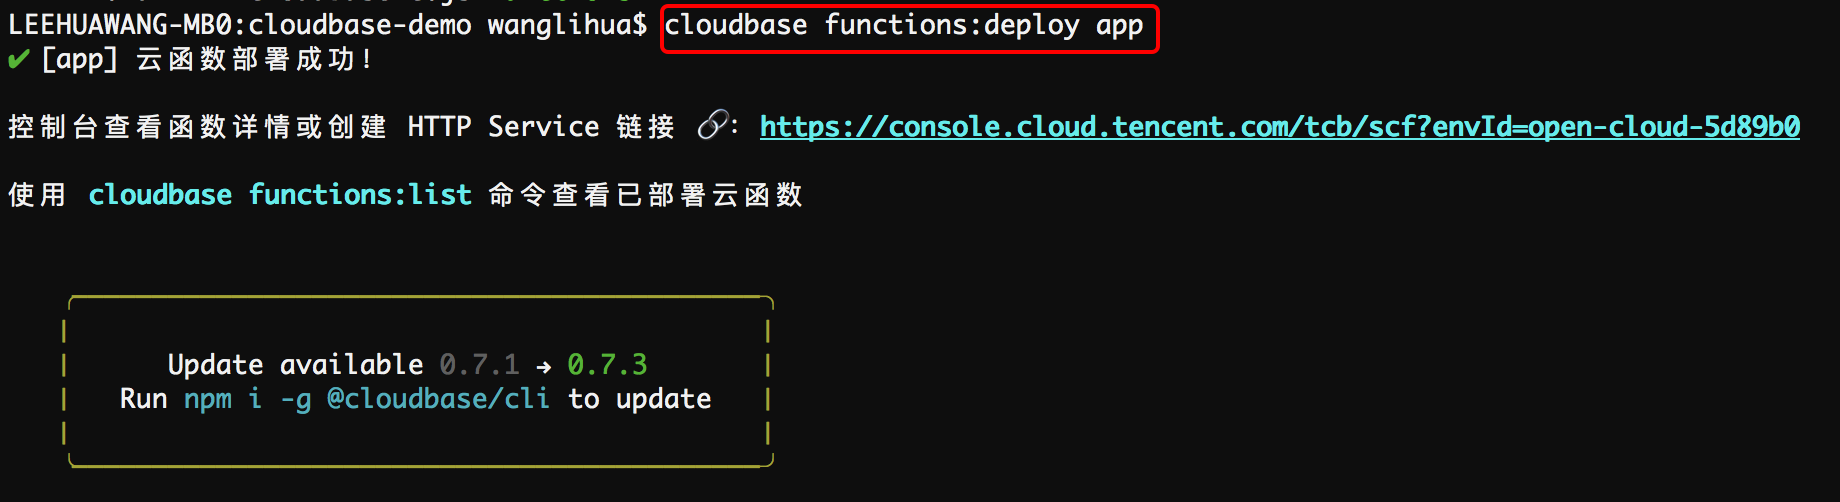
Let's follow the command-line prompts that just created the project to complete:
cd cloudbase-demotcb functions:deploy app
The command line executes as follows, and you can view the list of functions or create HTTP triggers based on prompts:
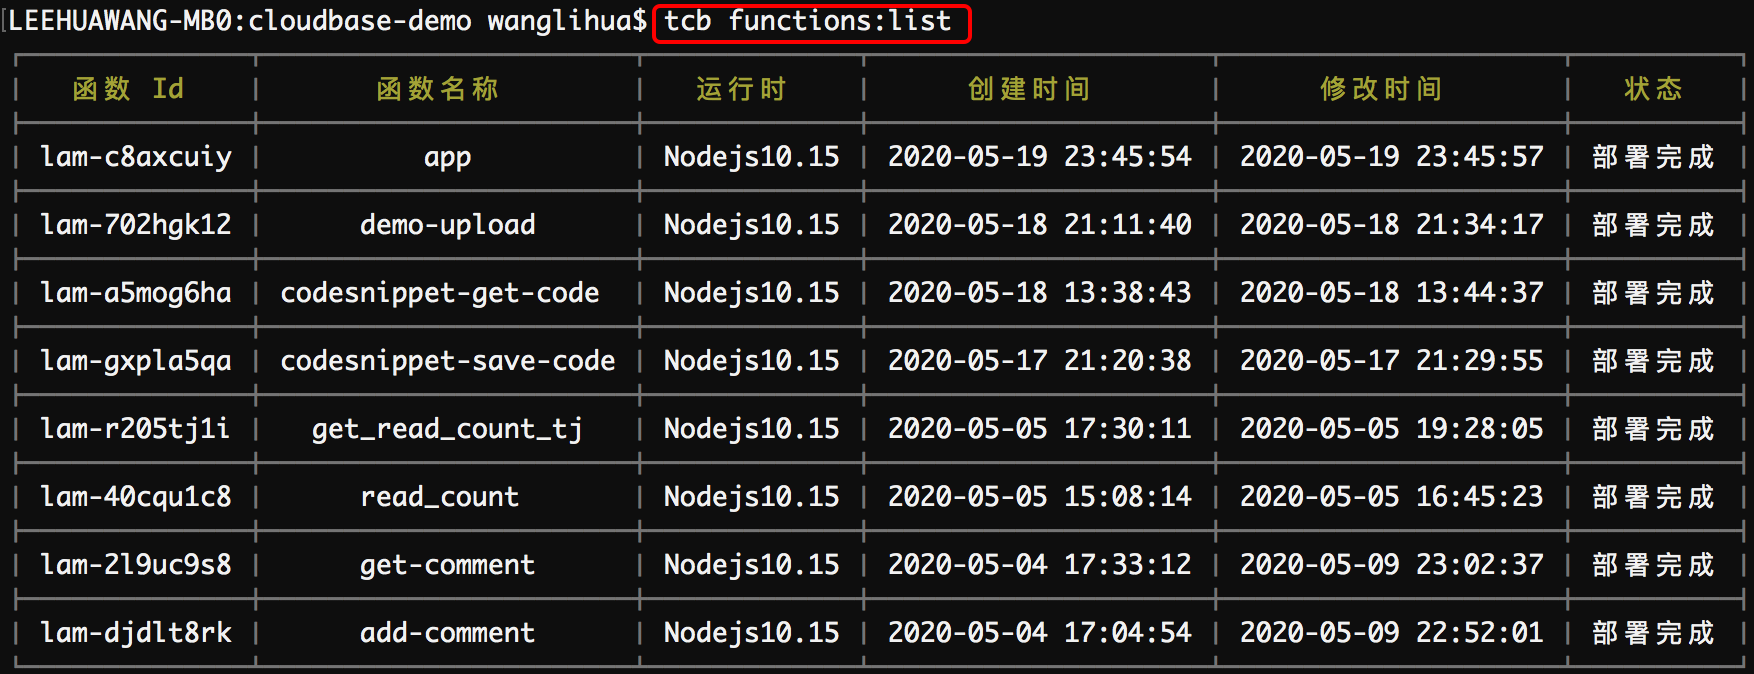
<span style="color:#1336EE;
Step 3: tcb functions: list-lt;/span>
See if the function is deployed and its status, as shown below:
More can be found in the CLI-Cloud function command.