Cloud Development Database CRUD
May 27, 2021 A minimalist getting started manual for cloud development serverless
Table of contents
The last section demonstrated the basic DEMO of cloud functions, but it's simple enough to go straight back to a "learn hard" JSON object. T his section familiarizes you with the database.
Cloud development provides a NoSQL database in which each record is a JSON-formatted object. A database can have multiple collections (equivalent to tables in relationship data) that can be seen as a JSON array, where each object is a record.
Typically, we refer to the increase of data records (Create), "Retrieve," "Update," and delete (Delete) collectively referred to as CRUD. B elow, we operate on the database based on cloud functions.
Create a database collection (table) and create a cloud function
Step 1:
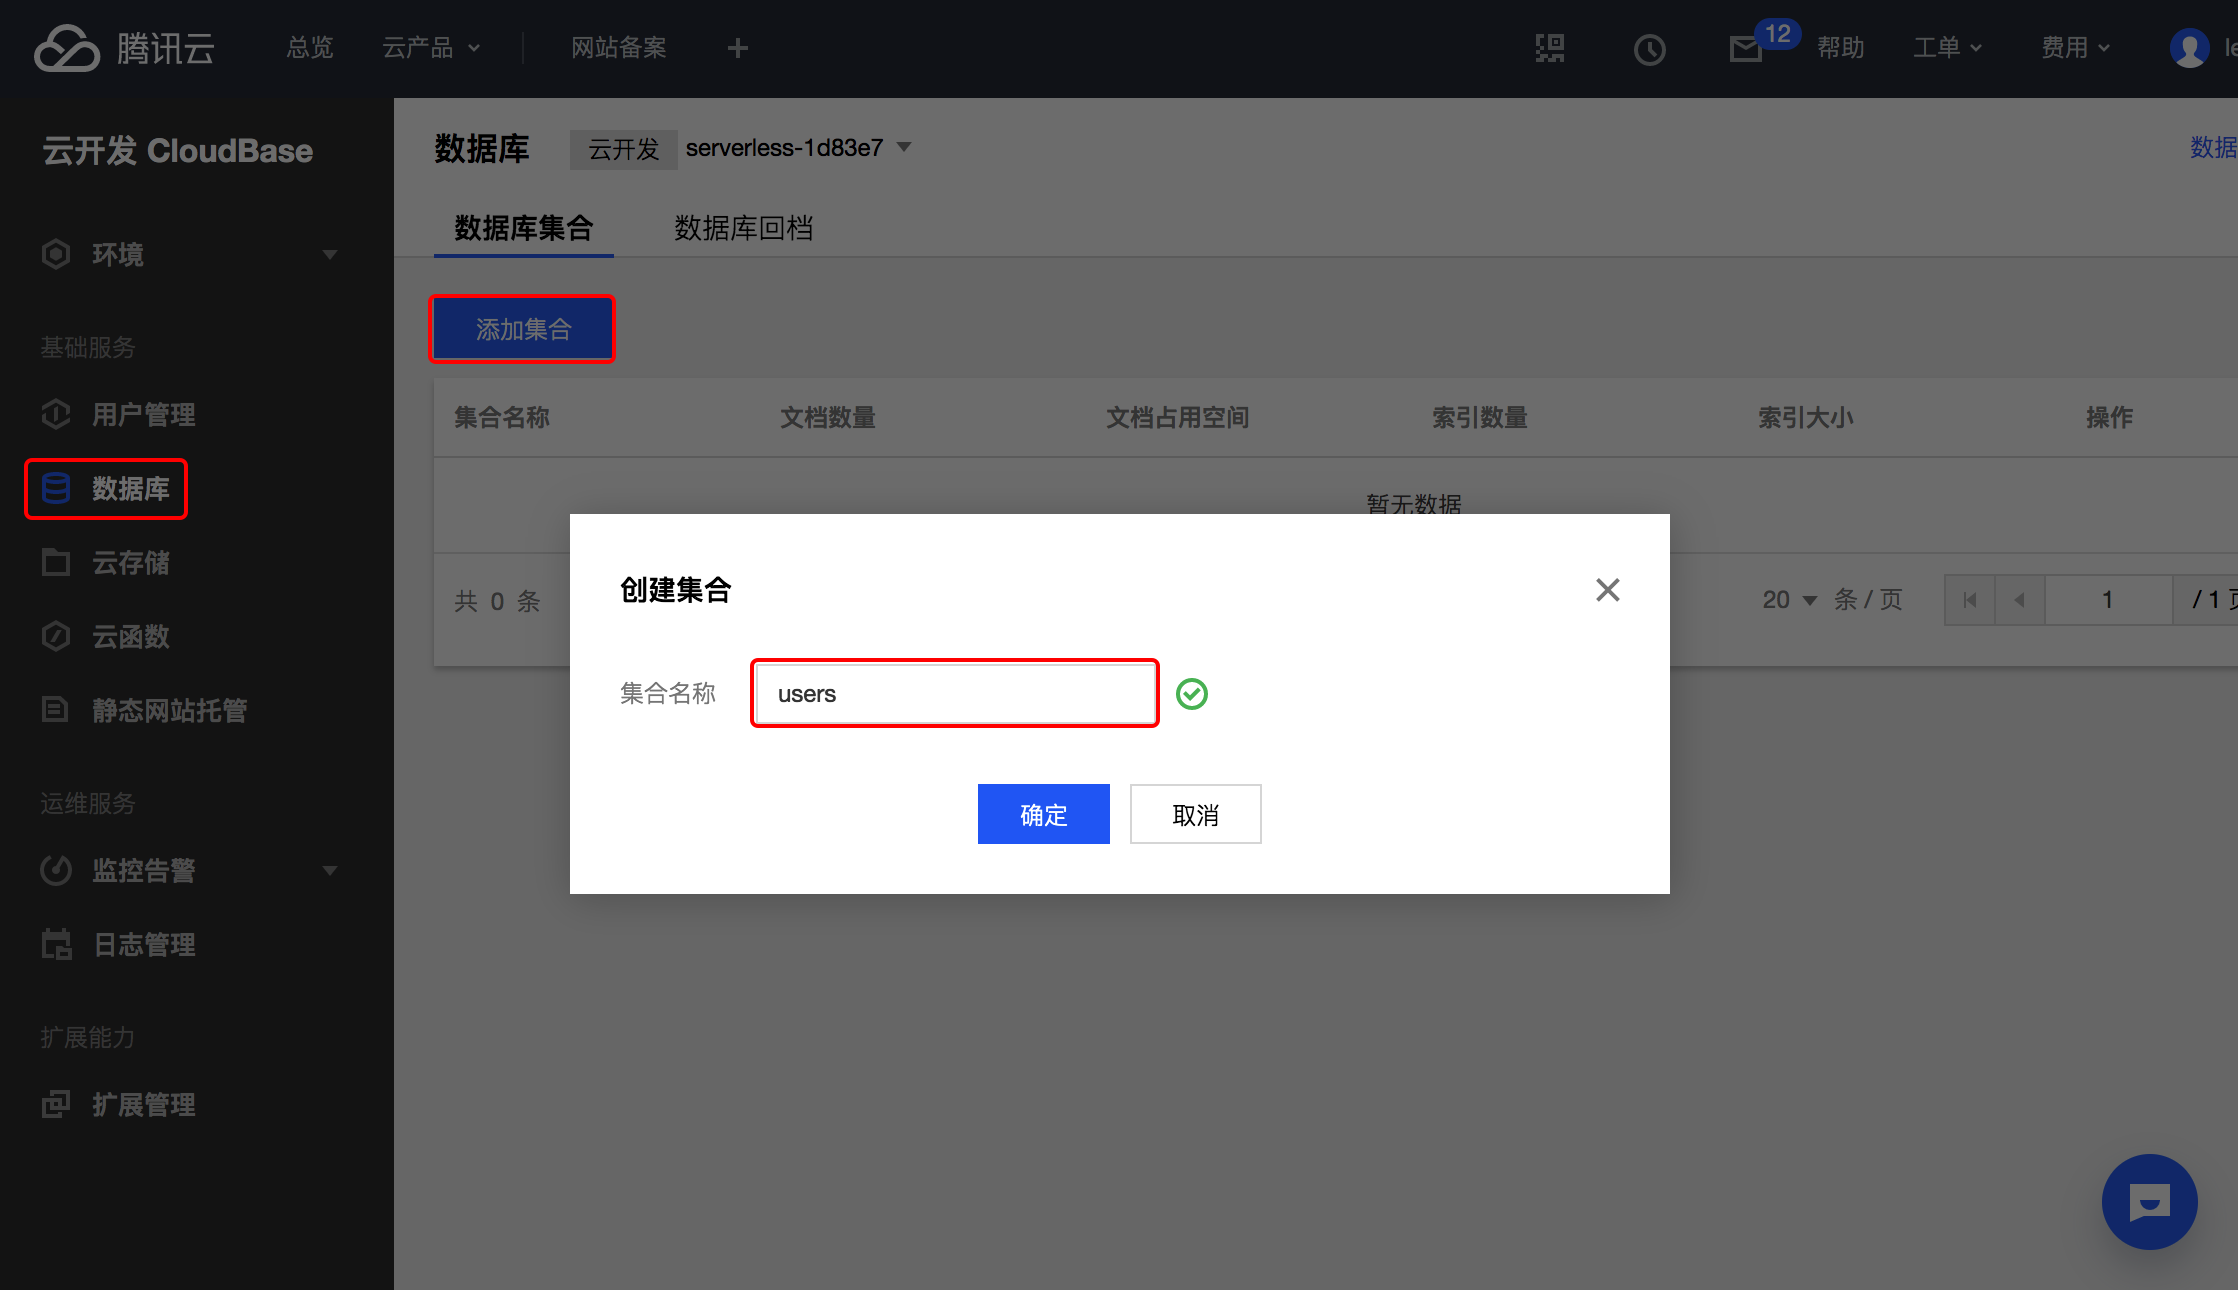
Create a collection of data named users
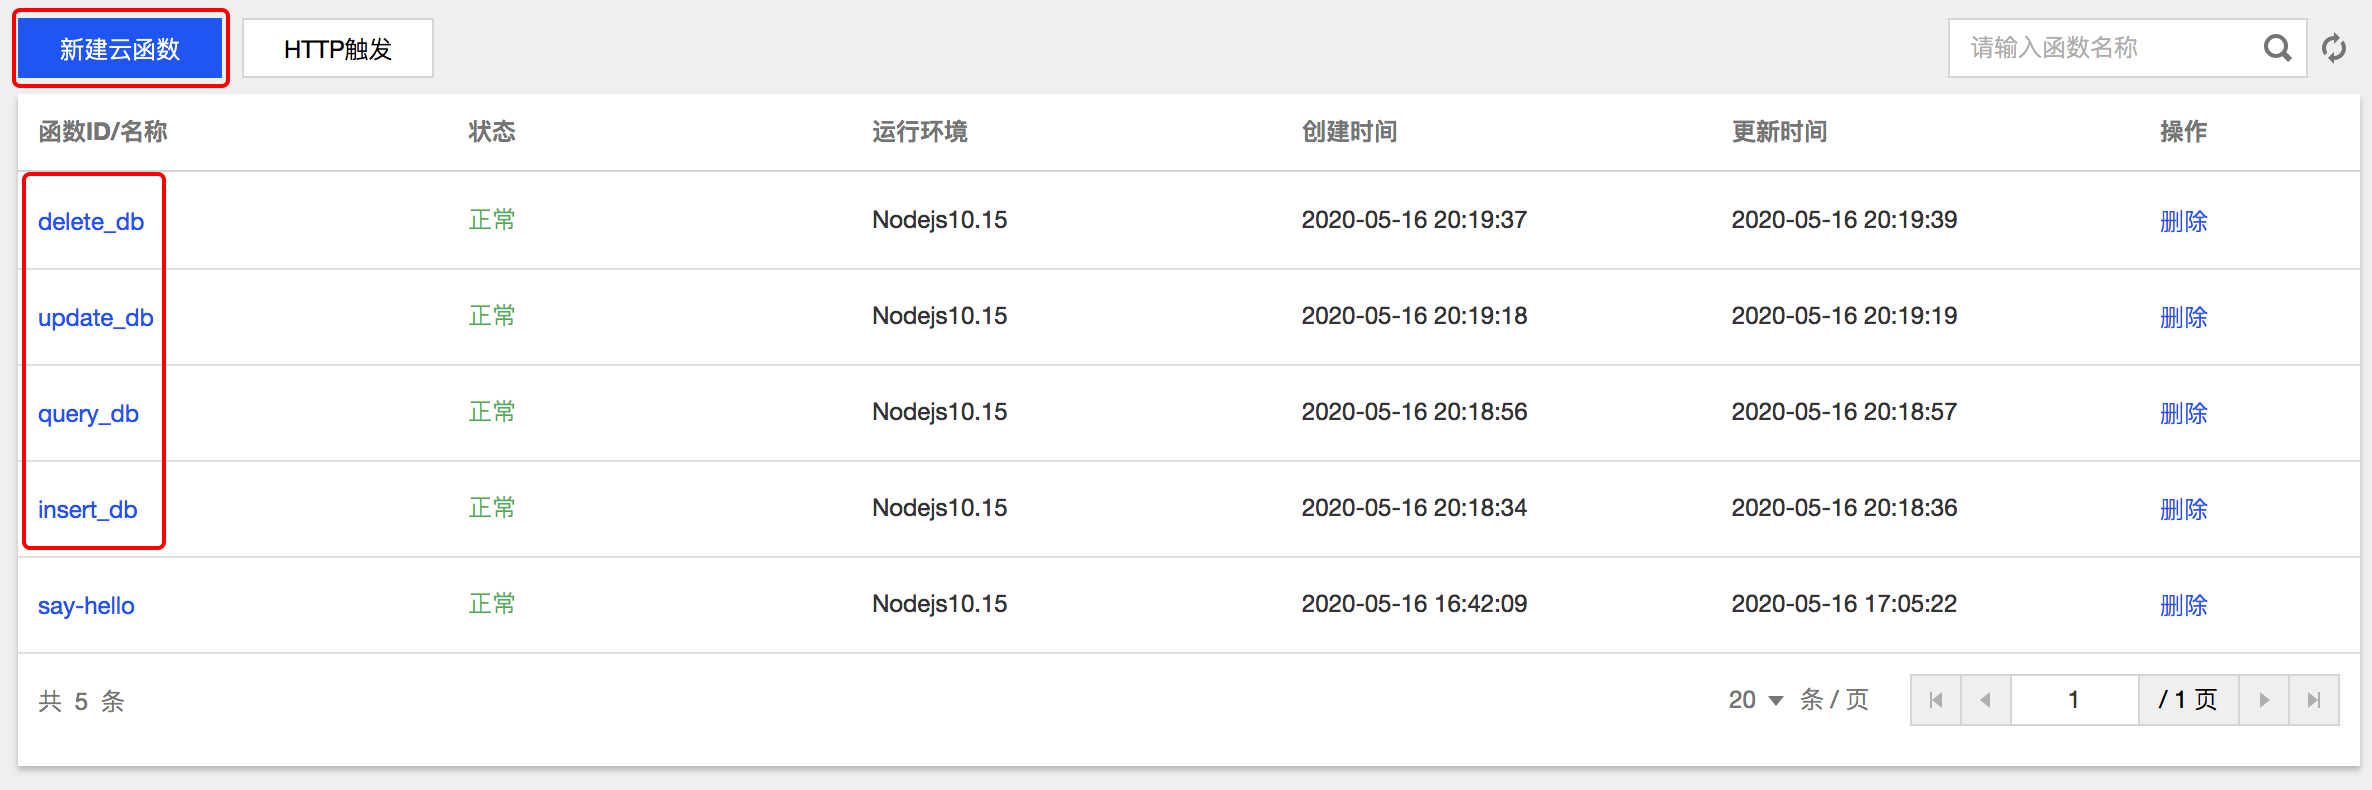
Step 2: Create four cloud functions named:
- insert_db
- query_db
- update_db
- delete_db
Here's the picture:
If you don't know how to create a cloud function, you can check out the last "Write the first cloud function."
Insert the data
Click on the "I'm insert_db" function in the list of cloud functions to go to the code editing page. B
efore we write the code, we need to install a Node.js module
tcb-admin-node
that provides some methods/APIs that can manipulate databases, cloud storage, and so on in a cloud function or node.js server environment.
Create a package.json file
Because the
tcb-admin-node
the package.json file can be created first, as shown in pictures 1, 2, 3, 4 below. F
inally, remember to click Save and install dependencies.
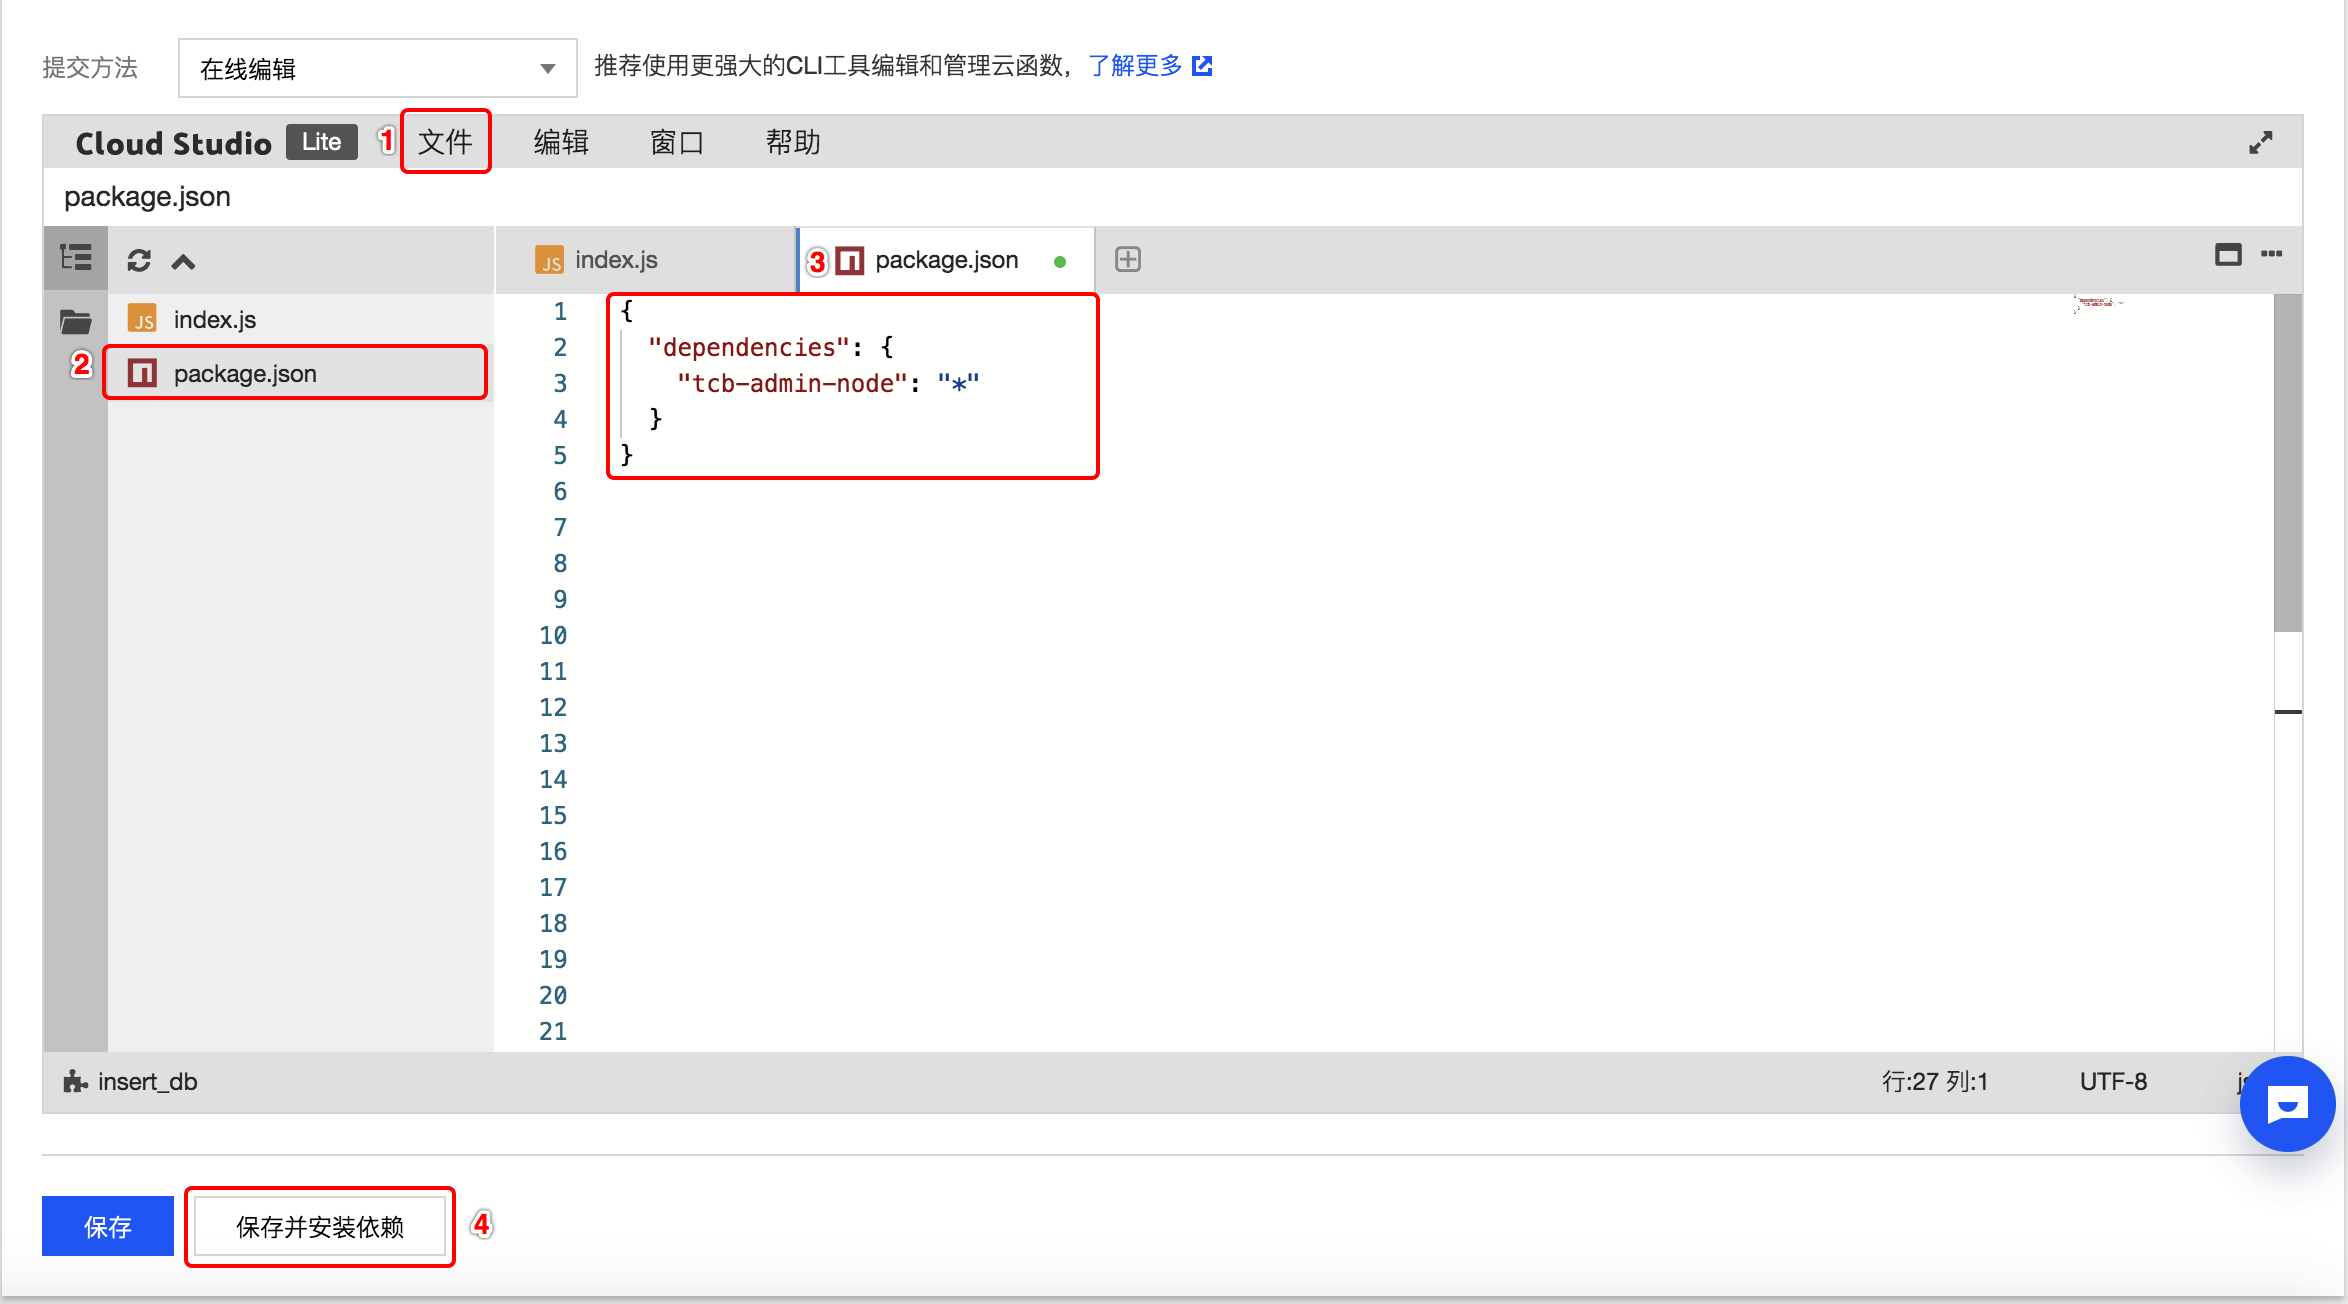
The package.json file is below and can be copied in.
{ "dependencies": { "tcb-admin-node": "*" }}
Write code
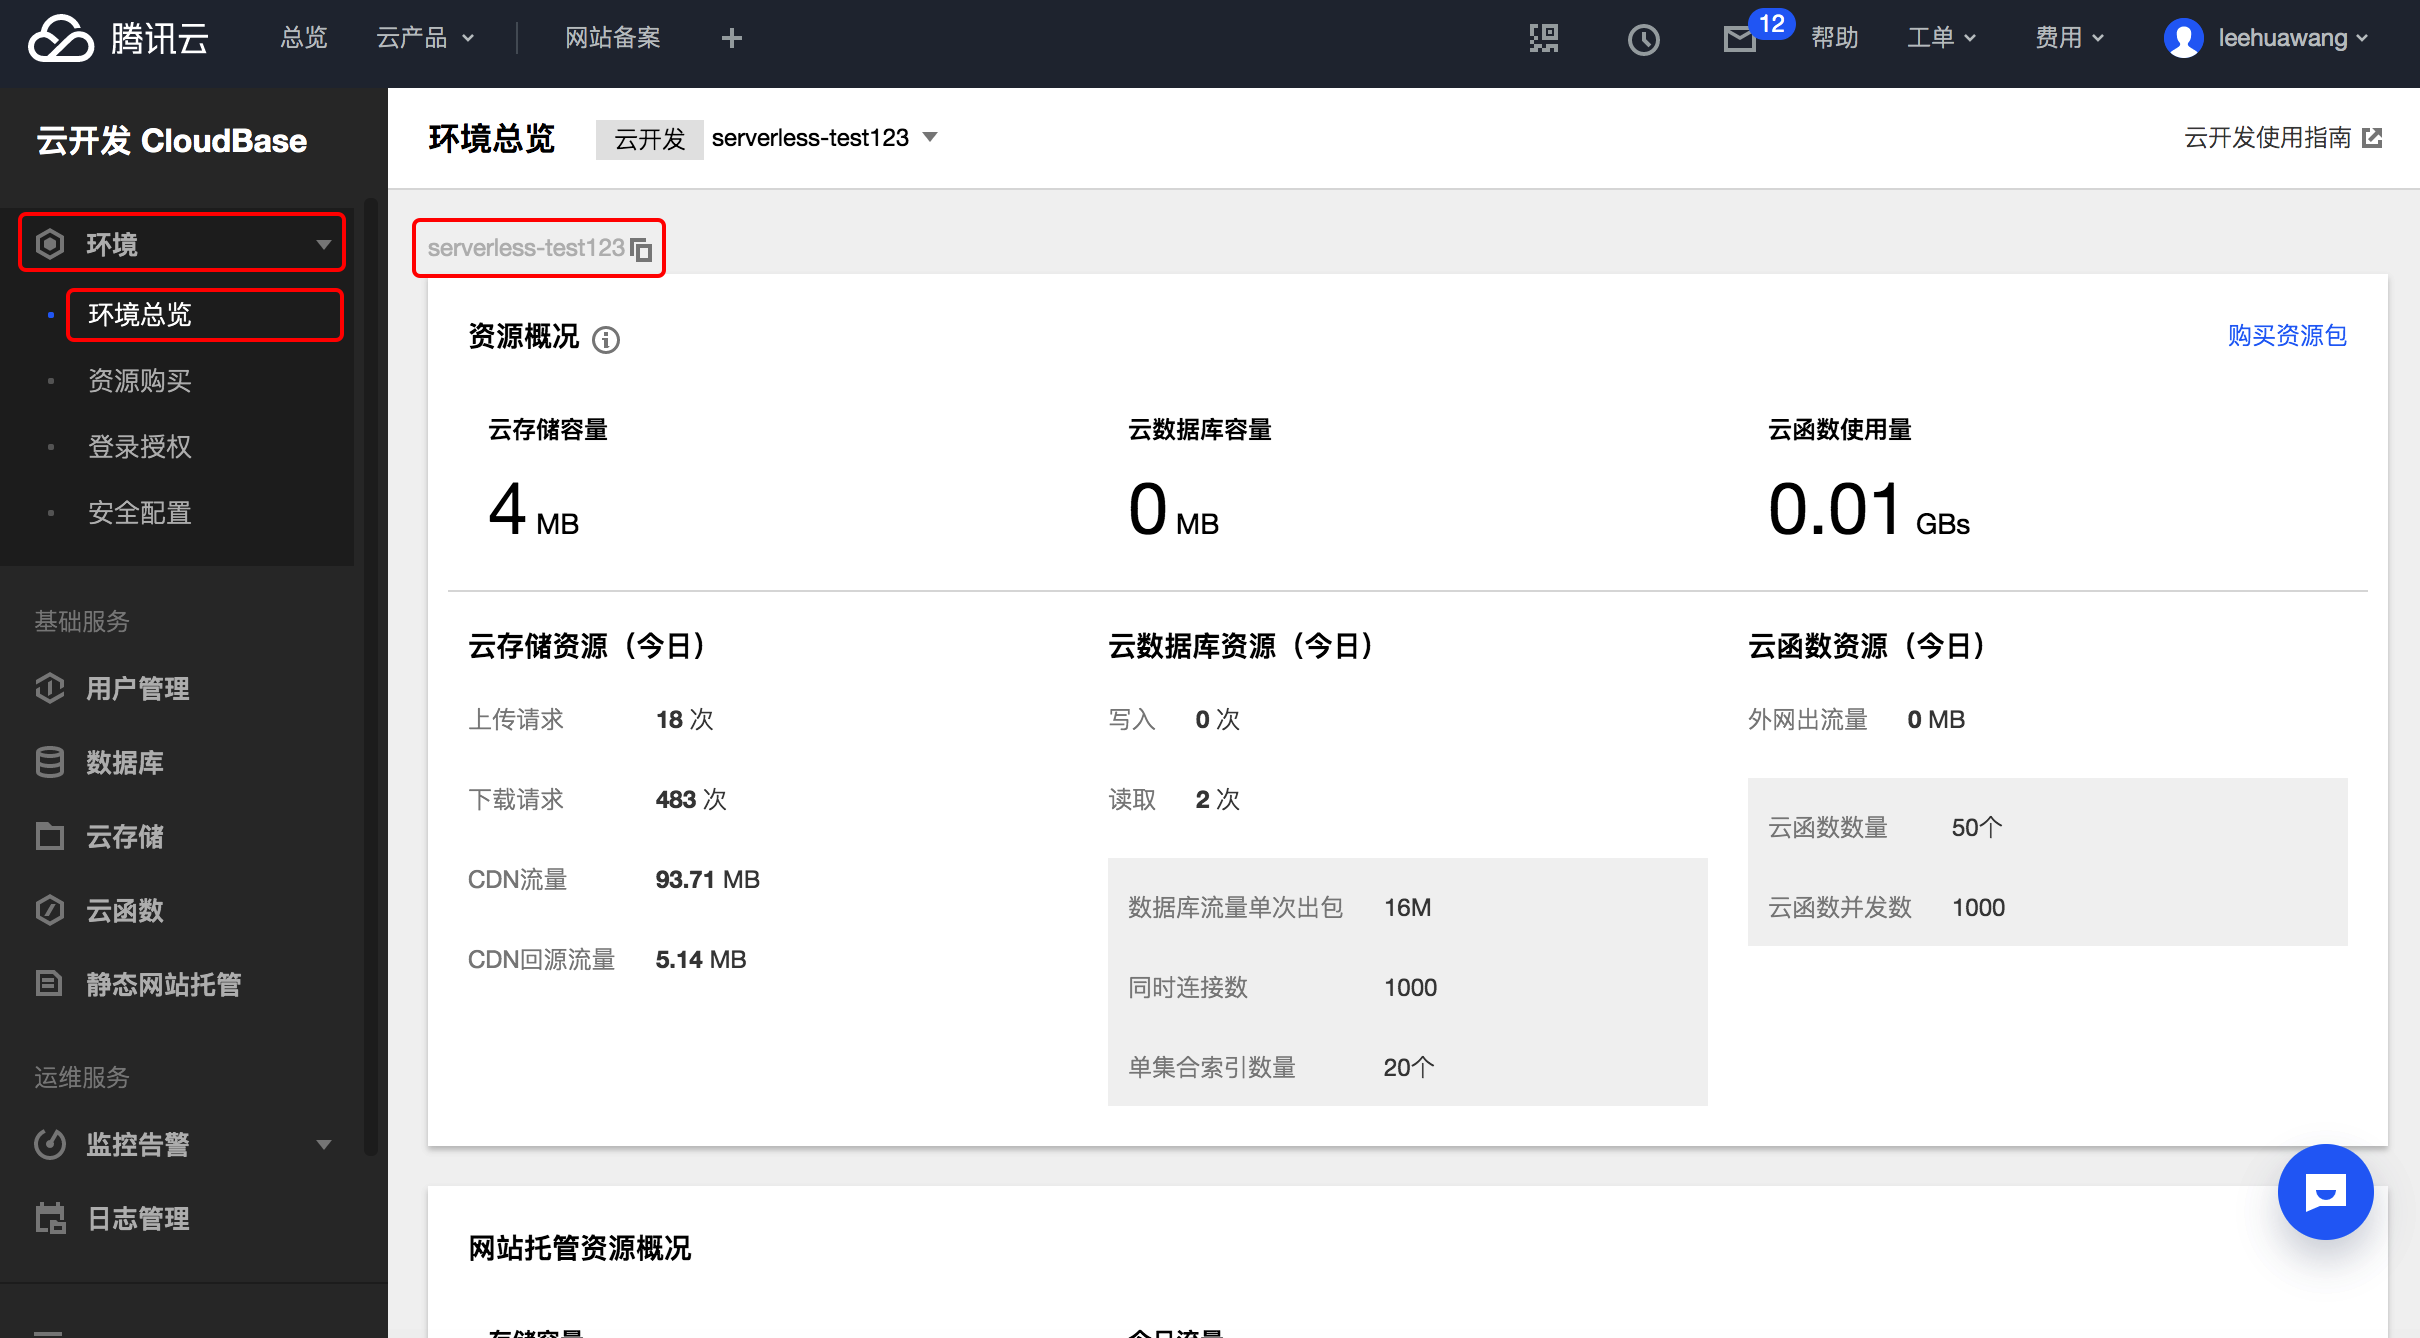
Step 1: Get the environment ID
Click Environment in the left sidebar of the console, click Environment Overview, and copy the Environment ID.
The following code needs to access the environment's resources, such as the database, through the environment ID.
Step 2: Write code
Write the .js the index file and click Save and install dependencies, as follows:
'use strict';const tcb = require('tcb-admin-node')const app = tcb.init({ env: '你的环境 ID'})const db = app.database()exports.main = async (event, context) => { let result = await db.collection('users').add({ name: 'test', age: 25, create_time: new Date() }) return result}
Here's the analysis code:
-
const tcb = require('tcb-admin-node')cloud development node .js SDK; -
const app = tcb.init({})environment; -
app.database()obtain a reference to the data; -
db.collection('users')users are a collection of databases created in Section 6.1, or "tables", where references to the collection are obtained; -
add({})input parameter is the JSON object, here is a user record; -
asyncandawaitJavaSript APIs that turn asynchronous into synchronous operations;
Step 3: Turn on HTTP triggering and path configuration
The entire configuration process can be seen in
the last article, "Writing the First Cloud Function".
C
onfigure a trigger path, as shown below:

Step 4: Access HTTP and verify that the data is inserted
Click on the link and the browser opens once to access the data and inserts it once. W
e click on the left sidebar of the database, and then click on the database "users", you can see the following data:
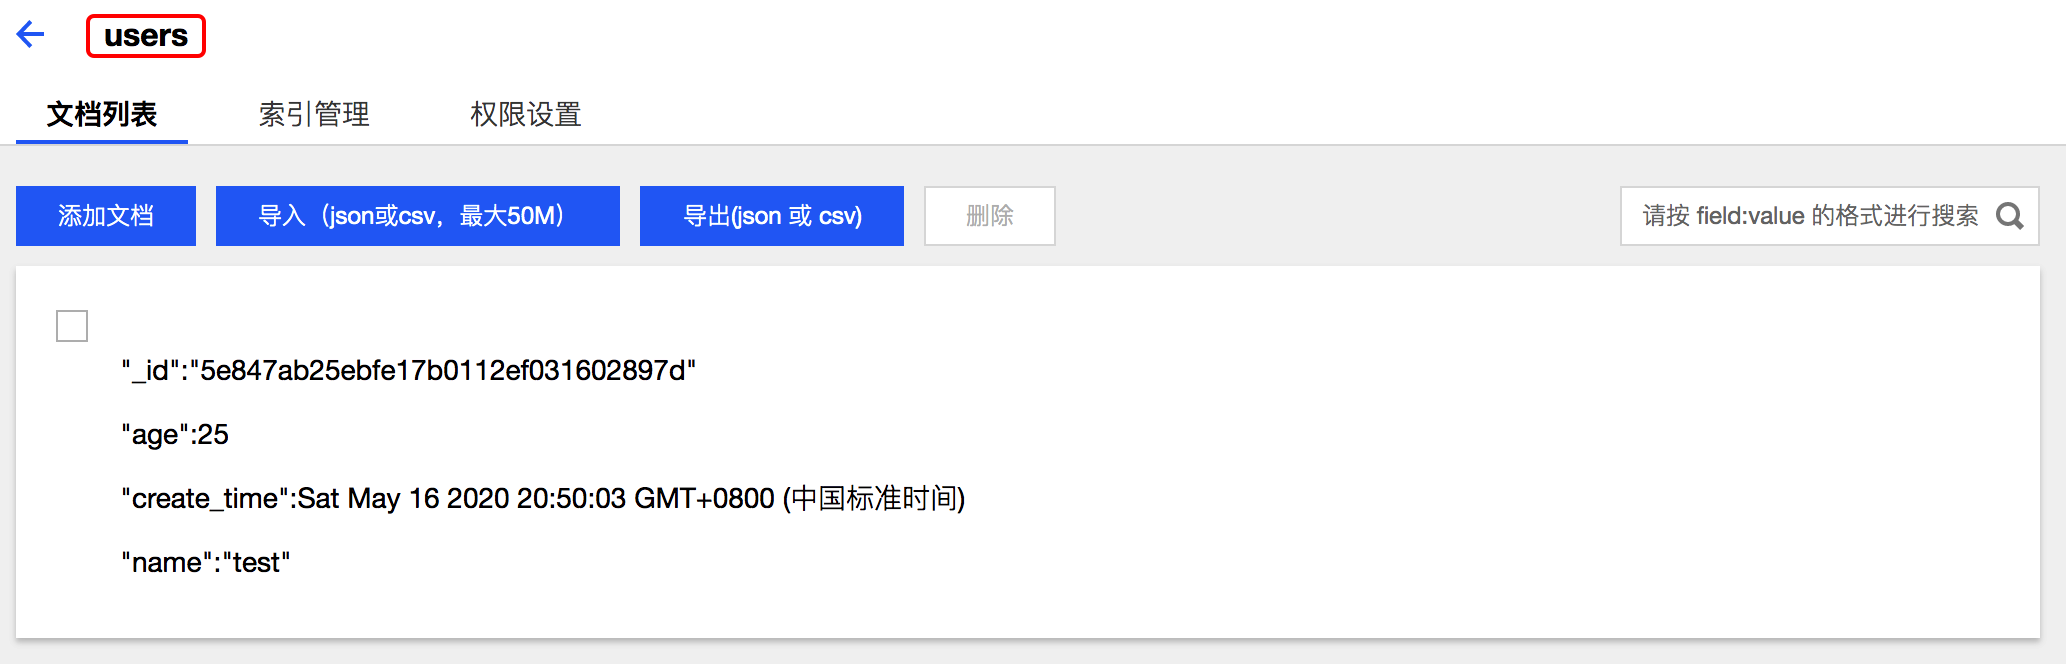
Several more requests to the database will appear more than a few data.
Query the data
Here, we use the cloud function that
query_db
the beginning. O
f course, you can continue
insert_db
function. I
f we don't use the function above, here are a few things we need to do:
- Create package.json and fill in package.json content, see Section 6.2.1;
- Use the Save and Install Dependency button;
- The environment ID needs to be copied;
-
The cloud function HTTP trigger path needs to be configured,
/query_db
The code for the query looks like this:
'use strict';const tcb = require('tcb-admin-node')//初始化环境const app = tcb.init({ env: '你的环境 ID'})//获取数据引用const db = app.database()exports.main = async (event, context) => { //使用 where 方法查询 name 为 test 数据 //链式调用 get 方法,执行查询过程并返回数据 let result = await db.collection('users').where({ name: 'test' }) .get() //获取返回的数据结果 return result.data}
Access to the configured HTTP trigger path to query the previously inserted data, which was requested 3 times, so the data returns 3.
[ { "_id": "5e847ab25ebfe17b0112ef031602897d", "age": 25, "create_time": "2020-05-16T12:50:03.492Z", "name": "test" }, { "_id": "e2297d935ebfe86b00bcb9cb6e7c7f1a", "age": 25, "create_time": "2020-05-16T13:19:39.931Z", "name": "test" }, { "_id": "a9bfcffc5ebfe88700b26c896baeac9f", "age": 25, "create_time": "2020-05-16T13:20:07.279Z", "name": "test" }]
If you need to return two data, you can use limit(2) to return N bars, for example:
let result = await db.collection('users').where({ name: 'test'}) .limt(2) .get()
Update the data
Similarly, if you are using a newly created cloud function, you need to do the following:
- Create package.json and fill in package.json content, see Section 6.2.1;
- Use the Save and Install Dependency button;
- The environment ID needs to be copied;
-
The cloud function HTTP trigger path needs to be configured,
/update_db
Here I would like to update the age value of all eligible records, all updated to 88 years old, as follows:
'use strict';const tcb = require('tcb-admin-node')//初始化环境const app = tcb.init({ env: '你的环境 ID'})//获取数据引用const db = app.database()exports.main = async (event, context) => { //使用 where 方法查询 name 为 test 数据 //将符合要求的数据的 age 字段值更新为 88 let result = await db.collection('users').where({ name: 'test' }).update({ age: 88 }) return result}
The http service is also requested to complete the update operation, and the browser returns the following data, indicating that all 3 data that meet the requirements have been updated.
{ "requestId": "1589636820392_1_01781", "updated": 3}
update
method is a local update that updates the field, and if you replace a record, you can
set
method, see Database Replacement
Update
Delete the data
Similarly, if you are using a newly created cloud function, you need to do the following:
- Create package.json and fill in package.json content, see Section 6.2.1;
- Use the Save and Install Dependency button;
- The environment ID needs to be copied;
-
The cloud function HTTP trigger path needs to be configured,
/delete_db
'use strict';const tcb = require('tcb-admin-node')//初始化环境const app = tcb.init({ env: 'serverless-1d83e7'})//获取数据引用const db = app.database()exports.main = async (event, context) => { //使用 where 方法查询 name 为 test 数据 //remove 删除符合条件的所有数据 let result = await db.collection('users').where({ name: 'test' }).remove() return result}
By triggering the cloud function via HTTP, the browser returns 3 data deletions:
{ "requestId": "1589637228874_1_51061", "deleted": 3}
The where method allows you to delete all eligible data, and if you only want to delete 1 data that specifies the _id field, you can see Delete a record
Appendix
- For more information, please refer to the Database Reference Guide