Chapter 9 Manifest file
May 21, 2021 Android SDK Getting started
Table of contents
Chapter 9 Manifest file
So far, we've been familiar with the various components of the Android project, including its resources. In today's article, we'll focus on the Project Manifest file.
For a project, Manifest can be simple or complex, depending on the application. Let's first look at the components in Manifest that are integral to all applications, and then explore further the alternative components that may be involved in project development in the future.
There are a number of elements and properties in the Manifest file, and we might as well click here to find out more about them in the Android Developer's Guide. M anifest has several key roles: it specifies application packages, provides formal descriptions of application components, and is responsible for declaring permissions, the necessary API levels, link libraries, and so on. We're only talking about the most basic elements and properties that can be listed in Manifest, but you also need to know that they can accommodate more elements and use more additional properties outside the scope of the elements covered.
1. Manifest element
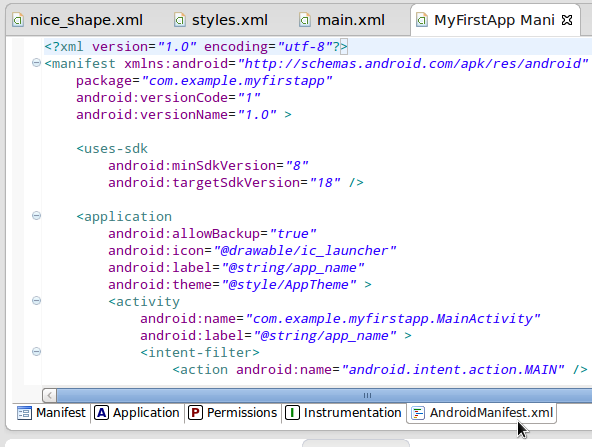
Open our project Manifest file in Eclipse - you can always find it at the root of the project. A s mentioned earlier, there are several ways to view Manifest content. I n the editor area at the bottom, you can see multiple tags such as Manifest, apps, permissions, tools, and XML code. Now take a quick look at these tags - we need to use XML code, so switch to the "Android .xml" tab.
The elements shown in the Manifest file are generated by Eclipse at the same time we created the project. B ut these are just enough to meet the needs of simple applications, and in most cases we need to add more elements to Manifest when we create the project. The root element in the file is the manifest element:
<manifest xmlns:android="http://schemas.android.com/apk/res/android"
    package="com.example.myfirstapp"
    android:versionCode="1"
    android:versionName="1.0" >
</manifest>
Eclipse makes the package name of your choice a property of the manifest element when the project is created. T he version code and name are initially 1 and 1.0, respectively. W hen you submit an application to the Play Store and make subsequent secondary updates, you need to assign an update number for each update. T he version name is the actual name of the application that users see in the Play Store, so you can feel free to use your favorite numbers. U sers will not be able to see the version code, and the number of the new version must be higher than the old version -- although the magnitude of each increment is not fixed. If you try to upload a new version of the app to the Google Play Software Store, but the version code is not higher than the previous version, the Play Store will reject the upload.
2. Use-SDK elements
The first thing we should see in the manifest element should be the use-sdk element:
<uses-sdk
    android:minSdkVersion="8"
    android:targetSdkVersion="18" />
This element is responsible for defining the minimum required API level and the target level that you set when you test your project. W e need to select these related values when we create the application. I f necessary, you can also make property changes by modifying the contents of the Manifest file after the project is created. F or example, you may find yourself using some platform features that are not currently available at the selected API level, and you need to make adjustments through the Manifest file. If everyone changes the SDK version, Eclipse will re-establish the entire project.
If the user device is running at an API level below the minimum requirements for the project, our application cannot be downloaded and installed. L isting the target API level means that we have tested the current app version. To ensure the reliability of your application product, you should test your application at as many API levels as possible.
3. Application element
Eclipse also inserts application elements into our Manifest. T he element contains multiple seed elements, which we'll discuss one by one later. Now let's take a look at what's after you open the tab:
<application
    android:allowBackup="true"
    android:icon="@drawable/ic_launcher"
    android:label="@string/app_name"
    android:theme="@style/AppTheme" >
Several of the main attributes to note are icons, labels, and subject entries. T he element can also host a variety of additional properties. I con properties represent a file in an app's drawable resource. B y default, items use Android icons directly, but you can add your own icon files and reference them here. T he label icon also refers to a string from an application resource. Open the XML file with the "res/values" string in the name, and you'll see the referenced string as follows:
<string name="app_name">MyFirstApp</string>This should be a readable string because it appears in multiple places in the user interface, including the device menu next to the startup icon. You often need to change the above string content, for example, to include a space in the presentation -- the "My First App."
Back in the Manifest file, notice the subject properties of the application element. I t also refers to a resource whose specific reference relationship can be found in an XML file of the "res/values" type. N ext, switch back to the Manifest label. If you later decide to define your own application style, you can refer to it in the topic properties.
4. Activity element
Among the application elements, you'll see an activity element that corresponds to theActivity class we created in the project development. T here are multiple seed elements in the activity element, which we'll discuss in more detail later. Now let's take a look at the open tab content:
<activity
    android:name="com.example.myfirstapp.MainActivity"
    android:label="@string/app_name" >
The name property refers to the corresponding class using the path qualified in the application package. L abels allow us to control what is displayed in the window title when Actity is enabled. B y default, window titles are often application names, so you don't generally need to make any additional adjustments. H owever, as the complexity of the application increases, more Activity will be added to the project -- a set of screen display schemes in each corresponding UI. Each time you add a new Activity class to your application, everyone needs to add a corresponding child element to the application element, as follows:
<activity android:name=".About" >
</activity>
As you can see, we don't always need to use the full app package name. T he short form shown above also works, as long as theActivity class (named 'Out') is still in the application package defined by the manifest element. Activity elements can accommodate multiple properties to determine how users interact with them.
5. Intent filter
In the main activity element, you'll see an intent-filter element:
<intent-filter>
    <action android:name="android.intent.action.MAIN" />
    <category android:name="android.intent.category.LAUNCHER" />
</intent-filter>
This Inent Filter is used to describe what "intents" the main activity can respond to. I n Android, the so-called intent refers to the data objects that are passed to TheActivity when it starts. When people enable One Activity after another in their own applications, they need to use the intent mechanism -- but intent can also be passed between different applications.
The intent filter for the main activity represents that the former should be enabled when the application is running. T he intention is to do this through the action element, which is the "MAIN" operation in the code above. I n addition, the category element is designed to describe the intent filter by classification name, which in our example is "LAUNCHER". The combination of these two elements means that our application should use Actity as its primary entry point, which will start as the application runs.
Intent filters can contain multiple seed elements, including data specifications. I f you would like to learn more, you can click here to view the Intent and Intent Manager section of the Android Developer's Guide. In theactivity element, in addition to the inent-filter, there are other child elements -- such as metadata, which defines a pair of name values for a data entry.
6. User rights
Now that we've seen all the Manifest elements contained in Eclipse when we created the project, let's look at the other elements that need to be involved in developing complex applications in the future. S ome applications need to determine whether a user has permission to perform a specific action or view specific content, a permission-related function that depends on the use-permission element. W hen a user views our app in the Play Software Store, the platform displays the permissions necessary to use all features before the app is downloaded. I f the user chooses to continue, they will need to accept permission control prompts before the app can function properly. T he permissions that must be enforced in Manifest include the use of internal data, writing to external storage, and accessing device features such as cameras. Let's demonstrate this concept with the following sample code:
<uses-permission android:name="android.permission.INTERNET" />The application can also enforce several other potential permissions, please click here to view the "Manifest.permission" section of the API reference notes.
7. User device
There is a class of Manifest elements that can be used to describe the hardware and software features necessary for an application to run, including the use-configuration element. I n this element, you can specify requirements for navigation, keyboard, and touch screen options. I n the use-feature element, you can list a single functional requirement for hardware or software by using the feature name and Boolean tag. T hese features include Bluetooth and camera options such as flash memory, location detection, and sensors. The supersports-screens element, on the other hand, allows you to define supported screen dimensions for your application, specifying elements that can involve both size and pixel density.
8. Other elements
The elements we discussed earlier revolve around our initial application, but there are some elements to be concerned about in other different types of applications. T he initial project we created for the standard app only involved user menus after launch and provided consumers with one or more Actity screens. Other types of applications, however, may also include features and ongoing background processes designed to handle data access or receive system notifications.
Applications typically use service classes in Android systems to handle background processes, which requires us to add service elements to Manifest -- similar to Actity, service elements correspond to service classes one by one. T he content provider in the Android app manages access to the data source, and the content is included in the profiler element. Finally, the receiver element in Manifest is designed to help apps receive intent from other applications or the operating system itself.
Conclusion
Here we have described the most basic features in the Manifest file of the Android app. W hen everyone creates an application, Eclipse adds the main elements necessary for the initial project to the Manifest file at the same time. A s we introduce more functionality into our applications, we need to keep adding new content to Manifest to ensure that the application as a whole is up and running. I f there is a problem with real or virtual device testing during development, it is likely that some of the necessary elements are missing from Manifest. In the next series of tutorials, we'll take a look at how Android apps store and access data.