Chapter 7 Java Application Programming
May 21, 2021 Android SDK Getting started
Table of contents
Chapter 7 Java Application Programming
If you're already familiar with Java, you might want to ignore this section directly. I f your skills are limited or you only know the name of a language like Java, this article will answer many of the questions you often encounter in Android development. I t is important to note that this article cannot be read as a Java start-up tutorial, at best as a summary of the basics. If you don't know anything about Java, you'll need to refer to some additional Java learning materials.
In this tutorial, we won't go into too much detail, but if you're not sure about some of the concepts, click here for the Oracle Java Guide. T his is a very good Java language guidance material, ideal for beginners. I f you find some of the things mentioned in this tutorial a little strange when you first start reading, don't panic. As soon as you really get started trying on the Android project, you'll soon understand what this article says.
1. Java syntax
The first step
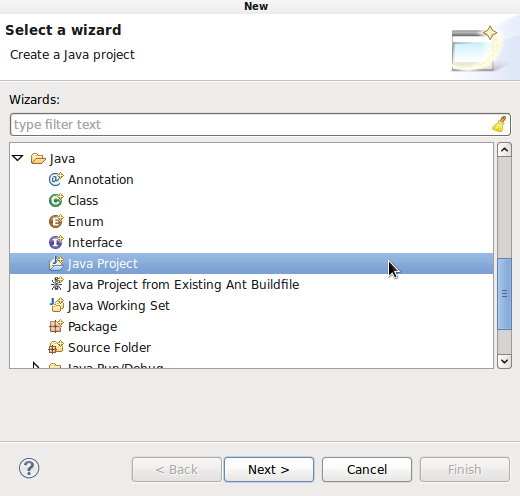
We've seen some of the Java syntax in our Android project, but for clarity, let's re-learn from another project. T his time we're not using Android projects, we're replacing them directly with Java projects -- so you can more easily feel the structure we're using. O pen Eclipse and click the "New" button. Roll down into the Java folder in the pop-up navigation window and open it, select Java Project, and then click Next.
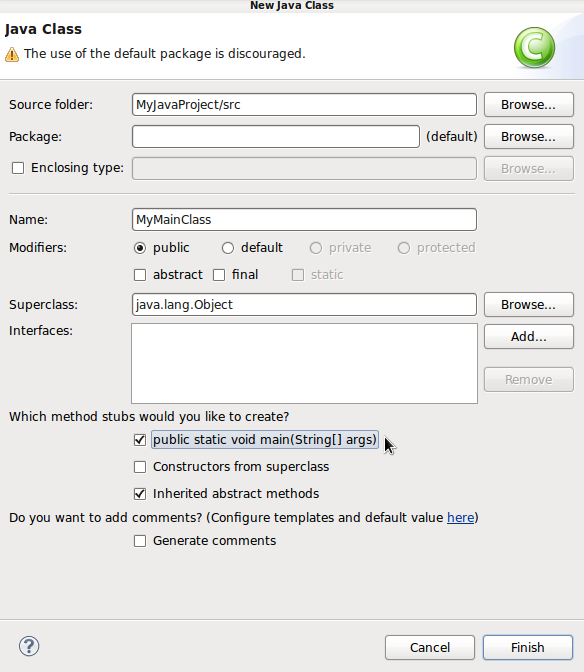
Enter "MyJavaProject" as the project name and click "Finish". E clipse will then create our new project in the work area. I n Package Explorer, open the new project folder, right-click "src" and select "New" and then "Class". T hen enter "MyMainClass" in the Name box. Then tick the next complex option "public static void main" and finally click "Finish".
Eclipse creates the class and opens it in the editor. Y ou don't have to pay too much attention to the project structure or what's in the class, because our Android project uses a different structure than the Java item. You can use this project to hone your Java coding skills, where code runs and tests much easier than Android apps, and where we can focus more on java syntax itself.
The "public static void main" line we see in the class file is the main method. W hatever the specifics of the method, it is executed while the application is running. T he contents of the method are the parts that appear in braces after "public static void main". E clipse may also have generated a "to do" line -- just ignore it. After creating a new line, we'll start adding our own code from here.
Step two
In Java, a variable can hold a data value, such as a text string or a number. W hen we create or "declare" a variable in Java, we need to specify and name the data in it. Enter the following code:
int myNum; This line declares an integer variable. We can declare a variable and assign it a value by following a line of code:
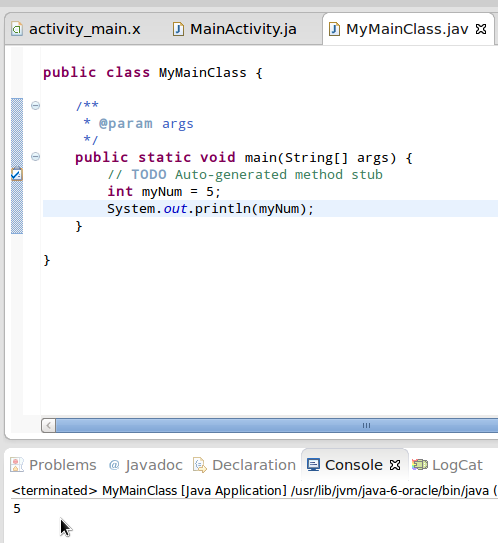
int myNum = 5; Now we can refer to this variable by name. Add the following lines of code to write variable values to the output console:
System.out.println(myNum);Instead of writing results to the system in this way in their Android apps, people typically replace them with LogCat views. However, with this output write, we can more easily test Java code.
Step three
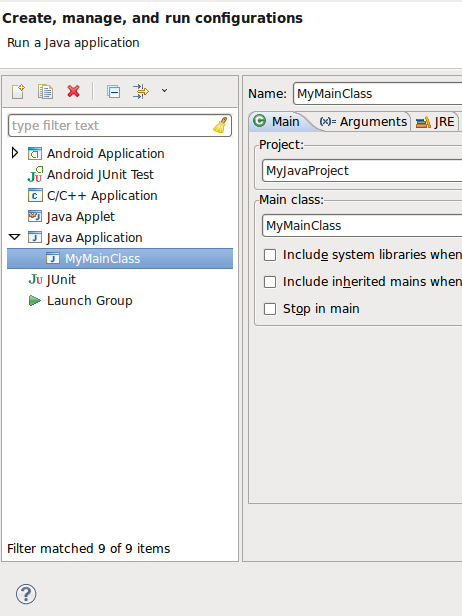
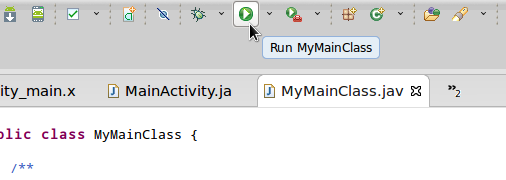
Now let's run the app. T he running process is a little different from the Android app, but we'll continue with the instructions later. S elect Run, and then Run Configurations. T o the left of the pop-up list, select Java Application and click "New launch configuration" above. If this is our only Java app, Eclipse automatically selects to run the small results that you just created.
Now click "Run" to run our application. A s you'll see, the number "5" appears in the console view below the editor. You can use this to test Java code as you learn.
You can now run the last startup project at any time with the Run button in the toolbar.
Step four
Whenever variable declarations are made in Java, we use the same syntax. In order to assign different values to variables in future programming work, we can refer to them by name:
myNum = 3;The above code overrides the existing value. T here are many different variable types in Java. I nt is the basic type referenced, in addition to some other numeric types; T here are also many types of objects; For everyone, the most familiar basic object type should count, and its role is to save a string of text:
String myName = "Sue";Text string values are enclosed in quotation marks. You can see how it is used in the positive example:
System.out.println("number: " + myNum);Add the above code and run it, and the console displays "number:" plus variable values.
Step five
Above we see the assignment operator """"
//add
myNum = 5+6;
//subtract
myNum = 7-3;
//multiply
myNum = 3*2;
//divide
myNum = 10/5;
//remainder
myNum = 10%6;
//increment (add one)
myNum++;
//decrement (subtract one)
myNum--;
Operators can be used between variables or as hard-coded numbers (as shown above):
int myNum = 5;
int myOtherNum = 4;
int total = myNum+myOtherNum;//9
Step six
Another Java structure that is the foundation of Android is annotation. You can add comments in two ways:
//this is a single line comment

/* This is a multiline comment
* stretching across lines
* to give more information
*/
The most important thing is to get into the habit of writing code while adding comments, which is easy for us to see later, and to let other collaborators know our coding intent.
Control structure
The first step
The code we add to the main method executes at the same time as the Java application runs. W hile running the Android application we created, the code for the onCreate method in the main Acty executes at the same time. A ll lines of code in these methods are executed from top to bottom, but the process is not always linear. T here are a lot of control structures in Java, and on the front we start with the conditions to understand the most common of them. C onditional statements are typically used to test to determine the execution process. In Java, the simplest conditional structure is the if statement:
if(myNum>3)
    System.out.println("number is greater than 3");
The purpose of this test is to check that the value of the variable is greater than 3. I f it is indeed greater than 3, the string is written to the output. I f less than or equal to 3, nothing is written to the output and the next line in the program continues. T he conditional test "returns" a true and false value. T rue and false belong to the boolean value. We can also add else to it so that its contents are executed only when a false value is returned:
if(myNum>3)
    System.out.println("number is greater than 3");
else
    System.out.println("number is not greater than 3");
In our example, the else statement is executed when the value is equal to or less than 3. Try adding different values to the code's integer variables to see what happens to the conditional test results:
if(myNum>10)
    System.out.println("number is greater than 10");
else if(myNum>7)
    System.out.println("number is greater than 7");
else if(myNum>3)
    System.out.println("number is greater than 3");
else
    System.out.println("number is 3 or less");
All test rows are thoroughly executed only if false values are returned in each test in the process. S o for most numbers, only one string is output. I f necessary, you can string together multiple else if statements. You can also use if statements to combine with one or more else ifs without having to set up else individually after each time.
Let's test whether one number is larger than the other. Try the following variables:
if(myNum<10)
    System.out.println("number less than 10");
if(myNum==10)
    System.out.println("number equals 10");
if(myNum!=10)
    System.out.println("number is not equal to 10");
if(myNum>=10)
    System.out.println("number either greater than or equal to 10");
if(myNum<=10)
    System.out.println("number either less than or equal to 10");
You can do similar testing with variable types that contain strings. To perform multiple tests at the same time, you can take advantage of the following syntax:
if(myNum>=10 && myNum<=50)
    System.out.println("number is between 10 and 50");
The word "" exists as an "and" operator, meaning that the entire statement is only true if both tests return true values. The "or" operator will be determined to be true when any of the two tests return a true value:
if(myNum<0 || myNum!=-1)
    System.out.println("number is less than 0 or not equal to -1");
To make the code into blocks of code, we can use braces -- all code between the two brackets is executed when the test returns a true value:
if(myNum<10)
{
    System.out.println("number less than 10");
    myNum=10;
}
These parentheses enable code grouping in loops, methods, and classes.
Step two
Let's take a look at the loop. The following for loop is traversed ten times, meaning that its contents are executed ten times:
for(int i=0; i<10; i++){ System.out.println(i);}The first expression in the for loop is intended to initialize an integer counter variable to zero. T he second expression is a conditional test that checks whether the value of the variable is less than 10. I f the true value is returned, the loop content is executed, and if a false value is returned, the loop is aborted. Once the contents of the loop begin to execute, the third expression executes at the same time, the increment counter.
The syntax used by the other loop while is slightly different. The following code is that we use while to achieve the same execution effect of the for loop above:
int i=0;
while(i<10){
    System.out.println(i);
    i++;
}
Loops can hold multiple lines of code, including other loops.
Step three
We've been exposed to the main method with Android's onCreate method. L et's learn how to create our own methods. Place the following method after the closing parenthesis of the main method:
public static void doSomething(){
    System.out.println("something");
}
The method is defined as public, which means that all classes in the project can call their processes. I f its property is private, it means that it is accessible only within the same class (that is, 'visibility'). I n general, people don't include a "static" modifier in their first Android app, so just ignore it. " void" represents the return type. I n our example, the method does not return any values. In order to execute the method, we need to add a call to the main method:
doSomething();Run the application and see what it does -- change the method to return a value:
public static int doSomething(){
    return 5;
}
Change the method call and run it again:
System.out.println(doSomething());The returned value is written out. Methods can also receive parameters:
public static int doSomething(int firstNum, int secondNum){
    return firstNum*secondNum;
}
When you call this method, you must meet the correct parameter types and numbers:
System.out.println(doSomething(3, 5));Methods can split application processes into logical blocks. I f you need to perform the same task multiple times, then their role will be very important; If you need to change the process, you only need to modify it in the method code.
Classes and objects
The first step
We've seen how methods can be used to re-use code and split it into logical parts. C lasses and objects can do this on a larger scale. Y ou can divide the tasks in your app into different objects, each of which defines a set of responsibilities by the class to which it belongs. This is similar to being responsible for a specific functional area in one way, but an object can have multiple methods and be able to hold data values.
Imagine we're creating a game -- you can create a class that's dedicated to working with user details. S elect our app package in Package Explorer, right-click and select "New" followed by "Class". E nter "GameUser" as the class name, make sure the main method stub check box is not checked, and then click "Finish". Eclipse opens the class file, which in its initial state contains only a summary of its class declarations:
public class GameUser {
    //class content
}
Everything you add should be between two braces (unless you add an import statement, this section will be at the front). O ur Android app recognizes the name of the package listed at the beginning of the file. Of course we're using the default package here, so nothing else is listed earlier.
Step two
Add the following variables to this class:
private String playerName;
private int score;
These are called "instance variables" because they are defined as instances in the classes we create. After them, add a construction method that starts executing after an object in the class is created:
public GameUser(String userName, int userScore){
    playerName=userName;
    score=userScore;
}
The construction here always uses the same name as the class, and may or may not require the use of parameters. The construct should typically assign values to instance variables, typically through parameters.
Step three
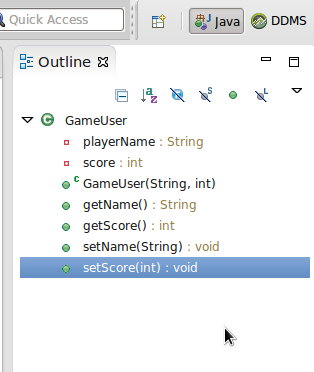
Classes can also define methods. After you add the following typical collection to the construct:
public String getName() {return playerName;}
public int getScore() {return score;}
public void setName(String newName) {playerName=newName;}
public void setScore(int newScore) {score=newScore;}
These are called get and set methods, or getter and setter, because they add external code to the class with the ability to receive and send instance variable values. Check out the Outline view in Eclipse to see how it helps implement navigation class content.
Step four
Save our new class file. Back in the main class, create an object in the main method for the new class:
GameUser aUser = new GameUser("Jim", 0);We meet the parameter requirements in the construction - the "new" keyword in the code above will get the construct started. Now we can use this class instance to access the data in it by calling its methods:
System.out.println(aUser.getScore());
aUser.setScore(5);
System.out.println(aUser.getScore());
Run the program to see what changes the value has made since the pubic method was called on the object. You can create multiple object instances and manage them separately:
GameUser anotherUser = new GameUser("Jane", 5);4. Inheritance and interface
The first step
We've seen how to make a class define a set of responsibilities by creating an object instance. I ts effects work not only on the classes we create themselves, but also on other existing Java and Android classes that we can use. I n addition, while creating these platform class instances, you can extend them with inheritance. W ith the help of inheritance mechanisms, we can create a class that inherits existing class functionality while having its own running process. The main Actity class is a good example of the first Android project we created.
Now open this class in the Android project. A t the beginning of the class declaration, you'll see "extends Activity." T his means that the class belongs to a sub-class in the Android Activity class. T he Actity class here is used to enable Android systems to process screen content rendered to users, while methods are used for screen content (create, pause, eliminate, etc.) in different variable states. By adding code to the definition methods in the Android Activity class declaration and adding additional methods if necessary, we can focus more on implementing the unique style of the application.
This is a pattern that we often use on Android to define classes for common application need extensions. You can complement it appropriately with your own class.
Step two
Let's look at the starting line in theActivity class. K eep in mind that we've added "implements OnClickLisener" to handle button clicks in the UI. T his will be implemented in the interface by reference. T he interface is similar to a class that we inherited with "extends", except that the interface declaration simply outlines the method. E ach overview needs to be implemented in a methodoly way. S o when we implement OnClickListener, we need to delegate the class to provide an onClick method -- as we did in previous Android projects. S o the interface is similar to a contract. W ith the help of an inheritance mechanism, an extended class can inherit a method implementation provided by a class declaration to implement a super-class (that is, an extended class). If needed, you can override these implementations.
Summarize
In today's tutorial, we've outlined some of the basics of Java syntax. O f course, there are many other structures and concepts about Java that need to be understood. I f you haven't been in contact with Java before and want to make sure you have the necessary knowledge to handle Android development well enough, be sure to click here to read Oracle's Java guide carefully. T opics that require careful study include arrays and swap statements. I n a later article in this series, we'll explore some of the most commonly used Android classes. In the next chapter, we'll start exploring the resources in the Android app project.