Chapter 12 Operation and Commissioning
May 21, 2021 Android SDK Getting started
Table of contents
Chapter 12 Operation and Commissioning
In the previous article, we learned how to interface hardware and virtual devices with Eclipse. In today's guide, we'll explore how to run and debug applications on physical devices and Android virtual devices (AVDs) through Eclipse.
The first thing to emphasize is that the application we created in the previous article is not really useful for the time being, but we can use it to experience how the app is running and use it as a basis for introducing some very important Eclipse ADT utilities. A s the level of development improves, new applications in the future are bound to become more advanced and complex, and the commissioning we are presenting will play an extremely important role. A fter completing today's guide, you might want to take the time to adjust the app you created and then try to run it on a physical or virtual device. With this approach in hand, you can regularly run the application semi-finished products on top of the device during the development process, thus achieving the ideal effect of debugging while developing.
1. Run
The first step
Eclipse handles most of the necessary details when we compile and run our own Android apps on virtual or physical devices. E clipse and ADT create an APK file for our app and install it on the device we use. A PK files are the format of app files that users download from the Google Play Store. H owever, you'll need to take some extra steps to publish your application, which we'll explain in a later tutorial. In summary, Eclipse first creates an APK file for debugging, which we can use to run it directly on the device.
I believe you have learned through the last guide article how to use the relevant technology to start your own AVD or connect hardware devices to your computer. W e'll have the application run on top of the connected device. Both virtual and physical devices must meet the minimum API level that we specify in the application manifest, otherwise the application object will not function properly.
Step two
Now we can first create a run configuration for our application. I n Eclipse, select Run and then Run Configuration. O n the left side of the Run Configuration window, you'll see a list of the types of applications you can run. Select "Android App" and click the new button above.
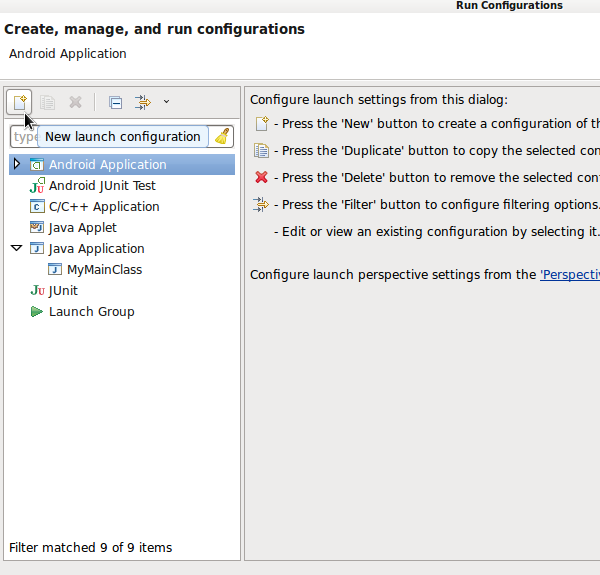
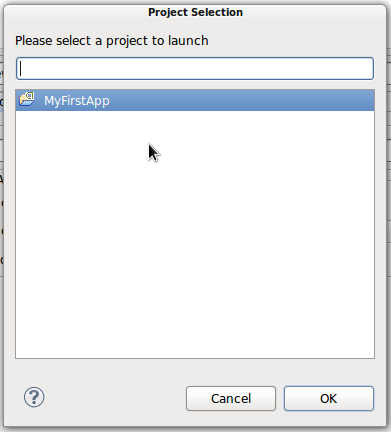
In the new configuration project that opens, enter a name in the name bar instead of the existing text. P lease choose a clear name so that you can clearly distinguish between different applications. Now click the Browse button, select your own application items, and then click OK.
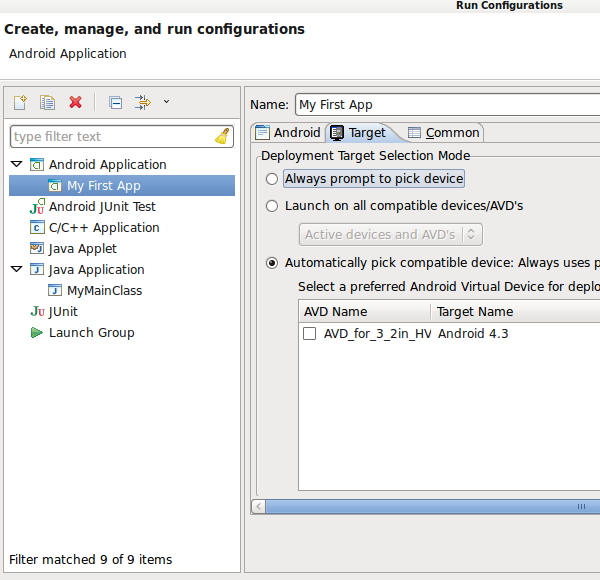
Click on the Target tab. Y ou can have Eclipse automatically select the device you want to launch the application on, or you can set it to remind the user to choose manually each time you run the application. This set of options is only available for multiple devices connected to Eclipse at the same time, such as a hardware device and a set of AVDs.
Please note that our app is now listed in the Android app that runs the configuration checklist. When everything is ready, you can start the application from here -- I'm sure there will be more applications in your work area in the future.
Click "Run". E clipse will provide the option if you are prompted to select a device before each run in the configuration. S elect the physical or virtual device you want to use now. I f we do not have an access device or are running an AVD, but require Eclipse to automatically select the device in the settings, a set of AVDs will be activated for the current situation. You can also start the run environment used by the last application with the Run button in the Eclipse toolbar, which eliminates the hassle of opening the run configuration window every time.
Tip: In the Target tab of the application running configuration, if you scroll down, you'll see a variety of simulator options that also contain command line areas. Y ou can click here to see the various command line parameters that may be required during the AVD process.
Step three
When we run our own applications, Eclipse copies the APK to the target device, installs it, and starts masterActivity.
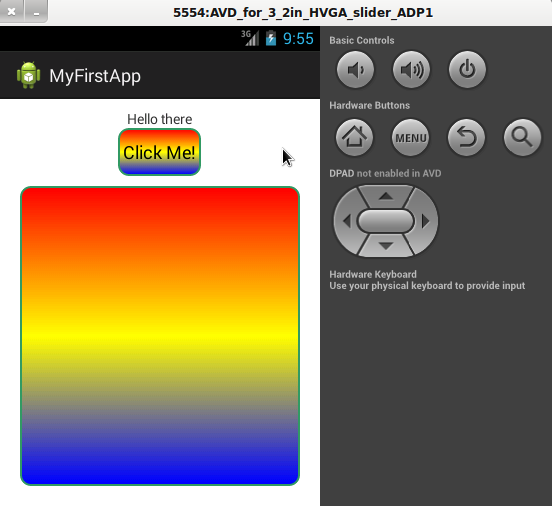
You should remember the basic user interaction mechanism we built on the button, clicking the button to change the display text (simulating clicks with the mouse in the AVD and touching with your finger on the real machine).

Step four
As you develop your own application, it's likely that you'll need to repeat the current results, edit the content, and run it again. I n this case, Log will be one of our most frequently used primary tools. I n Java files, we can write information about the output to LogCat to help us get development and debugging done more smoothly. In our main Actity class, before adding the following instance variables to the original class content:
private final String LOG_TAG = "MainActivity";This is a marker constant that we usually use to write log output information, and by class names we can see more clearly which class the current log information comes from. In the onClick method, before adding the following code to the button text settings section:
Log.v(LOG_TAG, "button clicked");You need to import "android.util.Log" into your own class. W hen writing to Log, we can choose from a variety of methods to express the corresponding information that matches the purpose. I n the above code, we use v to refer to the details (verbose). You can also use d to refer to debug messages, i to information, w to warn, and e-to-errors.
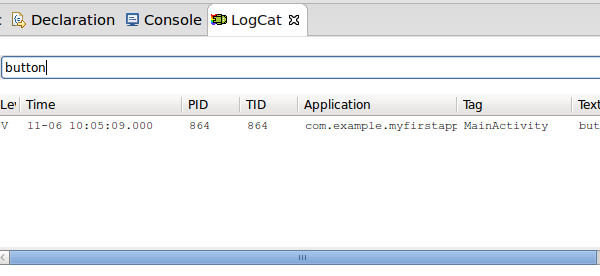
Now save our files and run the application again with the Run button. M ake sure you've opened LogCat View in Eclipse. C lick the UI button on your device or AVD again. Now scroll down LogCat View until we find the corresponding running information.
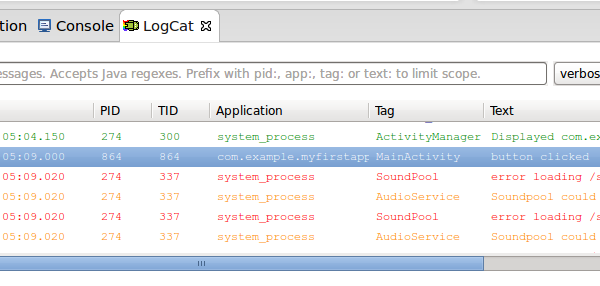
As you can see, the above color information reflects the actual operation of the Log method in each case. We can search for information by typing in a text box, which is useful when the amount of information is displayed -- for example, when running an application with a hardware device.
Tip: If you find yourself using LogCat View when Eclipse stops responding or crashes, you'll need to set the maximum buffer for LogCat information in The Window . I f such an adjustment still does not resolve the issue, reduce the buffer number further and try again.
2. Test
We won't discuss much of the testing details in today's article, as this is a very important and quite repetitive task that will be one of the main topics in the future Android learning process. O nce you're ready to test, you can create a test-specific project in Eclipse. T he Android Developer's Guide features two sections, "TestIng Fundamentals" and "Activity Testing Guide", which provide an in-depth look at testing on the Android platform. T he test tools are all based on JUnit, a solution that brings together and extends proprietary Android testing resources, and JUnit was created specifically for Android development. If you're already familiar with testing Java code, you should be more aware of what you need to do with Android app testing.
3. Commissioning
The first step
Although you don't need to debug your application right away, I'd like to give you a preliminary introduction to DDMS (that is, the Dalvik debugging monitoring server) and the real value these tools can bring to the development process through today's article. We've learned about one of Eclipse's debugviews, LogCat;
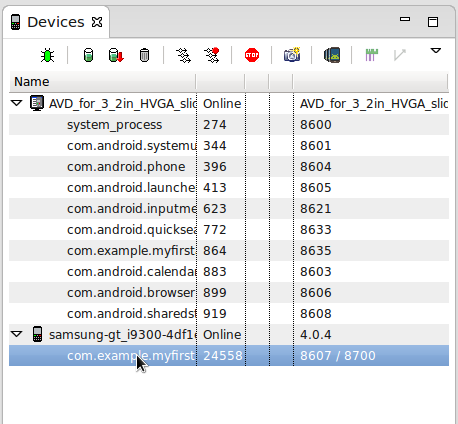
On virtual or hardware devices running or connected to Eclipse, we can turn on the DDMS view by selecting Windows, Open View, DDMS. Here, you can use the top right button of Eclipse to switch between the DDMS view and the Java view.
Step two
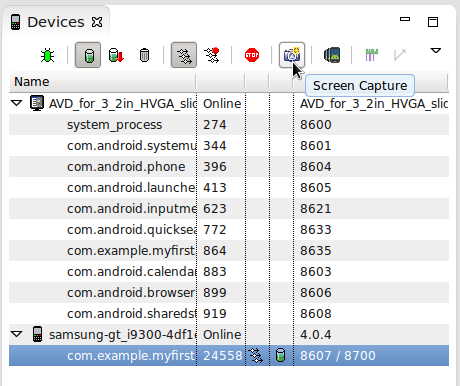
Let's explore the DDMS view. T he last time we looked at the device view (it showed a list of all connected devices plus links to the processes running them). O nce you select a process, you can access the features in the device view. Let's find our own buttons from the list by name.
After selecting the corresponding process, click the Update Threads button in the device view to turn on Threads View.
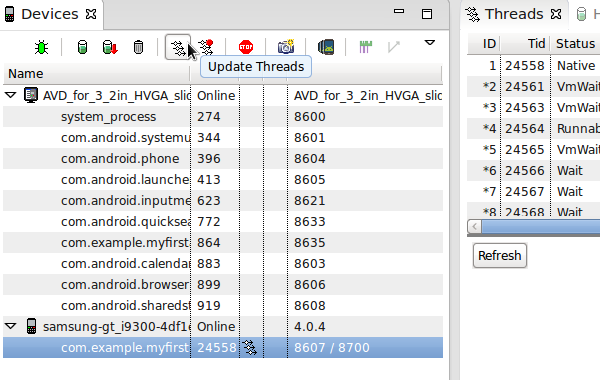
The Update Heap button will do the same for Heap View. I n future development work, you'll also learn about the role of other views as needed, some of which are only relevant to applications that perform specific task types. But now we don't think too much about it, we just spend time on what's worth paying attention to in DDMS.
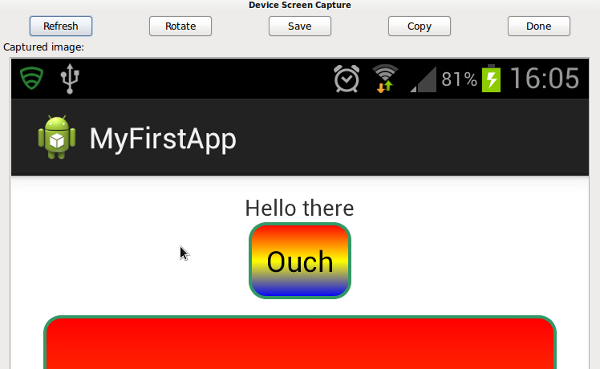
The Simulator view provides control options for any running virtual device instance, allowing you to select a set of AVDs in the device list and open its Simulator Control tab to view the content. A lso, it's important to note that we can stop the currently running process in the device view, debug the running process, and enforce garbage collection. Before we finish our description of DDMS, the application must be running on top of hardware or virtual devices, select the corresponding device in the device view and click the Screenshot button.
Screenshot results of the current device display appear in the new window. H ere, you can save or copy the image and use it in promotional materials in the App Store. Limited by space, our instructions for debugging are brief, so you can click here to see what's in the Android Developer's Guide about Android app debugging.
Summarize
When we started creating Android apps, the focus was on running the app and recording the information to the console to monitor the app's activity. H owever, as the complexity of the project increases, a large number of Android debugging and testing tools are often used in the run-up to the release of the application. In the next article in this series of tutorials, we'll cover the Android Activity lifecycle, and only with this knowledge can you really start creating full-featured applications.