Cloud development Jekyll blog deployment
May 27, 2021 Web Cloud Development and Web Hosting Learning Guide
Table of contents
2. Build a Jekyll local environment
4. Create a static site hosting service
Cloud development static hosting is the ability to host static websites provided by cloud development, and the distribution of static resources (HTML, CSS, JavaScript, fonts, etc.) is supported by Tencent Cloud Object Storage COS and Tencent Cloud CDN with multiple edge outlets
Introduction to Jekyll
Jekyll is a static site production machine in a simple blog form. I t has a template catalog that contains documents in the original text format, converted through a converter (such as Markdown) and our Liquid renderer into a complete publishable static site that you can publish on any server you like. Jekyll can also run on GitHub Page, which means you can use GitHub's services to build your project pages, blogs, or websites for free.
- Chinese translation website: http://jekyllcn.com/
Build a Jekyll local environment
The translation site above has provided a detailed description of the construction, through the "Quick Build Guide: http://jekyllcn.com/docs/quickstart/" can be quickly based on Jekyll to complete the site construction. This article will build the https://blog.bihe0832.com/ on-premises environment and migration based on the migration of personal blogs.
Plug-ins such as Jekyll can be installed by referring to the "Installation documents http://jekyllcn.com/docs/installation/" provided on the official website. B ecause the system is prone to problems during the default Ruby installation, it is recommended that you customize the installation of the new Ruby. F or more information about uninstalling and reloading Ruby and Jekyll, you can also refer to the article iMac Build a Jekyll local environment. Here are a few simple installation cases:
➜ blog git:(master) ✗ gem install jekyll # 安装 Jekyll Fetching mercenary-0.3.6.gem 25 gems installed ➜ blog git:(master) ✗ gem install github-pages #安装 Github Pages 方便预览 Fetching addressable-2.5.2.gem 62 gems installed
Create a static site
This section can refer to the Quick Guide http://jekyllcn.com/docs/quickstart/ provided on the website to create a simple site and customize your site style according to the configuration. I chose to download my blog-related content directly from Github (address: https://github.com/bihe0832/bihe0832.github.io)
For the directory structure of The static site based on Jekyll, you can refer to the "Directory Structure http://jekyllcn.com/docs/structure/" provided on the official website, which is a brief introduction to the directory structure of personal blogs:
├── 404.html :404页面├── CNAME :Github Pages的域名配置├── LICENSE :开源协议├── _config.yml :博客相关的配置信息├── _includes :部分重用子页面├── _layouts :页面布局├── _posts :文章内容├── _site :Jekyll 生成静态页面目录├── index.html : 博客首页页面格式├── pages :一些特殊的静态页面├── public : 博客相关的资源,包括css、js、以及所有图片├── search : 博客搜索功能相关代码├── sitemap.txt :站点地图└── sitemap.xml :站点地图
Compile the build
When the article is finished, you can verify that the build is no problem with the local build first. R
un
jekyll build
directly from the project root to see the build results
➜ blog git:(master) ✗ jekyll buildConfiguration file: /github/blog/_config.yml Source: /github/blog Destination: /github/blog/_site Incremental build: disabled. Enable with --incremental Generating... done in 5.437 seconds. Auto-regeneration: disabled. Use --watch to enable.➜ blog git:(master) ✗
If the build is error-positive, you can choose to deploy
_site
to your server.
If you want to see the effect locally, run
jekyll server
directly from the project root command line
➜ blog git:(master) ✗ jekyll serverConfiguration file: /github/blog/_config.yml Source: /github/blog Destination:/github/blog/_site Incremental build: disabled. Enable with --incremental Generating... done in 4.1 seconds. Auto-regeneration: enabled for '/github/blog' Server address: http://127.0.0.1:4000 Server running... press ctrl-c to stop.
You can then see the effect by opening the address displayed in Server address in your browser
Static sites will be hosted using Tencent Cloud static sites
Create a static site hosting service
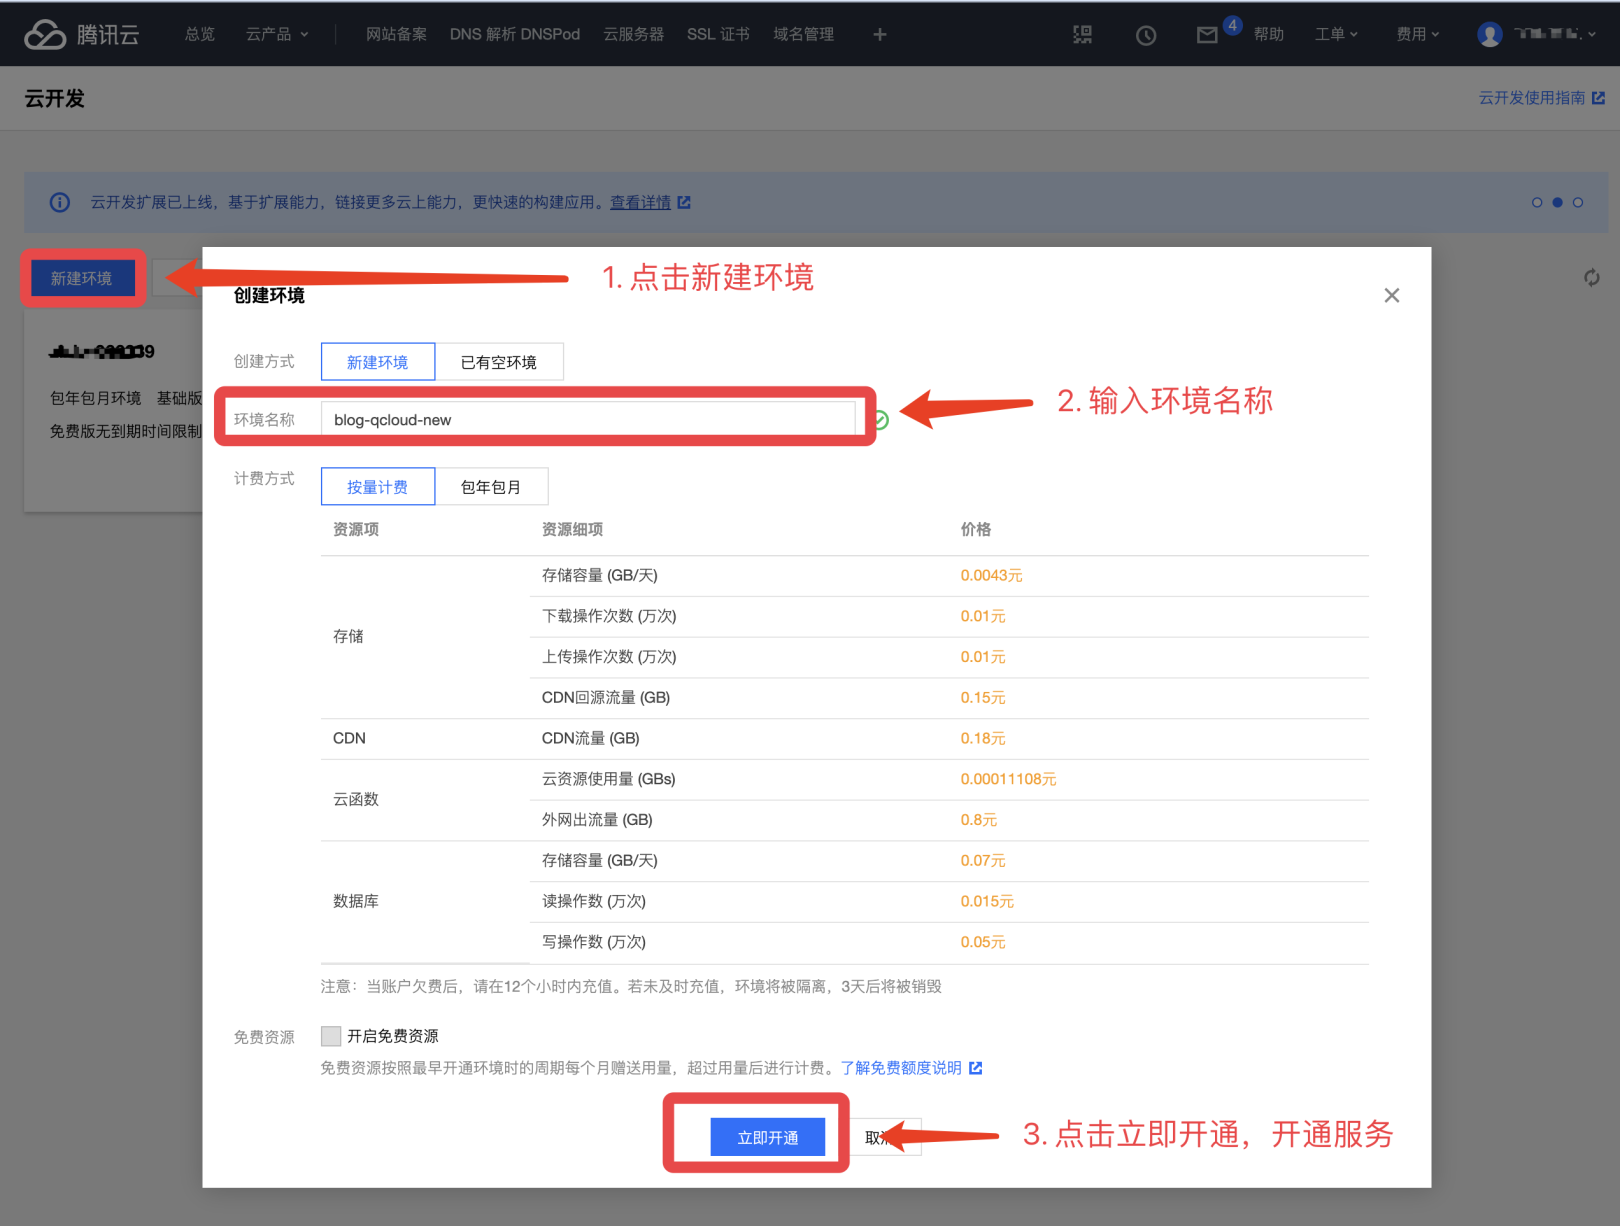
1, the creation of Tencent cloud development environment
Open the Tencent Cloud "Cloud Development https://console.cloud.tencent.com/tcb/env/index" service page. In the following image, click Create a new environment, then enter your custom environment name in the box, select paid mode, and then click on "Open Now" below.
Then it enters the initialization phase of the environment, which is longer. It usually takes about 1 minute, and when the initialization is over, clicking on the corresponding tab enters the environment overview interface and you can see specific resources and other information.
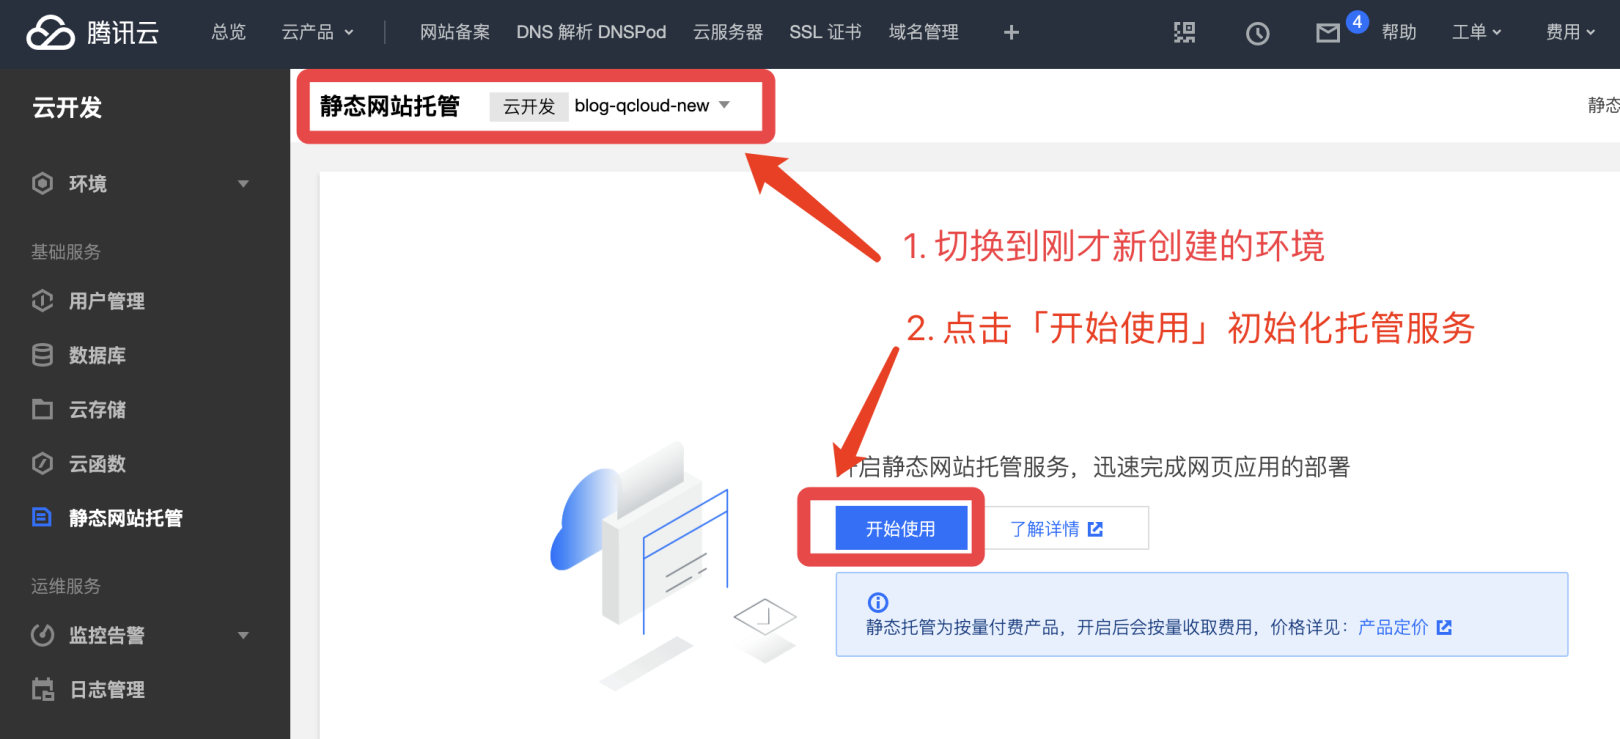
2, initial static site hosting services
Click to go to the "static website hosting https://console.cloud.tencent.com/tcb/hosting" service page. A s shown below, select the development environment you created earlier, and then click Get Started to initialize the environment. Static site service initialization typically takes about 3 minutes
Deploy static pages to managed services
You can choose directly to upload a built static page to a managed service, but given how often your blog is updated, you choose to use the official tools to upload it.
Start by using npm to download and install the official
cloudbase
➜ _posts git:(master) ✗ npm install -g @cloudbase/clinpm WARN deprecated request@2.88.2: request has been deprecated, see https://github.com/request/request/issues/3142/usr/local/bin/tcb -> /usr/local/lib/node_modules/@cloudbase/cli/bin/tcb.js/usr/local/bin/cloudbase -> /usr/local/lib/node_modules/@cloudbase/cli/bin/cloudbase.jsnpm WARN ws@7.2.3 requires a peer of bufferutil@^4.0.1 but none is installed. You must install peer dependencies yourself.npm WARN ws@7.2.3 requires a peer of utf-8-validate@^5.0.2 but none is installed. You must install peer dependencies yourself.+ @cloudbase/cli@0.6.6added 383 packages from 325 contributors in 26.045s
Then use
cloudbase
to obtain a CLI authorization, enter the command, and then click "Confirm authorization" on the pop-up page
➜ blog git:(master) ✗ tcb login✔ 已打开云开发 CLI 授权页面,请在云开发 CLI 授权页面同意授权✖ 未知错误:请求超时,请检查你的网络,如果终端无法直接访问公网,请设置终端 HTTP 请求代理!请检查你的网络,尝试重新运行 cloudbase login 命令!
If you encounter the above error, generally because of network limitations, you need to add an http proxy, you can refer to the article "iMac (OS X) daily development of various agent setup methods summary (shell, Android Studio, gem, npm) https://blog.bihe0832.com/proxy.html" to set up the shell agent. T ry again after setting up the agent:
➜ _posts git:(master) ✗ tcb login✔ 已打开云开发 CLI 授权页面,请在云开发 CLI 授权页面同意授权✔ 登录成功!? 是否同意 Cloudbase CLI 收集您的使用数据以改进产品? Yes可使用下面命令继续操作:– 创建免费环境$ cloudbase env:create envName– 初始化云开发项目$ cloudbase init– 部署云函数$ cloudbase functions:deploy– 查看命令使用介绍$ cloudbase -hTips:可以使用简写命令 tcb 代替 cloudbase
Using the host command to deploy on-premises compiled static files
_site
that deployed my blog), the environment ID behind the command line-e is the environment ID generated by the home page, which is typically suffixed by Tencent Cloud after our custom name.
Because the content of the blog is relatively large, coupled with the network agent, found that sometimes will fail, try again.
➜ blog git:(master) ✗ jekyll buildConfiguration file: /Volumes/Document/Documents/github/blog/_config.yml Source: /Volumes/Document/Documents/github/blog Destination: /Volumes/Document/Documents/github/blog/_site Incremental build: disabled. Enable with --incremental Generating... done in 4.504 seconds. Auto-regeneration: disabled. Use --watch to enable.➜ _site git:(master) ✗ cd ..➜ blog git:(master) ✗ cd _site➜ _site git:(master) ✗ tcb hosting:deploy ./ -e blog-qcloud-new-131e7bFetchError: request to https://tcb-admin.tencentcloudapi.com/admin failed, reason: connect ECONNRESET 127.0.0.1:12639 at ClientRequest.<anonymous> (/usr/local/lib/node_modules/@cloudbase/cli/node_modules/node-fetch/lib/index.js:1455:11) at ClientRequest.emit (events.js:205:15) at ClientRequest.EventEmitter.emit (domain.js:471:20) at onerror (/usr/local/lib/node_modules/@cloudbase/cli/node_modules/agent-base/index.js:101:9) at callbackError (/usr/local/lib/node_modules/@cloudbase/cli/node_modules/agent-base/index.js:123:5) at processTicksAndRejections (internal/process/task_queues.js:89:5)✖ request to https://tcb-admin.tencentcloudapi.com/admin failed, reason: connect ECONNRESET 127.0.0.1:12639➜ _site git:(master) ✗ tcb hosting:deploy ./ -e blog-qcloud-new-131e7b文件传输中 [==================================================] 100% 0.0s✔ 文件共计 842 个✔ 文件上传成功 842 个✖ 文件上传失败 0 个
Manage static pages and modify settings
After the upload is over, the "File Management" page hosted on the static page can adjust the content we upload, the "Settings" page can add domain names, error pages and other information, but also give the default domain name provided by Tencent Cloud. If you have your own domain name, you can also add your own domain name resolution, for example, below I modified to use my own domain name, and set up a custom index page and 404 pages:
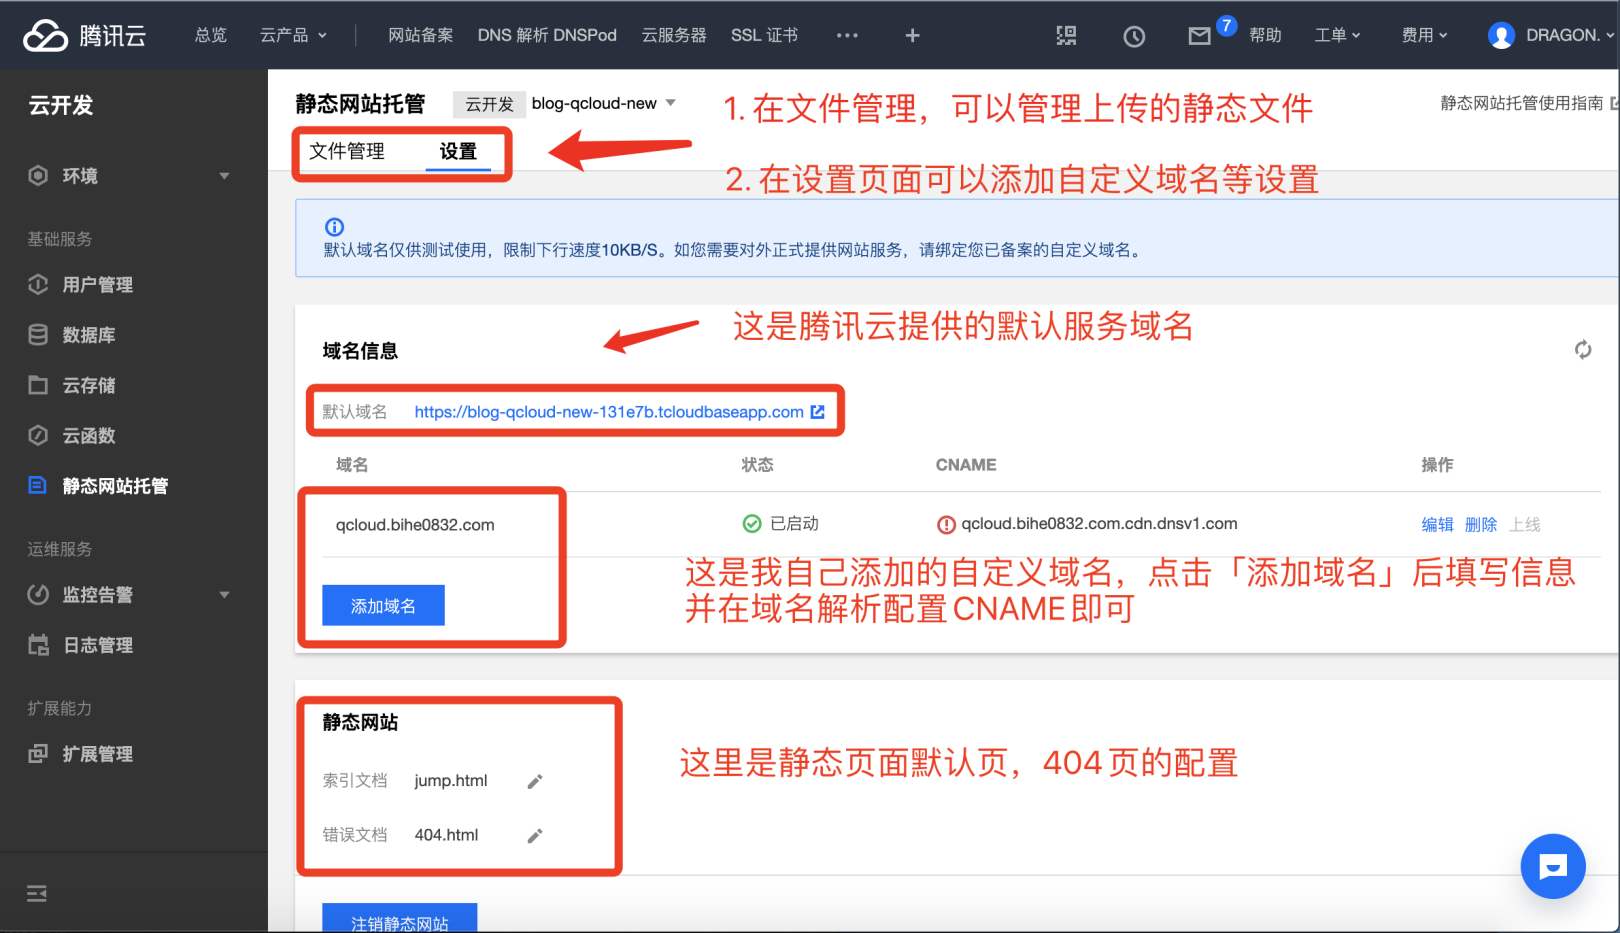
Visit the static page
Enter the default domain name https://blog-qcloud-new-131e7b.tcloudbaseapp.com/index.html provided by the browser, or use your own domain name http://qcloud.bihe0832.com/index.html can open the deployed static service, because the default resources are free, Tencent Cloud has made a speed limit on the download speed, so the opening speed will be very slow.
Special Note: Because the default resource Tencent Cloud has made a speed limit for download speed, so I have made a special configuration for my site:
- When you turn http://qcloud.bihe0832.com/jump.html by default, or jump to my blog domain name and server http://blog.bihe0832.com
- The full path opens the http://qcloud.bihe0832.com/index.html the service hosted by Tencent Cloud when the server is opened