Use Node and MongoDB to build a bed or net dish
Jun 01, 2021 Article blog
Table of contents
1 Article Origin
This article gives you to share an attachment about
Node+Mongodb
upload download project, this project is relatively simple, after reading the students can quickly build a small net disk or picture bed.
2 Starter
2.1 Concept
First we have to look at what
Mongodb
File Storage (GridFS) is, because we all store files based on
GridFS
2.2 What do we need?
Once you understand the general concept, you can start installing the plug-ins we need
-
express(this is what I don't have to say much) -
body-parser(Nodebody middleware) -
ejs(template engine, fast development without front and back end separation, interested partners can use Vue/React to build a small net disk) -
gridfs-stream(easy transfer of files with MongoDB GridFS.) ) -
method-override(we use the form form simply to upload, because the form does not support put/delete request method, so put it up, small partners can use Ajax, there is no need for this hassle) -
mongoose(essential plug-in for connecting mongodb) -
multeris a node .js middleware for processing multipart/form data, primarily for uploading files. I t is written on top of busboy for maximum efficiency. ) -
multer-gridfs-storage(Multer's GridFS storage engine stores uploaded files directly to MongoDb). ) -
nodemon(hot update)
(Recommended tutorial: Getting started with Node)
That's what we need to prepare for
npm install express body-parser ejs gridfs-stream method-override mongoose multer multer-gridfs-storage // or yarn add express body-parser ejs gridfs-stream method-override mongoose multer multer-gridfs-storage
2.3 Initialize a project
Additional information // npm init is available on its own
Then create a new portal file
app.js
at the root, and page
views/index.ejs
3 Now the project is under way
3.1 Finish the basics first
Bring in our installed package and run again
const express = require('express') const path = require('path') const crypto = require('crypto') const mongoose = require('mongoose') const multer = require('multer') const GridFsStorage = require('multer-gridfs-storage') const GridFsStream = require('gridfs-stream') const methodOverride = require('method-override') const bodyParser = require('body-parser')
const app = express()


app.set('view engine', 'ejs') // 设置模板引擎


app.use(bodyParser.json())
app.use(methodOverride('_method'))


app.get('/', (req, res) => {
        res.render('index')
    })
})


const port = 5000
app.listen(port, () => {
    console.log(`App listering on port ${port}`)
})
In general, if we start
app.js
we can see the interface in
views/index.ejs
http://localhost:5000
browser access, and if not, check the console for errors
3.2 Connect to our Mongodb database
The local
mongodb
database I use here is the same online, we can use
NoSQL manager for mongdb
to view the data in our database, we create a new collection, my side is called
grid_uploads
So connecting is also connecting this collection
Link to the database const mongoURL - 'mongodb://localhost:27017/grid_uploads'
const connect = mongoose.createConnection(mongoURL, {
    useNewUrlParser: true,
    useUnifiedTopology: true
})
You can try writing some data on
NoSQL
using the for MongoDB tutorial that you can refer to on the blog
NoSQL Manager for MongoDB
3.3 Beautify the interface (views/index.ejs)
As a small two years of front-end engineers, has practiced pixel eyes, we certainly can not do the interface spicy ugly right, eyes can not get through ah, so we simply use
bootstrap4
to do an interface
<!DOCTYPE html>
<html lang="en">


<head>
    <meta charset="UTF-8">
    <meta name="viewport" content="width=device-width, initial-scale=1.0">
    <title>文件上传</title>
    <link rel="stylesheet" href="https://cdn.jsdelivr.net/npm/[email protected]/dist/css/bootstrap.min.css" integrity="sha384-9aIt2nRpC12Uk9gS9baDl411NQApFmC26EwAOH8WgZl5MYYxFfc+NcPb1dKGj7Sk" crossorigin="anonymous">
    <style>
        img {
            width: 100%;
        }
    </style>
</head>


<body>
    <div class="container">
        <div class="row">
            <div class="col-md-6 m-auto">
                <h2 class="text-center display-4 my-4">Mongo文件上传</h2>
                <form action="/upload" method="POST" enctype="multipart/form-data">
                    <div class="custom-file mb-3">
                        <input type="file" name="file" id="file" class="custom-file-input">
                        <label for="file" class="custom-file-label">选择文件</label>
                    </div>
                    <input class="btn btn-primary btn-block" type="submit" value="提交">
                </form>
                <hr>
            </div>
        </div>
    </div>
</body>
<script src="https://cdn.jsdelivr.net/npm/[email protected]/dist/jquery.slim.min.js" integrity="sha384-DfXdz2htPH0lsSSs5nCTpuj/zy4C+OGpamoFVy38MVBnE+IbbVYUew+OrCXaRkfj" crossorigin="anonymous"></script>
<script src="https://cdn.jsdelivr.net/npm/[email protected]/dist/umd/popper.min.js" integrity="sha384-Q6E9RHvbIyZFJoft+2mJbHaEWldlvI9IOYy5n3zV9zzTtmI3UksdQRVvoxMfooAo" crossorigin="anonymous"></script>
<script src="https://cdn.jsdelivr.net/npm/[email protected]/dist/js/bootstrap.min.js" integrity="sha384-OgVRvuATP1z7JjHLkuOU7Xw704+h835Lr+6QL9UvYjZE3Ipu6Tp75j7Bh/kR0JKI" crossorigin="anonymous"></script>


</html>
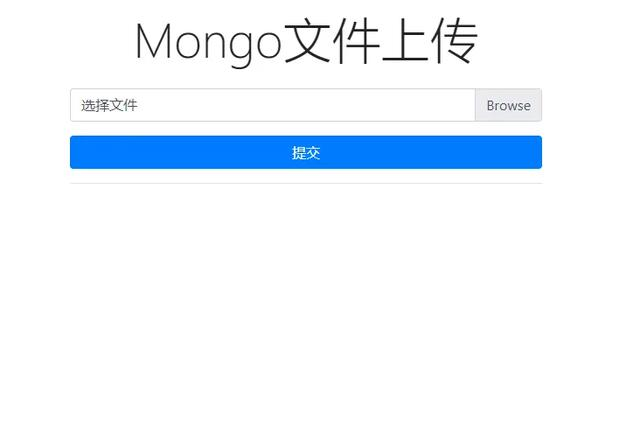
So if we ask
http://localhost:5000
we should see this

(Recommended tutorial: Node.js tutorial)
3.4 Do some of the necessary work
Define gfs variables, and then we can't do less let gfs when we do database file operations; connect.once ('open', () s.> s// listen to the database open, through gridfs-stream middleware and databases for file access control gfs s gridFsStream (connect.db, mongoose.mongo) gfs.collection ('upload') // It will establish upload.files in our database (record file information) upload.chunks (storage file blocks))
// 使用 multer-gridfs-storage Multer 中间件来讲我们上传的附件直接存储到MongoDb
const storage = new GridFsStorage({
    url: mongoURL,
    file: (req, file) => {
        return new Promise((resolve, reject) => {
            // 下面注释部分是给文件进行重命名的,如果想要原文件名称可以自行使用 file.originalname 返回,
            // 建议有时间的小伙伴存储两个文档,一个记录原文件名,一个记录加密文件名,然后返回到页面的时候可以将中文名返回去


            // crypto.randomBytes(16, (err, buf) => {
            //     if (err) {
            //         return reject(err)
            //     }
            //     const filename = buf.toString('hex') + path.extname(file.originalname)
            //     const fileinfo = {
            //         filename,
            //         bucketName: 'upload'
            //     }
            //     resolve(fileinfo)
            // })
            const fileinfo = {
                filename: new Date() + '-' + file.originalname,
                bucketName: 'upload'
            }
            resolve(fileinfo)
        })
    }
})


const upload = multer({ storage })
3.5 Write the interface where we uploaded the first file
app.post('/upload', upload.single('file'), (req, res) => { res.redirect('/') })
It looks simple, please remember these things
-
In
views/index.ejsinput type=filespecifiesnameas theupload.single('file') of the interface -
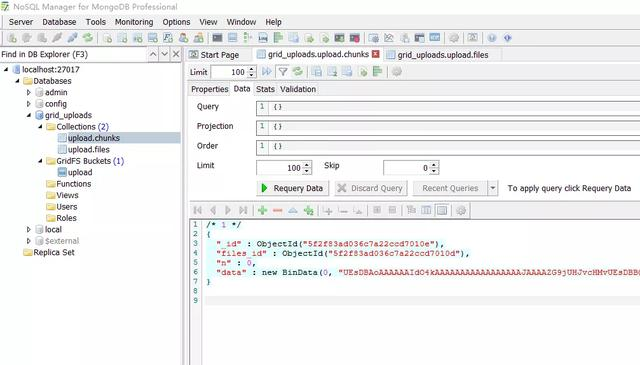
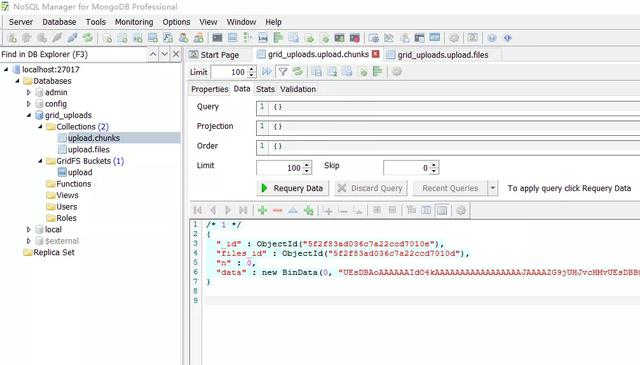
After uploading the file we redirect back to our home page At this point we can see in
NoSqlthat our two documents have data
(Recommended micro-classes: Node.js micro-classes)
This is
upload.chunks

This is
upload.files

3.6 Get all our documentation information
Get all our files
app.get ('/files', (req, res) s >// return an array object by looking for it back gfs.files.find().toarray (err, files) s.> .if (!files|| files.length. ' }) } return res.json(files) }) })
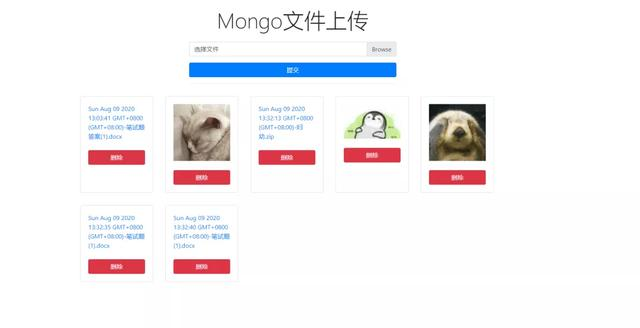
We can do some beautification, such as we can upload images, return to the interface to display pictures, others in
a
label format (clickable download), so we can
views/index.ejs
interface beautification
ejs
syntax is really troublesome), re-arrangement and add delete buttons
lt;! DOCTYPE html& lt;html &
<head>
    <meta charset="UTF-8">
    <meta name="viewport" content="width=device-width, initial-scale=1.0">
    <title>文件上传</title>
    <link rel="stylesheet" href="https://cdn.jsdelivr.net/npm/[email protected]/dist/css/bootstrap.min.css"
        integrity="sha384-9aIt2nRpC12Uk9gS9baDl411NQApFmC26EwAOH8WgZl5MYYxFfc+NcPb1dKGj7Sk" crossorigin="anonymous">
    <style>
        img {
            width: 100%;
        }
    </style>
</head>


<body>
    <div class="container">
        <div class="row">
            <div class="col-md-6 m-auto">
                <h2 class="text-center display-4 my-4">Mongo文件上传</h2>
                <form action="/upload" method="POST" enctype="multipart/form-data">
                    <div class="custom-file mb-3">
                        <input type="file" name="file" id="file" class="custom-file-input">
                        <label for="file" class="custom-file-label">选择文件</label>
                    </div>
                    <input class="btn btn-primary btn-block" type="submit" value="提交">
                </form>
                <hr>
            </div>
        </div>
        <div class="row">
            <% if(files){ %>
            <% files.forEach(function(file){ %>
            <div class="col-sm card card-body m-3  col-md-2">
                <% if(file.isImage){ %>
                <img src="image/<%= file.filename %>" />
                <% } else { %>
                <a href="download/<%= file.filename %>"><%= file.filename %></a>
                <%}%>
                    <form action="/files/<%= file._id%>?_method=DELETE" method="POST">
                <button class="btn btn-danger btn-block mt-4">删除</button>
                </form>
            </div>
            <% }) %>
            <% }else { %>
            <p class="card card-body text-center display-4 my-4">文件不存在</p>
            <% } %>
        </div>
    </div>
</body>
<script src="https://cdn.jsdelivr.net/npm/[email protected]/dist/jquery.slim.min.js"
    integrity="sha384-DfXdz2htPH0lsSSs5nCTpuj/zy4C+OGpamoFVy38MVBnE+IbbVYUew+OrCXaRkfj"
    crossorigin="anonymous"></script>
<script src="https://cdn.jsdelivr.net/npm/[email protected]/dist/umd/popper.min.js"
    integrity="sha384-Q6E9RHvbIyZFJoft+2mJbHaEWldlvI9IOYy5n3zV9zzTtmI3UksdQRVvoxMfooAo"
    crossorigin="anonymous"></script>
<script src="https://cdn.jsdelivr.net/npm/[email protected]/dist/js/bootstrap.min.js"
    integrity="sha384-OgVRvuATP1z7JjHLkuOU7Xw704+h835Lr+6QL9UvYjZE3Ipu6Tp75j7Bh/kR0JKI"
    crossorigin="anonymous"></script>


</html>
(Recommended tutorial: MongoDB tutorial)
To get the
files
in
ejs
to the
get('/')
interface we should override, let it read the database file information and output it to the page when accessing
localhost:5000
app.get ('/', (req,res) s.>.gfs.files.find().toarray(err, files) s.> .if (!files|| files.lengths.s. We'll show it on the front end if it's the following picture type, and the rest will be treated as attachment >s, using isImage to distinguish between pictures and non-picture const imageType 'image/png', 'image/jpg', 'image/gif', 'image/jpeg'' if (imagetype.includes (file.contentType)) else { file.isImage = false } }) res.render('index', { files: files }) }) })
To complete the above situation we visit the home page on the line should be as follows

3.7 Individual file downloads
Here we access
/download/:filename
interface via the a label,
filename
is the file name, of course, you can use other such as
_id
when you find the attachment, it will be merged into a readable stay, returned through the pipeline, so that on the front-end interface click on the file title can be downloaded directly
app.get ('/download/:filename', (req,res) s.> sgfs.files.findone ('filename:req.params.filename', (err,file) s.> .if(!file))?return res.status(404).json ('err:' file doesn't exist!) ' }) } const readstream = gfs.createReadStream(file.filename) readstream.pipe(res) }) })
3.8 Single file deletion
Here we access
/files/:id
interface via
a
tag, corresponding to
id
click the delete button and delete it directly and redirect it to the home page
app.delete('/files/:id', (req,res) s.>.gfs.remove ('_id:req.params.id,root:'upload', (err)','>'if'/returns.status(404).json ('err:' deleted file doesn't exist!) ' }) } res.redirect('/') }) })
Since we've been making requests with
form
but
form
form doesn't have a
delete
request, we've used
method-override
and of course it doesn't matter if we use
Ajax
our project is fast after all, mainly looking at the effects and processes.
(Recommended Micro-Course: MongoDB Getting Started and Case Study)
4 Finish the sprinkles
Simple and simple end, learned the small partners can try more in-depth operation, so we can use this project to make a bed or small net disk, or simple drop. Of course, the attachment upload also has certain restrictions, such as large files may be uploaded longer, we need to use file sharding upload.
The above is about how to use
Node+MongoDB
to build a simple diagram bed or network disk related to the introduction, I hope to help you.