Chapter 6 User Interaction
May 21, 2021 Android SDK Getting started
Table of contents
Chapter 6 User Interaction
In this tutorial, we'll set up the Button elements we added earlier to detect and respond to user clicks. T o achieve this, we need to involve Java programming slightly in the main Activity class of the application. I f you don't have much experience in Java development and don't have to worry, just follow the steps to complete the learning. We'll dive into Java syntax in the next article in this series to ensure that you understand the programming language knowledge necessary for your initial Android development tasks.
You can implement user interaction in many different ways in Android. W e'll look at two of the most typical processing scenarios to make the application buttons feel like a user click -- both of which use a little XML code and a Java implementation process. A ndroid contains several different interactive UI elements that sense a variety of input actions from the user. I nput operations must be handled in a way that matches UI items, but the process is still much the same. We'll start with a button to explore user interaction on the Android platform, because the button is undoubtedly the simplest and most commonly used interface element.
1. The basis for user interaction
Before I go into the details, I'd like to explain a few UI concepts to my friends who are new to application development. I n order to implement application interaction, we need to use specific elements to detect user interaction. F riends who read the previous article must remember that View exists in Android, and in today's example it specifically refers to Button. T o implement interaction, we first need to "listen" to the user's practices. A lthough Android is primarily run on mobile devices with touch screens, you can still use programming languages to handle interactive development on your computer. For example, in the "click" section mentioned later, we mean clicking with the mouse or touching/touching the corresponding position with your finger.
There are many ways in which users interact with applications. T hey can tap, stroke, and "press" the item. W hen these action activities occur, we call them an "event." T herefore, we need to set up the application to listen for specific events that occur on a particular UI project. In today's example, we need to listen for clicks (or touch/touch) actions against Button.
We need to listen for and respond to such user events. T o do this, we'll add code to the Java Activity class for listening and responding to button clicks. T his part of the code starts executing whenever a click event occurs on the button. While other types of user interaction involve different method codes and a variety of event types, the basic processes are connected.
2. Identify UI elements
The first step
To indicate which View the user interaction specifically points to, we need to identify each interactive View in the application. I n the examples listed in the article, we'll just talk about one View -- but there are many different types of interactiveViews that you might use when you actually develop your application in the future. I n order for them to work in an orderly manner with each other, we need to set a unique ID property for each View to identify and apply it to the entire application. S tart by opening our main layout file in Eclipse and switching to the XML editing tab. Next, find the code we added to the Button element and assign it an ID using the following syntax:
android:id="@+id/myButton"We need to assign ID properties to each element used in the Android layout to help us identify each View element smoothly. N otice the syntax in the code above. T his prompts the Android tool to create a new ID in the project resource "R.java" file and assign it a text string that is unique within the application, "myButton". W e'll use this name to specify Button View in the rest of the XML layout code in your app and in other XML and Java files. Then save the current layout file.
Step two
Open the main Actity file in the application. W e'll add a little Java code to it, but you don't have to worry about your own catchy Java level, just understand the general processes involved in the user interaction. I f your friends have never been exposed to Java before, keep an eye on our next tutorial, and look back and you'll see that the content is actually very simple. L et's create a variable in theActivity class to reference Button View. After the class declaration begins and starts:
public class MainActivity extends Activity {Add variable declarations:
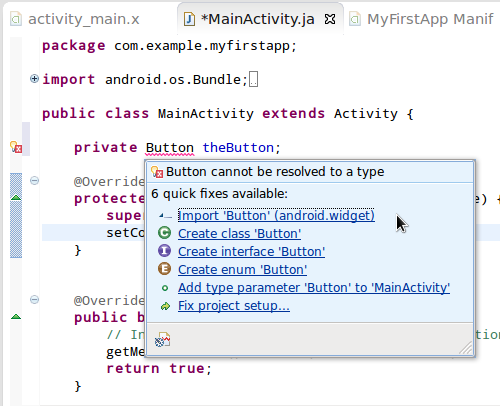
private Button theButton;Our declaration contains visual attributes (next time detailed), variable types, and variable names. E clipse may underline the Button text section and prompt "Button cannot be resolved to a type." S ince we are using the Button type provided by the Android platform, we must import it into the class file. H overing over the "Button" text, Eclipse will show us a list of suggestions. I n it, select "Import'Button' (android.widget). This results in a list of import claims that can be freely expanded and closed at the top of the class file.
Step three
Now we can take back the reference to Button View in the layout and save the reference in the variable we created. In my Actity onCreate method, the following lines of code are followed by layout settings:
setContentView(R.layout.activity_main); Enter a new line of code to get Button back as follows:
theButton = (Button)findViewById(); Enter "R." in parentheses for "findViewById()" E clipse provides us with a list of resource type tips. Select "id" in it.

The above code specifies the name of the method that needs to be executed after the button is clicked. T he corresponding method should be added to theActivity class that appears in the layout. T hat way, we don't have to add a lot of code to theActivity class, including creating a Button variable, saving a View reference in it, implementing OnClickListener, or setting up a dedicated click-listening class for the button. In this example, we can instead add the onClick method to the class by adding the following code( using the same code for consistent action):
public void buttonClicked(View v){
    Button theButton = (Button)v;
    theButton.setText("Ouch");
}
While this approach may seem simpler, it uses Java to make references point to layout elements a process that deserves serious attention -- something you'll often use in future application development. In addition, if everyone's layout contains multiple clickable items, you might prefer to handle all click events within the same method -- in which case the scenario mentioned earlier in the article is more ideal.
In addition to the two scenarios mentioned in the article, there are many other ways to implement click-processing tasks on View, but other methods are more complex and less suitable for use as no-go teaching.
Step two
In this tutorial, we learned how to handle button click events in Android in the most basic way. T he platform also provides processing power for a range of other user events for different View types, including long presses, keystrokes, touch, and more. Interested friends can refer to the Android Developer's Guide to learn about the types of event handling tasks they may be exposed to in future project development.
Summarize
In this section, we explore how to follow the basic process of implementing a user-click button response in the Android UI. T oday's content compared with the entire Android user interaction mechanism can only be regarded as a hair, but we should be able to understand the trunk from this universal approach, so as to guide themselves in future projects to come up with development results in line with user input habits. In other tutorials in this series, we'll learn about the most essential features of the Java language to achieve one brilliant victory after another in Android development.