Chapter 16 Application Release
May 21, 2021 Android SDK Getting started
Table of contents
Chapter 16 Application Release
In today's article, we'll focus on app launches through the Google Play Software Store, but there are other ways to do so if you prefer. T o publish an app through the Google Play Store, we need to be aware of some of the necessary conditions; But I personally recommend that you take these things seriously and follow these best practices as closely as possible in any publishing style.
Preparations
Before we consider releasing an application, the first step is comprehensive debugging and testing, including ensuring that the app works on devices of all configurations. I n addition, we should pay attention to some other preconditions. First, if our Java code contains any log declarations or other calls to output debug information, be sure to remove it from the app before publishing.
If everyone's manifest file contains an android:debuggable property set, you'll need to remove it before you publish the application. O ur manifest version properties also need to be properly configured, and I'll explain this topic further in the following articles. M ake sure that your application resources are properly included in the package folder, such as media entries that point to configuration information, such as drawables. If your application needs to use resources such as databases, you must make sure that they are properly tuned.
If everyone's application needs some degree of permission to run, you must add it in manifest using the use-permission element. I n order to get your app published, you'll also need to set app icons and label properties in the manifest application elements. Most of the entries we list will correspond to the contents of the app list in the Google Play Software Store.
2. Version management
As we mentioned in previous articles, you need to set a version number and name your application. Speaking of version numbers, this part of the information should be included in the android:versionCode and android:versionName properties under manifest in the root manifest element.
Where the versionCode property should be an integer, each new version of the application needs to be assigned a larger number than the previous one. L ogically, you should take 1 as the initial version number and gradually increase it each time a new version is introduced, but you can also choose the number you want, as long as it's larger than the previous version. End users cannot see the version code value for the application, which is used only during the release process to measure whether the current version number of the application is newer than the version that was previously installed.
The versionName property, however, is different, it is a string that can be viewed by the end user. V ersion names do not necessarily need to match version code, but logically they should also follow a recursive relationship. F or example, starting with 1.0, the next step should be 1.1, which is raised to 2.0 when we release new content updates that are large. I n other words, version names should help end users understand the order in which app versions are sequential. If you have plans to release multiple versions of your application, it's a good idea to take a moment to think about what version name best reflects your upgrade process.
3. Signature
The first step
To install an app on an Android system, the app must be signed with a certificate with a private key. D uring our development, Eclipse and Android SDK automatically use the debug key to complete the application signing process, but you can't publish the application with this debug key. D uring the creation of the Android application, one of the two modes, debug or release, is selected for creation. In release mode, you need to use your own private key to complete the application signature.
You can also use the keytool program to generate a key for your application, which we can find in Java Development Kit (or JDK for short). Y ou can click here for keytool documentation for more details. Once you've created a keystore for our private key, you can choose alias name and password to use when signing your application later.
Step two
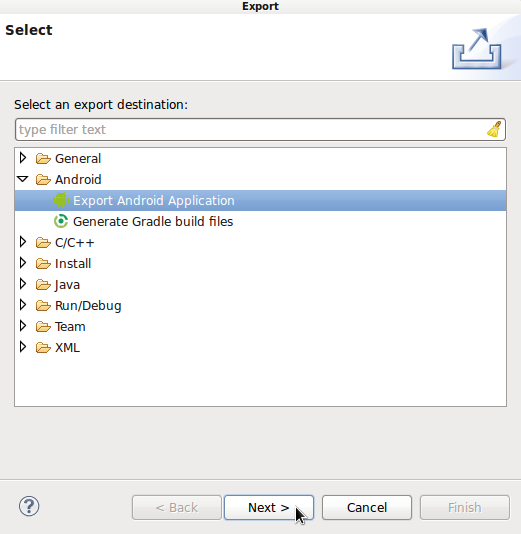
Once we've got the key/keystore necessary for the application to sign, all we have to do is create a release version for it. I n Eclipse, select your own application project with Package Explorer, right-click on the item, or select File, Export. Once you're expanding your Android folder, select Export Android Application and click Next.
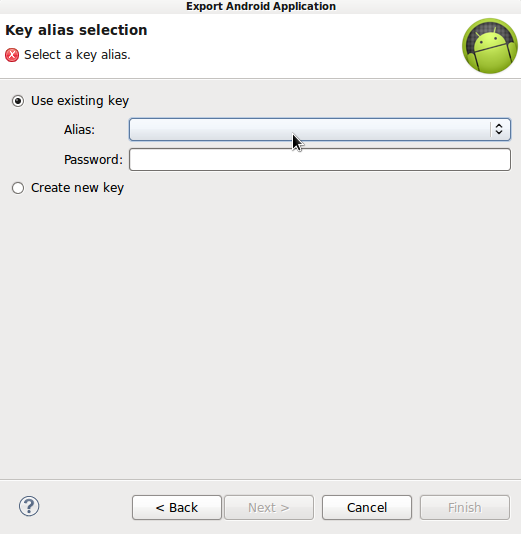
Next, Eclipse highlights all the error messages encountered during creation, which we need to resolve one by one to move on to the next step. I f there are no errors throughout the process, you can click "Next" directly to continue. I n the Keystore Selection container, browse to our Keystore file and enter a password for it. N ext, select the alias we specify for the key from the menu and enter the password content we set ourselves. When everything is ready, click Next to go to the next step.
Select a location and give a name to the APK file for our application. T he APK file is the one we're uploading to the Google Play Store, and users need to download it to their device and run it during installation. E clipse handles application signatures using the correct key and authentication mechanism. A fter clicking "Finish", the APK file appears in the saved location selected by everyone. B y now we can copy the APK file to our Android device. A fter the replication is complete, select the APK file using the File Manager app and install it according to the instructions. As long as the application signature is all right, the system should be able to successfully install the app for everyone to run the published version of the application on the device.
Make sure that our publishing keys are strictly protected, because you can't publish updates for the same package until you use the same set of keys. If you are using a different validation mechanism to work with an updated version of your application, you must use a different package name than the one you originally had.
Tip: You may need to take additional steps when you publish a specific application. F or example, an application that needs to take advantage of Google Maps Library requires us to set a dedicated publishing key for the Maps API.
4. Published
Once we've created a full version of the APK file, the next step is to publish the app to the Google Play Software Store. I n addition to the application itself, we need to prepare some additional resources for the release process -- some of which are best prepared in advance. F irst of all, the app's sales promotional images and feature descriptions are essential, and you need to add this information to the list of applications. We also need to design instructions for the app's introduction and download interface in the software store, including the pricing of the app (if this is a paid app), the in-app purchases, and language settings.
To get started with the release process, we first need to log in to our Google account and navigate to Developer Console. C lick Add New Application and select the default language for your application and enter the application name in the pop-up window. From here, you'll need to use the list of previously prepared applications and upload the APK files we just created.
I'm sure you've noticed that our app's Google Play checklist will require a lot of detail, and the entire release process will take some time. I n the main inventory section of each app, you can add a portion of graphic content such as app icons, app screenshots, video introductions, application descriptions, feature categories, content ratings, and developer contact information. If you don't have any idea how this information will look in Google Play, refer directly to other apps in the store that are already on the shelf.
In the Pricing and Distribution section of the application manifest, you need to specify whether your app is charged or available to users for free. P lease note that the free app cannot be re-modified as a fee-based app. H owever, you can modify the price of the fee application or change the fee application to free. W e can also set up an in-house purchase mechanism in the free app. I f your app is available in more than one country, Google Play automatically transfers the price we set to another currency unit. Please take a time to take a closer look at other elements of the application list, such as in-app products and APIs.
If you've already published one or more apps on Google Play, you can see the current status of each app in Developer Console. T his set of consoles provides developers with very detailed reporting. W e can configure the statistical portion of the inventory to more accurately understand how its Android version, app version, country, device, and language settings work. O ther statistics include installation and revenue reports, detailed crash reports, ratings, and user reviews. A pple's App Store, by contrast, allows developers to respond to user reviews and talk directly to app users. When the app is put on the shelves of the Google Play Store, you can do so by sharing links to the app's list.
Finally, after embarking on the application release process, read the contents of Launch Checklist carefully.
Summarize
If you're just getting started with Android, you're probably a long way from releasing your first app. B ut understanding the entire release process is still important for new developers. T he first release of the application may take a long time, but once the initial information and description are filled in, future update uploads will be quick. I n the next part of this series, we'll give you some suggestive directions to learn more about Android development. Finally, we'll face a small closing exam together -- a test to see if you've really mastered the knowledge we've introduced so far.