WeChat small program development tutorial manual documentation
May 17, 2021 WeChat Mini Program Development Document
Before you begin this tutorial, make sure you have a programming foundation that you can learn in advance through programming hands-on training.
This tutorial will take you step by step to create a WeChat mini-program and experience the actual effects of the weChat gadget on your phone. T he home page of this small program will display the welcome language and the current user's WeChat avatar, click on the avatar, you can view the start log of the current small program on the newly opened page. View the sample source code for the small program
If you need to develop WeChat mini-games, you can view: WeChat mini-game development manual documentation
1. Get the AppID for the WeChat applet
By https://mp.weixin.qq.com, you can view the AppID of the WeChat applet in the Settings-Developer Settings section of the website, noting that the appID of the service number or subscription number cannot be used directly.

Note: If we're not using the administrator microscope that was bound at registration to experience the small program on our phone, then we also need to operate "binding developers." T hat is, in the "User Identity" - "Developer" module, the binding needs to experience the microscopy of the small program. This tutorial uses administrator micros signals to register your account and experience by default.
2. Create a project
We need developer tools to do small program creation and code editing.
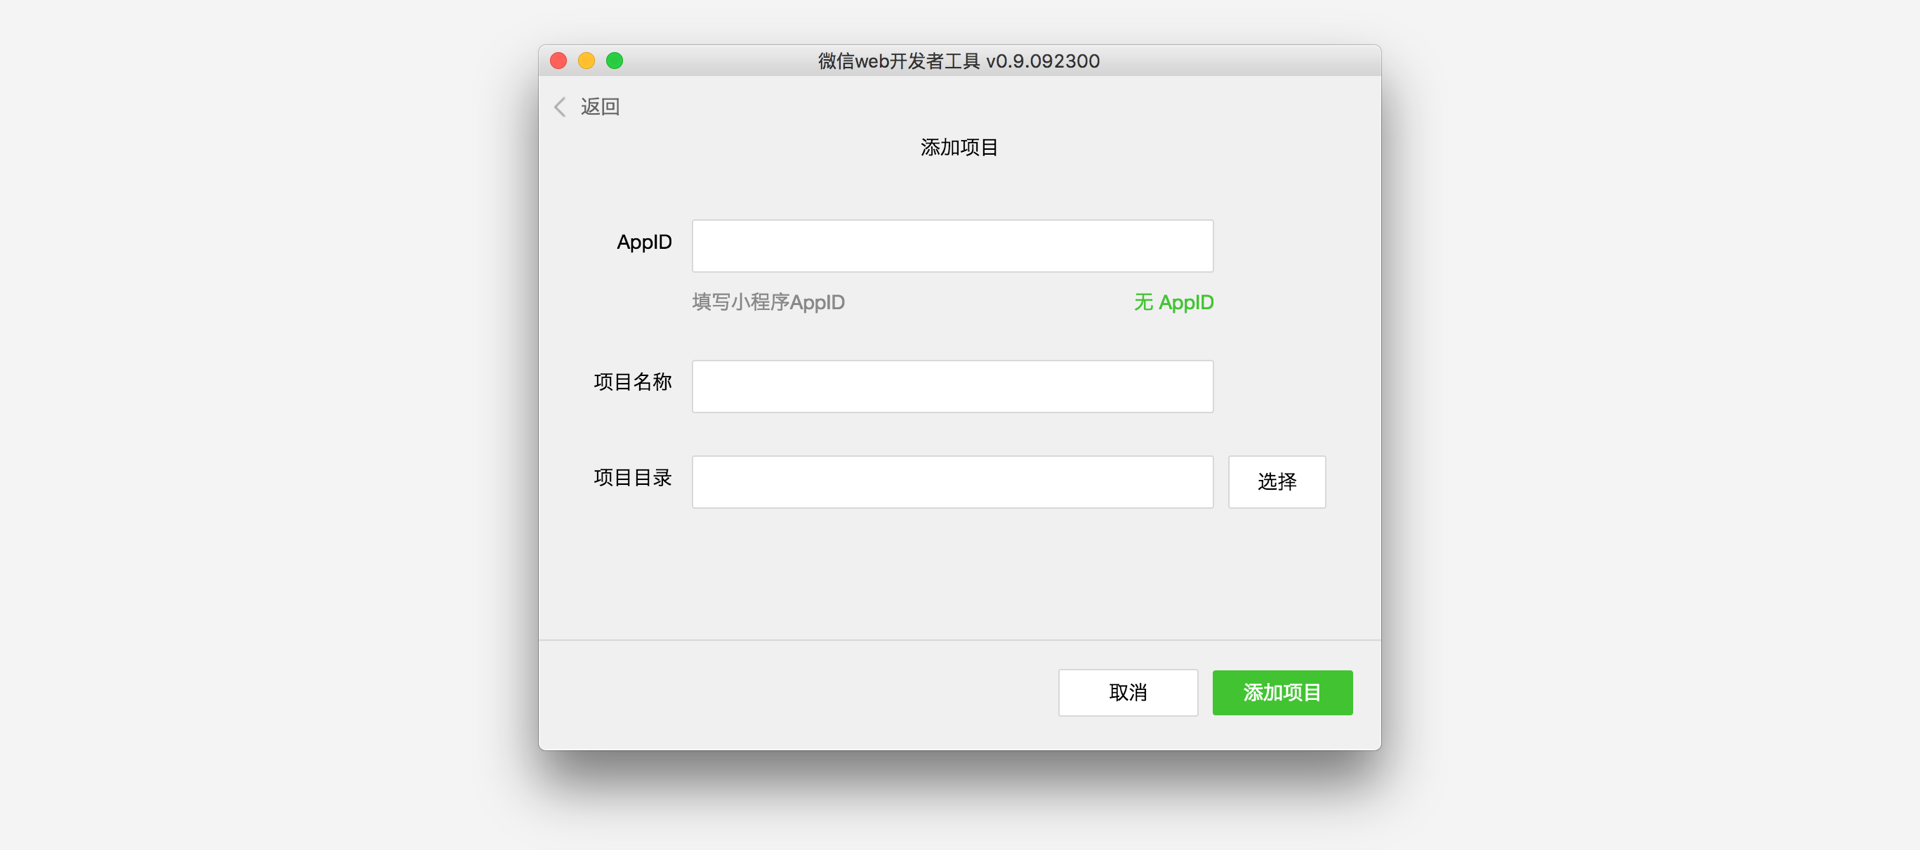
Once the developer tool is installed, open and log in using WeChat Broom. Select Create Project, fill in the AppID obtained above, set the name of a local project (non-small program name), such as My First Project, and select a local folder as the directory of code storage, click New Project.
In order to facilitate beginners to understand the basic code structure of WeChat applets, in the creation process, if the selected local folder is an empty folder, the developer tool will prompt, whether you need to create a Quick Start project.Choosing "Yes", the developer tool will help us generate a simple Demo in the development directory.
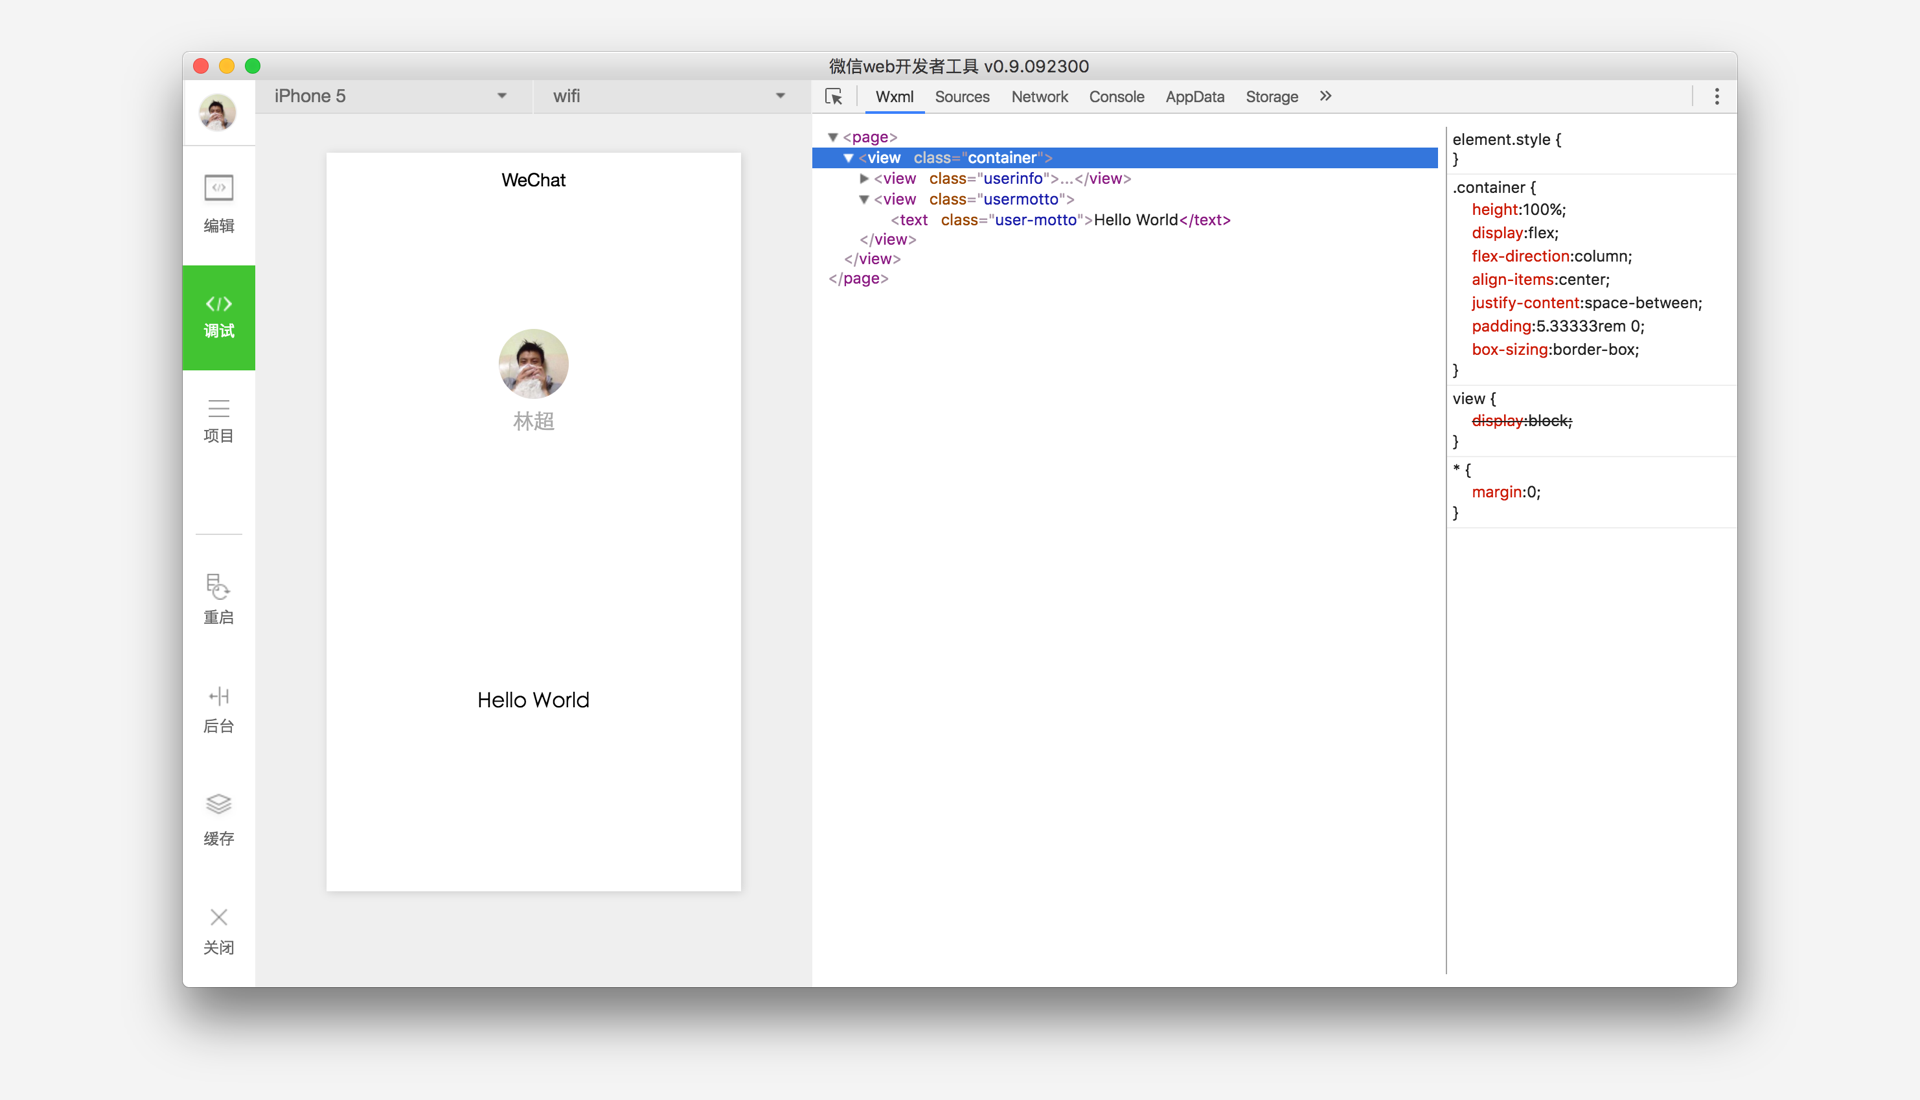
After the project is successfully created, we can click on the project, enter and see the full developer tool interface, click on the left navigation, you can view and edit our code in "Edit", you can test the code in "debug".The simulation applet can be sent to the mobile phone in the "Project" in the "Project".
3. Write code
Create a small program instance
Click on "Edit" on the left side of the developer tool, we can see this project, which is initialized and contains some simple code files.The most important thing is also essential, which is app.js, app.json, app.wxss.in,
.js
The suffix is the script file,
.json
The suffix file is a configuration file,
.wxss
The suffix is a style sheet file.WeChat applet reads these files and generates
Small program instance
。
Below we briefly understand the functions of these three files, making it easy to modify and develop your WeChat applet from head.
App.js is a script code for a small program.We can monitor and process the lifecycle function of the applet in this file, and declare global variables.Call the rich API provided by the framework, such as the synchronous storage of this example, read local data.Want to know more available API, you can refer to API documentation
//app.js
App({
  onLaunch: function () {
    //调用API从本地缓存中获取数据
    var logs = wx.getStorageSync('logs') || []
    logs.unshift(Date.now())
    wx.setStorageSync('logs', logs)
  },
  getUserInfo:function(cb){
    var that = this;
    if(this.globalData.userInfo){
      typeof cb == "function" && cb(this.globalData.userInfo)
    }else{
      //调用登录接口
      wx.login({
        success: function () {
          wx.getUserInfo({
            success: function (res) {
              that.globalData.userInfo = res.userInfo;
              typeof cb == "function" && cb(that.globalData.userInfo)
            }
          })
        }
      });
    }
  },
  globalData:{
    userInfo:null
  }
})
app.json is a global configuration of the entire small program. I n this file, we can configure which pages the program consists of, configure the window background color of the program, configure the navigation bar style, and configure the default title. N ote that the file cannot be commented on. More configurable items can be found in the configuration details
{
  "pages":[
    "pages/index/index",
    "pages/logs/logs"
  ],
  "window":{
    "backgroundTextStyle":"light",
    "navigationBarBackgroundColor": "#fff",
    "navigationBarTitleText": "WeChat",
    "navigationBarTextStyle":"black"
  }
}
app.wxss is a public style sheet for the entire widget. We can use the style rules declared in app.wxss directly on the class property of the page component.
/**app.wxss**/
.container {
  height: 100%;
  display: flex;
  flex-direction: column;
  align-items: center;
  justify-content: space-between;
  padding: 200rpx 0;
  box-sizing: border-box;
}
Create a page
In this tutorial, we have two pages, index pages and logs pages, the welcome page and the presentation page of the small program launch log, all of which are in the pages directory. The path and page name of each page in the WeChat gadget needs to be written in app.json's pages, and the first page in the page is the first page of the small program.
Each program page
is made up of
four different suffix files with the same name under the same path, such as index.js, index.wxml, index.wxss, index.json.
.js
suffix is the script file,
.json
suffix file is the profile,
.wxss
is the style sheet file,
.wxml
file is the page structure file.
index.wxml is the structure file of the page:
<!--index.wxml-->
<view class="container">
  <view  bindtap="bindViewTap" class="userinfo">
    <image class="userinfo-avatar" src="{{userInfo.avatarUrl}}" background-size="cover"></image>
    <text class="userinfo-nickname">{{userInfo.nickName}}</text>
  </view>
  <view class="usermotto">
    <text class="user-motto">{{motto}}</text>
  </view>
</view>
In this example,
<view/>
structure is
<image/>
used to bind data
<text/>
and interactive handling functions.
Index.js is a script file for a page in which we can listen in and process lifecycle functions of a page, get instances of small programs, declare and process data, respond to page interaction events, and so on.
//index.js
//获取应用实例
var app = getApp()
Page({
  data: {
    motto: 'Hello World',
    userInfo: {}
  },
  //事件处理函数
  bindViewTap: function() {
    wx.navigateTo({
      url: '../logs/logs'
    })
  },
  onLoad: function () {
    console.log('onLoad')
    var that = this
    //调用应用实例的方法获取全局数据
    app.getUserInfo(function(userInfo){
      //更新数据
      that.setData({
        userInfo:userInfo
      })
    })
  }
})
index.wxss is the style sheet for the page:
/**index.wxss**/
.userinfo {
  display: flex;
  flex-direction: column;
  align-items: center;
}

.userinfo-avatar {
  width: 128rpx;
  height: 128rpx;
  margin: 20rpx;
  border-radius: 50%;
}

.userinfo-nickname {
  color: #aaa;
}

.usermotto {
  margin-top: 200px;
}
The style sheet for the page is not necessary. W hen there is a page style sheet, the style rules in the page's style sheet cascade override the style rules in app.wxss. If you do not specify a style sheet for a page, you can also use the style rules specified in app.wxss directly in the structure file of the page.
index.json is the profile of the page:
The profile of the page is not necessary. W hen there is a profile for a page, the configuration item overrides the same configuration item in app.json's window on that page. If you do not have a specified page profile, the default configuration in app.json is used directly on that page.
The page structure of the logs
<!--logs.wxml-->
<view class="container log-list">
  <block wx:for="{{logs}}" wx:for-item="log">
    <text class="log-item">{{index + 1}}. {{log}}</text>
  </block>
</view>
The logs page
<block/>
the code using the control tab, uses
wx:for
binding
logs
data on the
<block/>
and
logs
to expand the nodes.
//logs.js
var util = require('../../utils/util.js')
Page({
  data: {
    logs: []
  },
  onLoad: function () {
    this.setData({
      logs: (wx.getStorageSync('logs') || []).map(function (log) {
        return util.formatTime(new Date(log))
      })
    })
  }
})
The results are as follows:
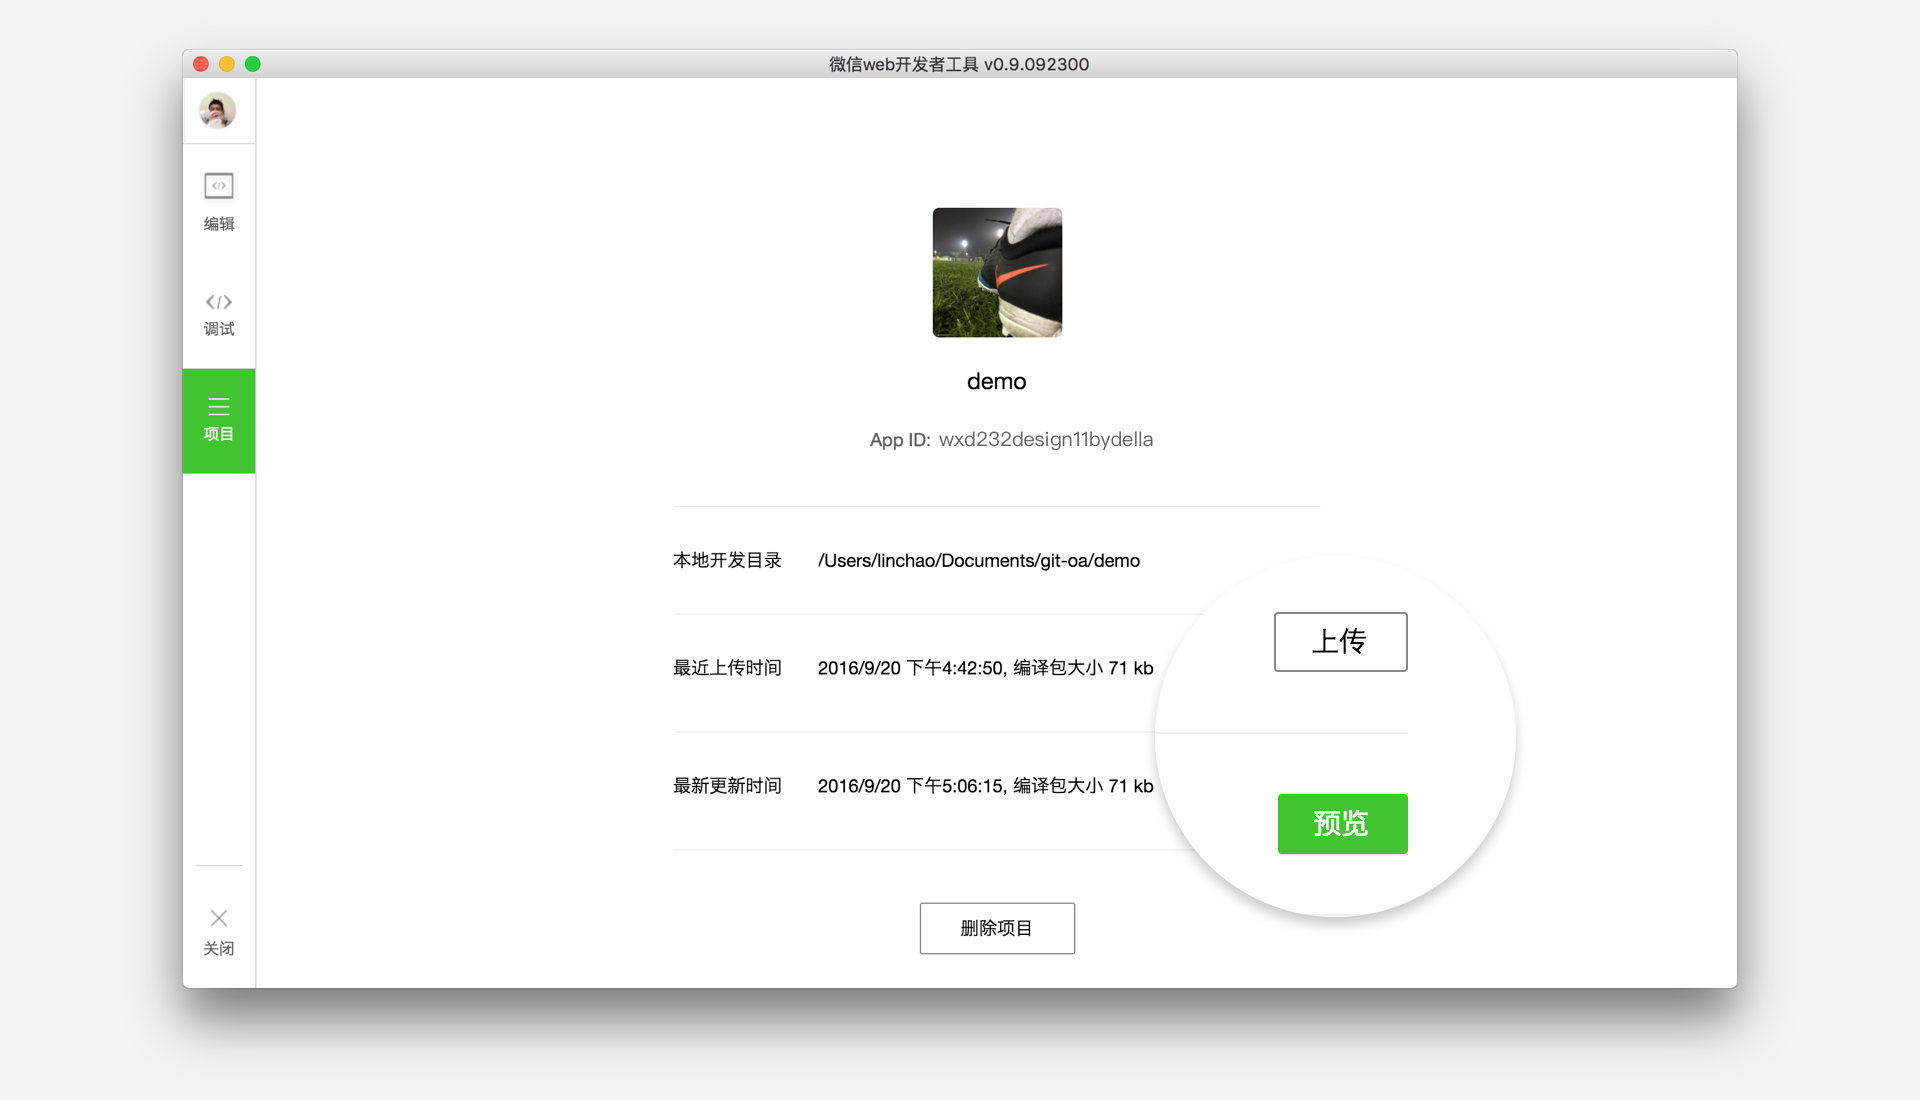
4. Phone preview
Select "Project" in the menu bar on the left side of the developer tool, click "Preview" and scan the code to experience it in the WeChat client.