Struts2 Interceptor
May 15, 2021 Struts2
Table of contents
Interceptors are conceptually the same as servlet filters or JDK proxy classes. T he interceptor allows the cross-cutting function to be implemented separately from the action and frame. Y ou can do the following with an interceptor:
-
Provides preprocessing logic before calling action.
-
Provides post-processing logic after the action is called.
-
Catch exceptions so that alternate processing can be performed.
Many of the features provided in the Struts2 framework are implemented using interceptors, including exception handling, file uploads, lifecycle callbacks, and validation. In fact, because Struts2 based most of its functionality on interceptors, it is unlikely that seven or eight interceptors will be assigned to each action.
Struts2 Frame Interceptor
The Struts 2 framework provides a good list of out-of-the-box interceptors that are pre-configured and ready to use. Here are a few important interceptors:
| Serial number | Interceptors and instructions |
|---|---|
| 1 |
alias
Allow parameters to use different aliases between requests. |
| 2 |
checkbox
Help manage the check box by adding the parameter value false to the unn check box. |
| 3 |
conversionError
The error message that converts the string to an argument type is placed in the error field of action. |
| 4 |
createSession
Create an HTTP session automatically, if it doesn't already exist. |
| 5 |
debugging
Provides developers with a number of different debugging screens. |
| 6 |
execAndWait
When action is performed in the background, the user is sent to the waiting page in the middle. |
| 7 |
exception
Map exceptions thrown from action to result, allowing exceptions to be handled automatically by redirection. |
| 8 |
fileUpload
Easy to upload files. |
| 9 |
i18n Track selected areas during a user session. |
| 10 |
logger
Provides simple logging by outputing the name of the action being executed. |
| 11 |
Params
Set the request parameters on the action. |
| 12 |
prepare
This is typically used to perform preprocessing, such as setting up a database connection. |
| 13 |
profile
Allows you to record simple analysis information for action. |
| 14 |
scope
The state of the action is stored and retrieved within the scope of the session or application. |
| 15 |
ServletConfig
Provides access to a variety of action based on servlet information. |
| 16 |
timer
Provides simple analytical information in the form of action execution time. |
| 17 |
token
Check the validity of the action to prevent duplicate submission of the form. |
| 18 |
validation
Provides validation support for action. |
You can read the Struts 2 documentation for the full information on the interceptors above. N ext we'll show you how to use interceptors in Struts applications.
How do I use interceptors?
Let's see how to use an existing interceptor in our Hello World program. W
e'll start
with the timer
interceptor, which measures the time it takes to execute the action method. W
e also use
params
interceptors to send request parameters to action.
You can try not to use this interceptor in your case, and then
you'll find that the name
property isn't set because the parameters can't be sent to action.
We can keep HelloWorldAction.java, web.xml, HelloWorld.jsp and index .jsp files because they have
been created in the Hellow World sample
chapter, and then
let's add interceptors to it by referencing the struts.xml file
below:
<?xml version="1.0" encoding="UTF-8"?>
<!DOCTYPE struts PUBLIC
   "-//Apache Software Foundation//DTD Struts Configuration 2.0//EN"
   "http://struts.apache.org/dtds/struts-2.0.dtd">
<struts>
   <constant name="struts.devMode" value="true" />
   <package name="helloworld" extends="struts-default">
      <action name="hello"
         class="cn.w3cschool.struts2.HelloWorldAction"
         method="execute">
         <interceptor-ref name="params"/>
         <interceptor-ref name="timer" />
         <result name="success">/HelloWorld.jsp</result>
      </action>
   </package>
</struts>
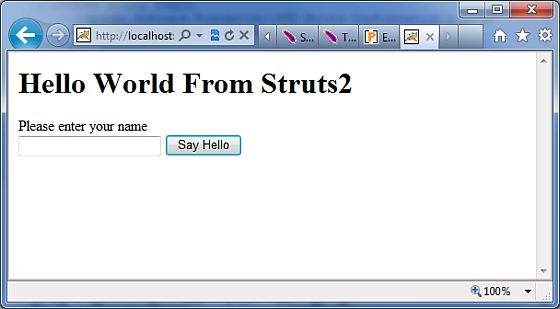
Right-click on the project name, and then click "Export" and "WAR File" to create a WAR file. T he WAR file is then deployed in Tomcat's webapps directory. F inally, start the Tomcat server and try to access the URL http://localhost:8080/HelloWorldStruts2/index.jsp. T he results are shown in the following image:

Now enter any word in a given text box, and then click the Say Hello button to perform the defined action. If you look at the generated logs, you'll see the following text:
INFO: Server startup in 3539 ms
27/08/2011 8:40:53 PM
com.opensymphony.xwork2.util.logging.commons.CommonsLogger info
INFO: Executed action [//hello!execute] took 109 ms.
The last line here is generated by the timer interceptor, which means that a total of 109ms is required to execute.
Create a custom interceptor
Using custom interceptors in your application is a simple way to provide cross-cutting application functionality. C reating custom interceptors is easy and requires the following Interceptor interfaces:
public interface Interceptor extends Serializable{
   void destroy();
   void init();
   String intercept(ActionInvocation invocation)
   throws Exception;
}
As name points out, the init() method provides a way to initialize interceptors, while the testroy() method provides a tool for interceptor cleanup.
Unlike action, interceptors are reused between requests and require thread safety, especially the intercept() method.
ActionInvocation objects
have access to the runtime environment.
It allows access to the action itself as well as the method to call the action and determines whether the action has been called.
If you don't need to initialize or clean up your code, you can extend the
AbstractInterceptor
class to implement the default no-action instructions for init() and testroy().
Create an interceptor class
Let's next create the following MyInterceptor file in the Java Resources.java folder:
package cn.w3cschool.struts2;

import java.util.*;
import com.opensymphony.xwork2.ActionInvocation;
import com.opensymphony.xwork2.interceptor.AbstractInterceptor;

public class MyInterceptor extends AbstractInterceptor {

   public String intercept(ActionInvocation invocation)throws Exception{

      /* let us do some pre-processing */
      String output = "Pre-Processing";
      System.out.println(output);

      /* let us call action or next interceptor */
      String result = invocation.invoke();

      /* let us do some post-processing */
      output = "Post-Processing";
      System.out.println(output);

      return result;
   }
}
You can see that in practice action will be executed
by using the interceptor using the invocation.invoke() call,
so you can do some pre-processing and some post-processing according to your needs.
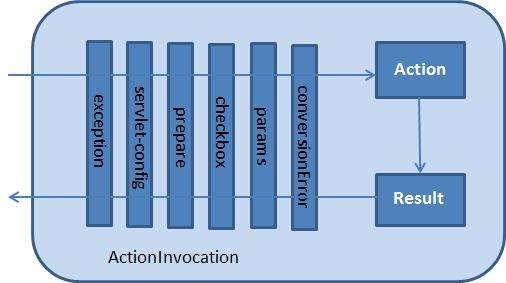
The framework itself starts the process by calling actionInvocation object invoke() for the first time. E
ach time
invoke()
is called, ActionInvocation queries its status and executes the next interceptor. W
hen all configured interceptors are called, invoke() causes the action itself to be executed.
The following chart shows the concepts described through the request flow:
Create an Action class
We create a java file, HelloWorldAction.java under the Java Resources and src folder, with the package name cn.w3cschool.struts2 as follows:
package cn.w3cschool.struts2;

import com.opensymphony.xwork2.ActionSupport;

public class HelloWorldAction extends ActionSupport{
   private String name;

   public String execute() throws Exception {
      System.out.println("Inside action....");
      return "success";
   }

   public String getName() {
      return name;
   }

   public void setName(String name) {
      this.name = name;
   }
}
This is the same class we saw in the previous example, we have the getters and setter methods of the "name" property standard, and the execute method that returns the string "success".
Create a view
Let's create the following jsp file HelloWorld in the WebContent folder of your eclipse .jsp.
<%@ page contentType="text/html; charset=UTF-8" %>
<%@ taglib prefix="s" uri="/struts-tags" %>
<html>
<head>
<title>Hello World</title>
</head>
<body>
   Hello World, <s:property value="name"/>
</body>
</html>
Create a home page
We also need to create an index.jsp file in the WebContent folder, which will be used as the initial action URL, which the user can click to command the Struts 2 framework to call the definition method of the HelloWorldAction class and render the HelloWorld .jsp view.
<%@ page language="java" contentType="text/html; charset=ISO-8859-1"
   pageEncoding="ISO-8859-1"%>
<%@ taglib prefix="s" uri="/struts-tags"%>
   <!DOCTYPE html PUBLIC "-//W3C//DTD HTML 4.01 Transitional//EN"
"http://www.w3.org/TR/html4/loose.dtd">
<html>
<head>
<title>Hello World</title>
</head>
<body>
   <h1>Hello World From Struts2</h1>
   <form action="hello">
      <label for="name">Please enter your name</label><br/>
      <input type="text" name="name"/>
      <input type="submit" value="Say Hello"/>
   </form>
</body>
</html>
Hello action, as defined in the view file above, maps .xml files using struts to the HelloWorldAction class and its execute method.
Profile
Now we need to register a new interceptor and call it, because we called the default interceptor in the previous example. T o register a new interceptor, put the . T he label is placed directly in the struts file under the struts .xml label. F or the default interceptor, you can skip this step, as we did in the previous example. But now let's register the new one using the following method:
<?xml version="1.0" encoding="UTF-8"?>
<!DOCTYPE struts PUBLIC
    "-//Apache Software Foundation//DTD Struts Configuration 2.0//EN"
    "http://struts.apache.org/dtds/struts-2.0.dtd">

<struts>
   <constant name="struts.devMode" value="true" />
   <package name="helloworld" extends="struts-default">

      <interceptors>
         <interceptor name="myinterceptor"
            class="cn.w3cschool.struts2.MyInterceptor" />
      </interceptors>

      <action name="hello"
         class="cn.w3cschool.struts2.HelloWorldAction"
         method="execute">
         <interceptor-ref name="params"/>
         <interceptor-ref name="myinterceptor" />
         <result name="success">/HelloWorld.jsp</result>
      </action>

   </package>
</struts>
It is important to note that you can register multiple interceptors within the hashtag, call multiple interceptors within the tag, or call the same interceptor with a different action.
The web .xml file needs to be created under the WEB-INF folder under WebContent, as follows:
<?xml version="1.0" encoding="UTF-8"?>
<web-app xmlns:xsi="http://www.w3.org/2001/XMLSchema-instance"
   xmlns="http://java.sun.com/xml/ns/javaee"
   xmlns:web="http://java.sun.com/xml/ns/javaee/web-app_2_5.xsd"
   xsi:schemaLocation="http://java.sun.com/xml/ns/javaee
   http://java.sun.com/xml/ns/javaee/web-app_3_0.xsd"
   id="WebApp_ID" version="3.0">

   <display-name>Struts 2</display-name>
   <welcome-file-list>
      <welcome-file>index.jsp</welcome-file>
   </welcome-file-list>
   <filter>
      <filter-name>struts2</filter-name>
      <filter-class>
         org.apache.struts2.dispatcher.FilterDispatcher
      </filter-class>
   </filter>

   <filter-mapping>
      <filter-name>struts2</filter-name>
      <url-pattern>/*</url-pattern>
   </filter-mapping>
</web-app>
Right-click the project name, and then click "Export" and "WAR File" to create a WAR file. T he WAR file is then deployed in Tomcat's webapps directory. F inally, start the Tomcat server and try to access the URL http://localhost:8080/HelloWorldStruts2/index.jsp. T he following image will be displayed:
Now enter any word in the text box you're giving, and then click the Say Hello button to perform the defined action. If you look at the generated log, you'll see the following text at the bottom:
Pre-Processing
Inside action....
Post-Processing
Interceptor stack
As you can imagine, multiple interceptors configured for each action will soon become extremely difficult to manage. T o do this, the interceptor is managed using the interceptor stack. Here is an example of a file .xml from struts-default:
<interceptor-stack name="basicStack">
   <interceptor-ref name="exception"/>
   <interceptor-ref name="servlet-config"/>
   <interceptor-ref name="prepare"/>
   <interceptor-ref name="checkbox"/>
   <interceptor-ref name="params"/>
   <interceptor-ref name="conversionError"/>
</interceptor-stack>
The stack above,
called basicStack,
can be used in your configuration as described below, and this configuration node is placed under the .lt;package ... / /gt; node. T
he tag refers to an interceptor or interceptor stack configured before the current interceptor stack.
Therefore, it is important to ensure that name is unique across all interceptor and interceptor stack configurations when configuring the initial interceptor and interceptor stacks.
We've learned how to apply interceptors to action, and the application of interceptor stacks is similar.
In fact, the labels used are the same:
<action name="hello" class="com.tutorialspoint.struts2.MyAction">
   <interceptor-ref name="basicStack"/>
   <result>view.jsp</result>
</action
The "basicStack" registration above will fully register the six interceptors used by hello action. N ote that interceptors are executed in the order in which they are configured. For example, in the example above, exception will be executed first, and the second will be servlet-config, etc.