Struts2 comments
May 15, 2021 Struts2
Table of contents
As mentioned in the previous section, Struts provides two forms of configuration. T
he traditional way is to use struts for all configurations .xml files. S
o far, we've seen a number of examples of this in the tutorial. A
nother way to configure Struts is to use Java 5's annotation feature.
With struts annotations, we can implement a zero configuration.
To get started with comments in your
project, make sure that the following jar files are included in the WebContent/WEB-INF/lib
folder:
-
struts2-convention-plugin-x.y.z.jar
-
asm-x.y.jar
-
antlr-x.y.z.jar
-
commons-fileupload-x.y.z.jar
-
commons-io-x.y.z.jar
-
commons-lang-x.y.jar
-
commons-logging-x.y.z.jar
-
commons-logging-api-x.y.jar
-
freemarker-x.y.z.jar
-
javassist-.xy.z.GA
-
ognl-x.y.z.jar
-
struts2-core-x.y.z.jar
-
xwork-core.x.y.z.jar
Now let's see how you can
.xml the configurations
available in the file and replace them with comments.
To explain the concept of annotations in Struts2, we must re-use the validation examples learned in the
Struts2
validation framework section.
Here we will give an
example of an Employee
whose name and age are captured using a simple page, and we will perform two validations to ensure that the user always enters a name and that the age should be between 28 and 65.
So, let's start with the JSP main page of the example.
Create a home page
First, start by writing the home page JSP file index that collects information about Employee mentioned .jsp.
<%@ page language="java" contentType="text/html; charset=ISO-8859-1"
   pageEncoding="ISO-8859-1"%>
<%@ taglib prefix="s" uri="/struts-tags"%>
<!DOCTYPE html PUBLIC "-//W3C//DTD HTML 4.01 Transitional//EN"
"http://www.w3.org/TR/html4/loose.dtd">
<html>
<head>
<title>Employee Form</title>
</head>

<body>

   <s:form action="empinfo" method="post">
      <s:textfield name="name" label="Name" size="20" />
      <s:textfield name="age" label="Age" size="20" />
      <s:submit name="submit" label="Submit" align="center" />
   </s:form>

</body>
</html>
Index .jsp the Struts tags we use, but we'll learn about them in the relevant sections of the labels. N ow, suppose the s:textfield label prints an input field and the s:submit prints a submit button. W e use the label property for each label, which is to create a tag for each label.
Create a view
We'll use the .jsp of the JSP file to call it if the defined action returns TOCSS.
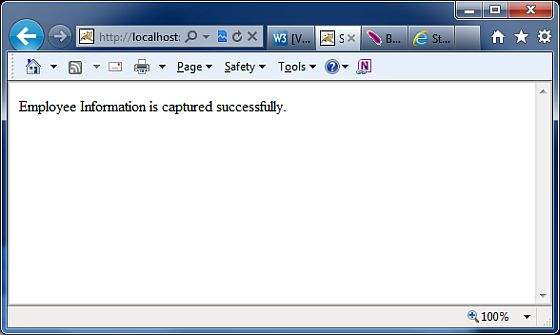
<%@ page language="java" contentType="text/html; charset=ISO-8859-1"
	pageEncoding="ISO-8859-1"%>
<%@ taglib prefix="s" uri="/struts-tags"%>
<!DOCTYPE html PUBLIC "-//W3C//DTD HTML 4.01 Transitional//EN"
"http://www.w3.org/TR/html4/loose.dtd">
<html>
<head>
<title>Success</title>
</head>
<body>
   Employee Information is captured successfully.
</body>
</html>
Create Action
Action is where comments are used. L et's redefine the action class Employee with comments, and then add a method .java validate() to the Employee file as follows. Y ou need to make sure that the action class extends the ActionSupport class, otherwise the validate method will not be executed.
package cn.w3cschool.struts2;

import com.opensymphony.xwork2.ActionSupport;
import org.apache.struts2.convention.annotation.Action;
import org.apache.struts2.convention.annotation.Result;
import org.apache.struts2.convention.annotation.Results;
import com.opensymphony.xwork2.validator.annotations.*;

@Results({
   @Result(name="success", location="/success.jsp"),
   @Result(name="input", location="/index.jsp")
})
public class Employee extends ActionSupport{
   private String name;
   private int age;

   @Action(value="/empinfo")
   public String execute()
   {
       return SUCCESS;
   }

   @RequiredFieldValidator( message = "The name is required" )
   public String getName() {
       return name;
   }
   public void setName(String name) {
       this.name = name;
   }

   @IntRangeFieldValidator(message = "Age must be in between 28 and 65",
                                      min = "29", max = "65")
   public int getAge() {
       return age;
   }
   public void setAge(int age) {
       this.age = age;
   }
}
We've used some comments in this example, so let's take a look at it one by one:
-
The first is the Results comment contained in the example, which is a collection of results. U nder this collection of comments, there are two result comments. T hey contain the name that corresponds to the result of the execute method, as well as the view location that corresponds to the return value of the execute().
-
The next comment is the Action comment, which can be used to decorate the execute() method. T he Action method also receives a value that is the URL that calls action.
-
Finally, we used two validation comments. W e've configured the name field on the required field validator and the age field on the integer range validator, and we've also specified custom information for validation.
Profile
In fact, we really don't need a struts .xml profile, we can delete the file and look directly at the contents .xml the web file:
<?xml version="1.0" encoding="UTF-8"?>
<web-app xmlns:xsi="http://www.w3.org/2001/XMLSchema-instance"
   xmlns="http://java.sun.com/xml/ns/javaee"
   xmlns:web="http://java.sun.com/xml/ns/javaee/web-app_2_5.xsd"
   xsi:schemaLocation="http://java.sun.com/xml/ns/javaee
   http://java.sun.com/xml/ns/javaee/web-app_3_0.xsd"
   id="WebApp_ID" version="3.0">

   <display-name>Struts 2</display-name>
   <welcome-file-list>
      <welcome-file>index.jsp</welcome-file>
   </welcome-file-list>

   <filter>
      <filter-name>struts2</filter-name>
      <filter-class>
         org.apache.struts2.dispatcher.FilterDispatcher
      </filter-class>
      <init-param>
         <param-name>struts.devMode</param-name>
         <param-value>true</param-value>
      </init-param>
   </filter>

   <filter-mapping>
      <filter-name>struts2</filter-name>
      <url-pattern>/*</url-pattern>
   </filter-mapping>
</web-app>
Now, right-click on the project
name, and then click
"Export" and "WAR File" to
create a WAR
file. T
he WAR file is then deployed in Tomcat's webapps directory.
Finally, start the Tomcat server and try to access the URL http://localhost:8080/HelloWorldStruts2/index.jsp display the following interface:
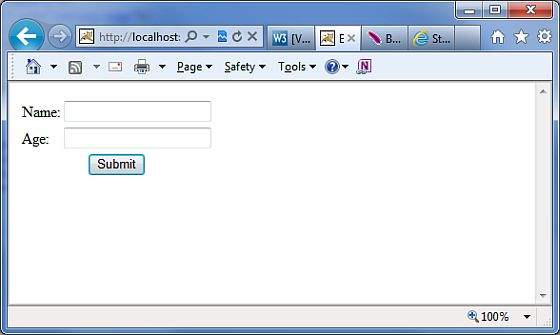
Don't enter any information you want first, just click the Submit button. Y ou'll see the following results:
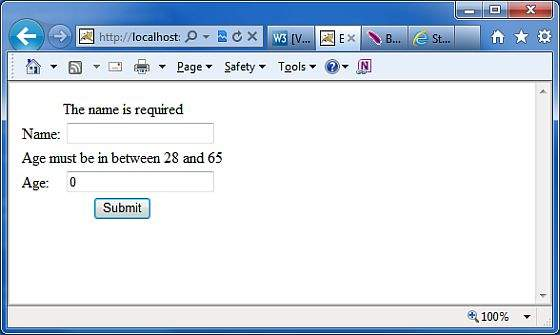
Enter the requested information instead of the field of the wrong class, such as the name "text"
with an age of 30, and then click the Submit
button
to see the following interface:
Struts2 comment type
The Struts2 application can use Java 5 comments instead of the configuration of XML and Java properties. You can view a list of the most important comments related to different categories: the Struts2 comment type.