AngularJS necessary preparations
May 08, 2021 AngularJS
Table of contents
Necessary preparations
PhoneCat tutorial app
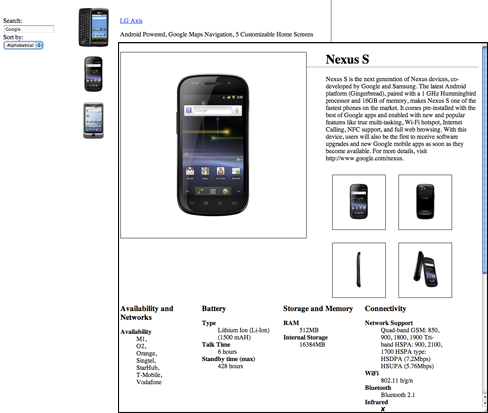
The best way to get in for AngularJS is to follow the tutorial, which takes you through the construction of an AngelJS web application. The app you'll build is a directory that shows a list of Android devices, allowing you to filter the list to see only the devices you're interested in, and then see the details of any device.
Follow this tutorial to see how Angel makes browsers smarter - you don't need native extensions or plug-ins:
- See an example of how to use client data binding to establish a dynamic view of the data that immediately changes itself in response to the user's actions.
- See how Angel keeps your view intact while syncing with your data, without DOM manipulation.
- Learn a better and easier way to test your web applications, using Karma and Protractor.
- Learn how to use dependency injection and services to create common web tasks, such as making it easier to get data in your app.
When you finish the tutorial, you will be able to:
- Create dynamic applications that work in modern browsers.
- Use data binding to connect your data module to your view.
- Create and run unit tests with Karma.
- Create and run end-to-end tests with Protractor.
- Move the app logic out of the template and into the control.
- Use the Angular service to get data from the server side.
- Use ngAnimate to apply animations to your app.
- Identify resources to learn more about AngelJS.
This tutorial will walk you through the process of building an application, including writing and running unit tests and end-to-end tests. The experiment at the end of each step gives you advice on learning more about AngelJS and the application you are building.
You can watch the entire tutorial in a few hours, or you might want to happily spend the day actually digging into it. If you're looking for a shorter introduction to Angel JS, read the Start documentation carefully.
Start
The rest of this page explains how you can set up your local machine for development. If you just want to read the tutorial, you can look directly at the first step: The first step boots the program.
The action code
You can follow this tutorial and fiddle with the code on your own computer. In this way, you can get hands-on practice of actually writing AngelJS code, and you can use the recommended testing tools.
The tutorial depends on which version of Git is used for the source code manager. In addition to installing and running a few pieces of git code, you don't need to know anything about Git, just follow this tutorial.
Install Git
You can
download http://git-scm.com/download Git
from the website. O
nce installed, you should be able to access
git
command line tool.
The main commands you will need are:
-
git clone ...: Clone a remote knowledge base to your local machine -
git checkout ...: Check for a specific branch or a tag version of the code to crack
Download angular-phonecat
Run the following command to clone the angular-phonecat repository placed on GitHub:
git clone --depth=14 https://github.com/angular/angular-phonecat.git
The command creates the
angular-phonecat
Turn your current
angular-phonecat
cd angular-phonecat
From now on, this tutorial instruction assumes that you run
angular-phonecat
directory.
Install the .js
If you want to run a pre-configured local web server and test tools, you'll also need node .js v0.10.27 plus.
You can download a Node http://nodejs.org/download/ package for your .js system.
Run the following command line to check the version of the Node .js installed:
node --version
In a Debian-based release, there is a name conflict with another utility, called
node
The recommended solution is to
nodejs-legacy
apt installation package, which
node
nodejs
apt-get install nodejs-legacy npm
nodejs --version
npm --versionOnce you've installed Node on your .js, you can download the tool by running the following code.
npm install
This command reads the package.json file
package.json
and downloads the following tools
node_modules
directory:
- Bower - Client Code Pack Manager
- Http-Server - Simple local static web server
- Karma - Unit test runr
- Protractor - End-to-end test runr
Running
npm install
also automatically use bower to download the Angular framework to the
app/bower_component
directory.
The project is preconfigured with some npm assistant scripts to make it easy to run common tasks that you need to use when developing:
-
npm startStart a local development Web server -
npm testStart the Karma unit test runr -
npm run protractorRun the Protractor end-to-end (E2E) test -
npm run update-webdriverthe drivers required for Protractor
Install assistant tools (optional)
Bower, Http-Server, Karma, and Protractor modules are also executable and can be installed globally or run directly from the terminal/command prompt. F
ollowing this tutorial, you don't need to install it, but if you decide that you really want to run them directly,
sudo npm install -g ...
to install these modules globally.
As an example, to install an executable Bower command line, you only need to enter the following instructions:
sudo npm install -g bower(Omit the sudo if running on Windows)
Then you can run the bower tool directly, as follows:
bower installRun the development Web server
Although anAngular application is client-only code and can open them directly from the file system in a web browser, it is best to supply them from an HTTP web server. In particular, for security reasons, many modern browsers do not allow JavaScript to initiate server requests if a Web page is loaded directly from the file system.
To host the application during development, configure the angular-phonecat project with a simple static web server. Run the following instructions to turn on the web server.
npm startThis will create a local web server that listens to port 8000 on your local machine. Now you can browse the app at this address:
http://localhost:8000/app/index.htmlRun unit tests
We use unit tests to make sure that the JavaScript code in our application runs correctly. U
nit testing focuses on a small isolated part of the application.
Unit tests are saved
test/unit
directory.
The angular-phonecat project is configured to use Karma to run the unit test for this application. Run the following instructions to start Karma.
npm test
This will start the Karma unit test run. K
arma will read the
test/karma.conf.js
This profile tells Karma to:
- Open a Chrome browser and connect it to Karma.
- All unit tests are performed in this browser
- Report the results of those tests in the terminal/command line window
- Observe the JavaScript files for all projects and re-run the test whenever there is a change
Finally let it run in the background all the time, because North will give you an instant callback about whether your change passed the unit test callback when you were working on the code.
Run end-to-end tests
We use end-to-end testing to ensure that the application runs as a whole. E nd-to-end testing is designed to test the entire application client application, especially if the test view is displayed correctly and behaves correctly. It runs in a browser by simulating the interaction of real users with real applications.
End-to-end tests are
test/e2e
directory.
The angular-phonecat project is configured to use Protractor to run end-to-end testing for applications. P rotractor relies on a set of drivers that allow it to interact with the browser. You can install these drivers by running the following code:
npm run update-webdriverYou only need to run it once.
Because Protactor works by interacting with running applications, we need to turn on our web server:
npm startThen in a separate terminal/command line window, we can run the Protractor test script for the application by running the following instructions:
npm run protractor
Protractor reads the
test/protractor-conf.js
file.
This profile requires Protractor to do:
- Open a Chrome browser and connect it to the app
- Perform all end-to-end tests in the browser
- Report those test results in the terminal/command line window
- Close the browser and exit
It's a good idea to run end-to-end testing whenever you make changes to the HTML view, or when you want to check that the application performs correctly as a whole. End-to-end testing is typically run before a new change is submitted to the remote knowledge base.
Now that you've tested your local machine, let's start this tutorial: Step 1 Boots.