9.1.2 Create a network session
May 24, 2021 That's what Linux should learn
RHEL and CentOS systems use NetworkManager by default to provide network services, a daemon that dynamically manages network configurations to keep network devices connected. Y ou can use the nmcli command to manage the Network Manager service. n mcli is a command-line-based network configuration tool with rich features and many parameters. It makes it easy to view network information or network status:
[root@linuxprobe ~]# nmcli connection show NAME UUID TYPE DEVICE eno16777736 ec77579b-2ced-481f-9c09-f562b321e268 802-3-ethernet eno16777736 [root@linuxprobe ~]# nmcli con show eno16777736 connection.id: eno16777736 connection.uuid: ec77579b-2ced-481f-9c09-f562b321e268 connection.interface-name: -- connection.type: 802-3-ethernet connection.autoconnect: yes c onnection.timestamp: 1487348994 connection.read-only: no connection.permissions: connection.zone: -- connection.master: -- connection.slave-type: -- connection.secondaries: connection.gateway-ping-timeout: 0 .................. O mit some of the output information... I n addition, the RHEL7 system supports network session functionality, allowing users to quickly switch between multiple profiles (much like the zone technology in firewalld firewall services). I f we need to manually specify the IP address of the network when we use a laptop on a corporate network, we will automatically assign the IP address using DHCP when we get home. This requires troublesome frequent modification of IP addresses, but with the network session feature, everything is much simpler - you can automatically switch network configuration information by simply activating the appropriate network session in a different usage environment.
You can use the nmcli command and create a network session in the format of "connect add con-name type ifname". Suppose you call a network session in a corporate network a company, a network session in a home network as a house, and now create their own network sessions in turn.
Use the con-name parameter to specify the network session name company used by the company, and then specify the network card name of the machine in turn with the ifname parameter (don't copy the eno167777736 on the copy), set the network session default not to be automatically activated, and manually specify the IP address of the network with the ip4 and gw4 parameters:
[root@linuxprobe ~]# nmcli connection add con-name company ifname eno16777736 autoconnect no type ethernet ip4 192.168.10.10/24 gw4 192.168.10.1 Connection 'company' (86c71220-0057-419e-b615-38f4014cfdee) successfully added. U se the con-name parameter to specify the name house of the network session used by the family. Because we want to automatically obtain an IP address from an external DHCP server, there is no need for manual designation here.
[root@linuxprobe ~]# nmcli connection add con-name house type ethernet ifname eno16777736 Connection 'house' (44acf0a7-07e2-40b4-94ba-69ea973090fb) successfully added. After you successfully create a network session, you can use the nmcli command to view all network sessions that you create:
(root@linuxprobe) nmcli connect show NAME UUID TYPE DEVICE HOUSE 44acf0a7-07e2-40b4-94ba-69ea973090fb 802-3-ethernet -- company 86c71220-0057-419e-b615-38f4014cfdee 802-802 3-ethernet -- eno16777736 ec77579b-2ced-481f-9c09-f562b321e268 802-3-ethernet eno16777736 Network sessions configured using the nmcli command are permanently effective, so that when we get home from work, the house network session can be enabled and the network card can automatically get the IP address through DHCP.
[root@linuxprobe ~]# nmcli connection up house Connection successfully activated (D-Bus active path: /org/freedesktop/NetworkManager/ActiveConnection/2) [root@linuxprobe ~]# ifconfig eno1677773628: flags=4163<UP,BROADCAST,RUNNING,MULTICAST> mtu 1500 inet 192.168.100.128 netmask 255.255.255.0 broadcast 192.168.100.255 inet6 fe80::20c:29ff:fec4:a409 p refixlen 64 scopeid 0x20<link> ether 00:0c:29:c4:a4:09 txqueuelen 1000 (Ethernet) RX packets 42 bytes 4198 (4.0 KiB) RX errors 0 dropped 0 overruns 0 frame 0 TX packets 75 bytes 10441 (10.1 KiB) TX errors 0 dropped 0 overruns 0 carrier 0 collisions 0 lo: flags=73<UP,LOOPBACK,RUNNING> mtu 65536 inet 127.0.0.1 netmask 255.0.0.0 inet6 ::1 prefixlen 128 scopeid 0x10<host L oop txqueuelen 0 (Local Loopback) RX packets 518 bytes 44080 (43.0 KiB) RX errors 0 dropped 0 overruns 0 frame 0 TX packets 518 Bytes 44080 (43.0 KiB) TX errors 0 dropped 0 overruns 0 carrier 0 collisions 0 If you are using a virtual machine, switch the network card (network adapter) of the virtual machine system to bridge mode, as shown in Figure 9-9. Then restart the virtual machine system.
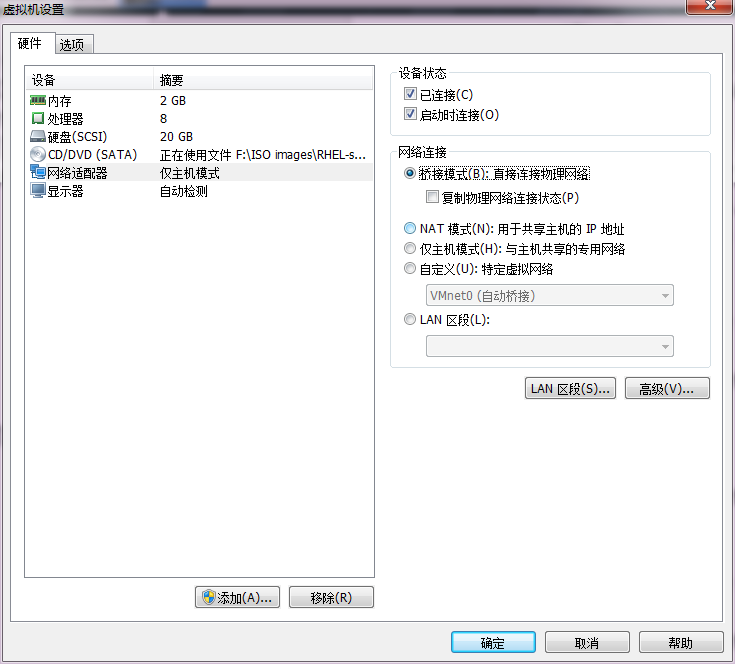
Figure 9-9 sets the mode of the virtual machine network card