git - a concise guide
Jun 01, 2021 Article blog
Table of contents
A concise guide to getting started with git, wood with deep content ;)
- Source: http://rogerdudler.github.io/git-guide/index.zh.html
- By Roger Dudler
- Thanks: @tfnico, @fhd and Namics
- If there is a leak, please report the problem at github

Installation
Create a new warehouse
Create a new folder, open it, and execute it
git initto create a new git repository.
Check out the warehouse
Perform the following command to create a clone version of the local repository:
git clone /path/to/repositoryIf it's a repository on a remote server, your command will look like this:
git clone username@host:/path/to/repository
Workflow
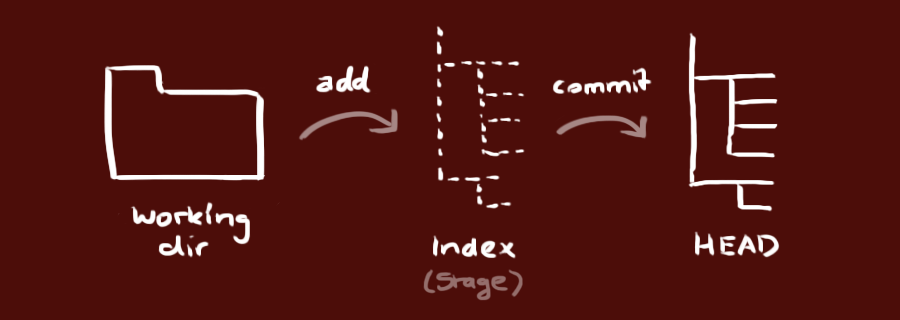
Your local warehouse consists of three "trees" maintained by git.
The first is your
工作目录
which holds the actual files, the second is
暂存区(Index)
which is like a cache area, temporarily saving your changes, and finally
HEAD
which points to the results of your last commit.
Add and submit
You can make changes (add them to the staging area) using the following command:
git add <filename>
git add *
This is the first step in git's basic workflow;
git commit -m "代码提交信息"Now, your changes have been committed to HEAD, but not to your remote repository.
Push changes
Your changes are now in HEAD in the local repository. Perform the following command to commit these changes to the remote repository:
git push origin masterYou can swap master for any branch you want to push.
If you haven't cloned an existing warehouse yet and want to connect your warehouse to a remote server, you can add it with the following command:
git remote add origin <server>This allows you to push your changes to the server you added.
branch
Branches are used to insulate feature development. W hen you create a warehouse, master is the "default" branch. Develop on other branches and merge them into the main branch when you're done.
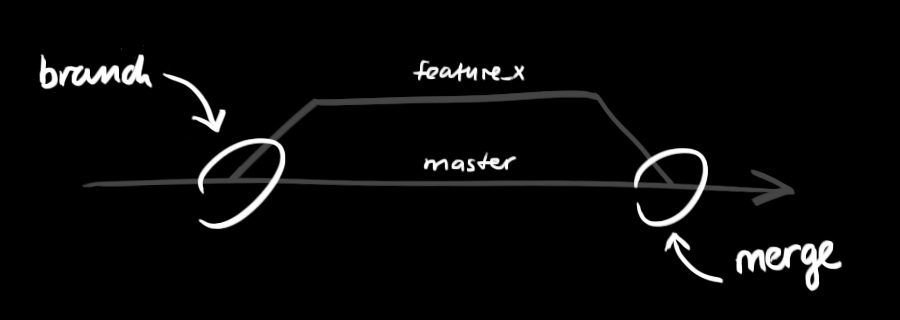
Create a branch called feature_x and switch past:
git checkout -b feature_xSwitch back to the main branch:
git checkout masterThen delete the new branch:
git branch -d feature_xUnless you push a branch to a remote repository, the branch is not seen by others:
git push origin <branch>
Update and merge
To update your local repository to the latest changes, perform:
git pullto get (fetch) in your working directory and merge (merge) changes at the far end. To merge other branches into your current branch, such as master, perform:
git merge <branch>In both cases, git tries to automatically merge changes. U nfortunately, this may not always succeed and conflicts may occur. T his is when you need to modify these files to manually merge these conflicts. Once you've changed, you'll need to execute the following commands to mark them as merged successfully:
git add <filename>Before merging changes, you can preview the differences using the following command:
git diff <source_branch> <target_branch>
label
Creating labels for software releases is recommended. T his concept already exists and is also present in SVN. You can create a label called 1.0.0 with the following command:
git tag 1.0.0 1b2e1d63ff1b2e1d63ff is the first 10 characters of the commit ID that you want to mark. You can get the commit ID using the following command:
git logYou can also use a smaller commit ID for the first few, as long as it points uniquely.
log
If you want to know the history of your local repository, the simplest command is to use:
git logYou can add some parameters to modify his output to get the result you want. Look only at a person's submission record:
git log --author=bobEach compressed commit record accounts for only one line of output:
git log --pretty=onelineOr you want to show all the branches through the tree structure of ASCII art, each with his name and label:
git log --graph --oneline --decorate --allSee which files have changed:
git log --name-statusThese are only a small fraction of the parameters you can use. For more information, see:
git log --help
Replace local changes
If you make an operational error (which, of course, is best never to happen), you can replace the local changes with the following command:
git checkout -- <filename>This command replaces the files in your working directory with the latest content in HEAD. Changes that have been added to the staging area, as well as new files, are not affected.
If you want to discard all your local changes and commits, you can go to the server to get the latest version history and point your local primary branch to it:
git fetch origin
git reset --hard origin/master
Practical tips
Built-in graphic git:
gitkColored git output:
git config color.ui trueWhen the history is displayed, only one line is displayed for each submitted information:
git config format.pretty onelineInteractively add files to the staging area:
git add -i
Links and resources
Graphical client
- GitX (L) (OSX, open source software)
- Tower (OSX)
- Source Tree (OSX, free)
- GitHub for Mac (OSX, free)
- GitBox (OSX, App Store)
Guides and manuals