Test HomeKitApp
May 22, 2021 HomeKit App Development guide
Table of contents
2. Add smart appliances (accessories)
3. Add services to smart appliances (accessories).
4. Add attributes to the service
5. Add smart appliances (accessories) to your home with your app
6. Control of smart appliances (accessories)
8. Add smart appliance accessories to the virtual bridge interface
9. Add a virtual bridge interface to home in your app
10.. Controls the smart appliances at the bottom of the virtual bridge interface
Test HomeKitApp
If you don't have smart appliances (smart accessories), you can use HomeKit Accessroy Simulator to simulate smart appliances in home. E ach analog accessory has services and features that you can control from your app. Y our app creates objects and relationships in the HomeKit database. I t creates a home layout, adds new accessories to a simulated home environment, and finally adds smart accessories to each room in home. Y our app can then control these analog smart accessories shown at HomeKit Accessory Simulator. To use HomeKit Accessory Simulator, run your app in the iOS emulator, or use Xcode to run the app on your iOS device.
HomeKit Accessory Simulator is an additional developer tool, but it is not installed in Xcode. Follow The installation of HomeKit Accessory Simulator as described in Download HomeKit Accessory Simulator.
Add smart appliances (accessories)
Use HomeKit Accessory Simulator to add smart appliances to your analog network.
Add smart appliance accessories to your network, follow these steps:
- In HomeKit Accessory Simulator, click the button on the bottom left.
- Select Add Accessory from the pop-up menu.
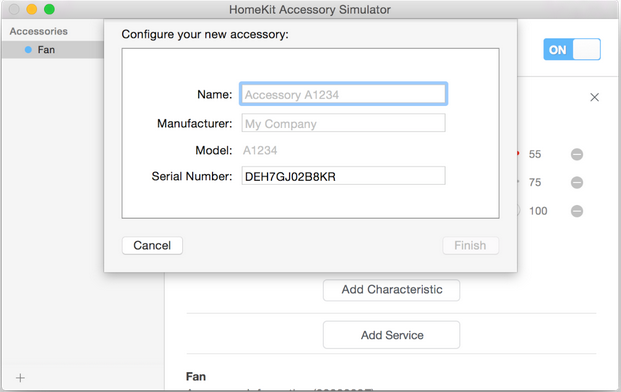
- Enter the name and manufacturer of the smart appliance.
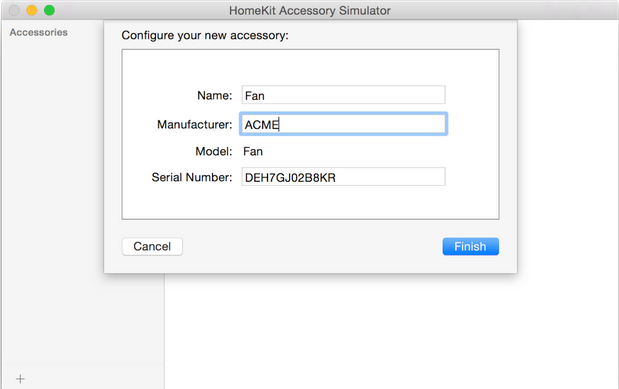
- Click to finish
If you want to delete a smart appliance, select a smart appliance and click the Delete key on the keyboard.
Add services to smart appliances (accessories).
A smart appliance requires a service and feature that you can control from the app. Select a service from a list of predefined services and customize the features.
Follow these steps to add services to the smart appliance
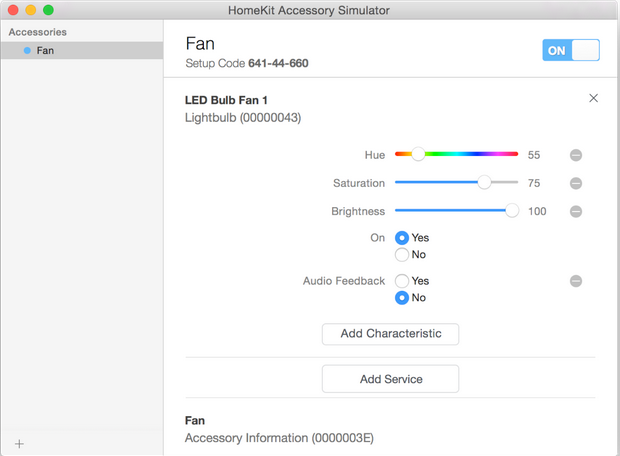
1. In HomeKit Accessory Simulator, select an accessory in the Accessories column.
The service information for the accessory is displayed in a detailed interface.
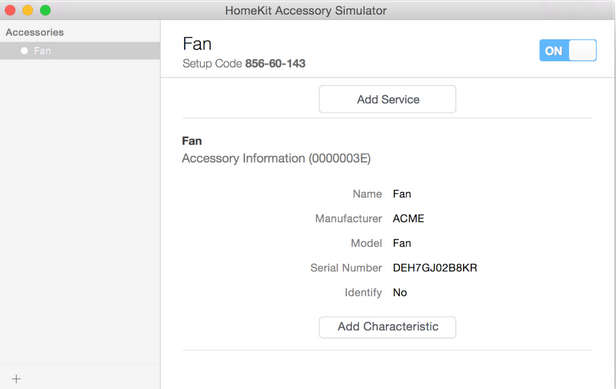
Note: All smart appliances have an Accessory Information that appears below all other services. You can add features to this Accessory Information service, but you can't remove the default features.
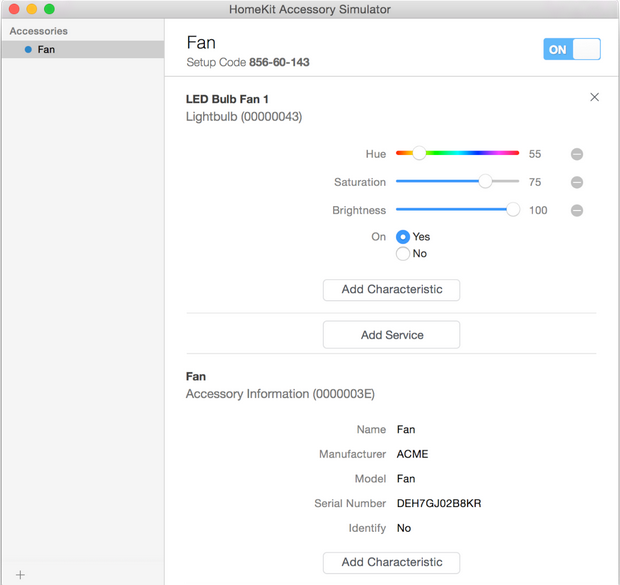
2. Click Add Service and select a service type from the pop-up view.
The newly added service is displayed in detail on the right. H omeKit Accessory Simulator creates common features for each service. F or example, the default characteristics of a lighting service are Hue, Saturation, Brightness, and switches. ( The switching and power state characteristics are the same, as described in Accessing Values of Features.) S ome features are mandatory and some are optional. For example, switching characteristics are mandatory, while color, saturation, and brightness are optional.
Add attributes to the service
You can add predefined attributes to a service, or customize features. You can only add one for each feature.
Follow these steps to add features to the service:
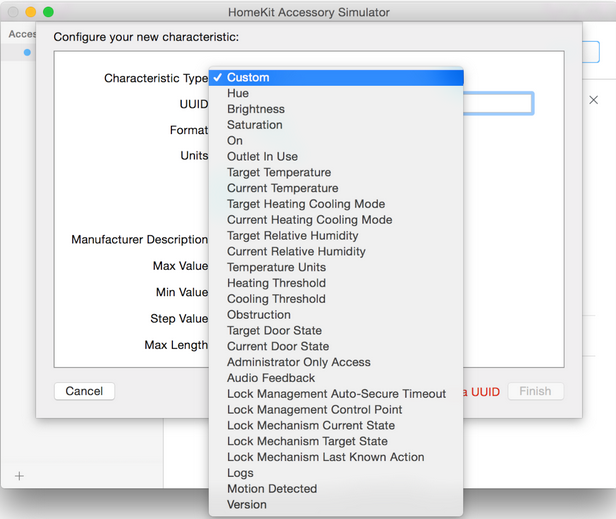
- In HomeKit Accessory Simulator, the service details view, click Add Feature
- In the attribute type menu, select a type or custom type.
- Enter additional information about this feature in other text boxes and click Finish. The newly added feature is shown in the detailed view.
Click the minus sign to the right of the feature to remove a feature. I f the feature does not have a minus sign to the right, this indicates that the feature is necessary for this service. For example, you can remove hue, saturation, and brightness from the light service, but you can't remove the switch feature.
Add smart appliances (accessories) to your home with your app
After you've created a smart appliance with HomeKit Accessory Simulator, run your app and add a new smart appliance to your home.
How to pair smart appliances in your home:
-
In Xcode, click Run and call addAccessory:completeHandler: Method (as described in Add Accessories to Homes and Rooms).
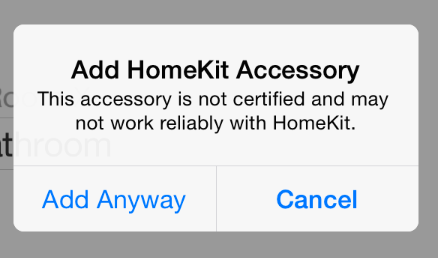
- If an Add HomeKit Accessory dialog box pops up declaring that the smart appliance is not trusted (which is allowed in HomeKit Accessory Simulator), leave it unsaled and click Add Anyway.
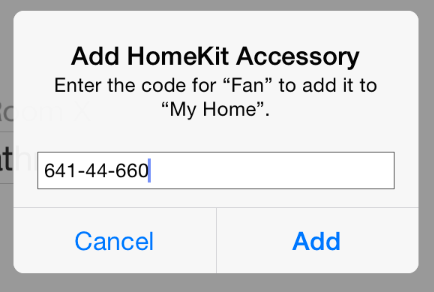
- In the Add HomeKit Accessory dialog box that appears next, enter the setup code for the smart appliance and click Add.
At HomeKit Accessory Simulator, setup code appears under the name of the smart appliance in the details interface.
Read Create Homes and Add Accessoris for how to write code to add a smart appliance to your home and room.
Control of smart appliances (accessories)
In HomeKit Accessory Simulator, you can get a smart appliance service and set the service's feature values in other HomeKit apps to simulate controlling the smart appliance, or manually simulate controlling the smart appliance.
To control a smart appliance you need:
- Select a smart appliance in the Accessories column in HomeKit Accessory Simulator. The services and features of this smart appliance are displayed in the details interface.
- A control that manipulates an attribute to change its value.
For example, to change the color (Hue), saturation, and brightness of a bulb, slide the slider. In order to turn on this bulb, select the On option.
If your app shows features of a service, such as the switching state of a light bulb, it should update the view when you change the values of those features in HomeKit Accessory Simulator.
To see how the HomeKit database changes, read Observing HomeKit Database Changes. If you want to control a smart appliance by writing code from an app, read Accessing Services and Features.
Add a bridge interface
To simulate smart appliances that do not support the HomeKit Accessory Protocol protocol, you need to add a virtual bridge interface and then add the smart appliance to the virtual bridge interface. Configuring the smart appliances at the bottom of the virtual bridge interface is similar to configuring other types of smart appliances.
Add a virtual bridge interface to the network
Add a smart appliance that represents this virtual bridge interface.
In order to add a virtual bridge interface to the network you need:
- In HomeKit Accessory Simulator, click the "plus" button at the bottom of the list of smart appliances.
- Select the Add virtual bridge interface in the pop-up box.
- Enter the name and manufacturer of a smart appliance.
- Click to finish
Add smart appliance accessories to the virtual bridge interface
One or more smart appliances can be added to a virtual bridge interface.
In order to add a smart appliance to a virtual bridge interface, you need to:
- In the list to the left of HomeKit Accessory Simulator, select a virtual bridge interface in the virtual bridge interface.
- Select Add Accessory on the details page.
- Enter the name and manufacturer of a smart appliance.
- Click to finish.
To learn more about smart appliances in the virtual bridge interface, select smart appliances in the virtual bridge interface section. I f needed, you can click on the view details next to the virtual bridge interface to view the smart appliances for this virtual bridge interface. A fter you add a service and feature to these smart appliances, as described in Adding Services to Accessories and Adding Characteristics to Services. They will be shown after the virtual bridge interface is selected.

Add a virtual bridge interface to home in your app
The process of matching a virtual bridge interface with a home is the same as configuring a smart appliance to a home, as described in Add Accessories to a Home in Your App. Smart electrical accessories at the bottom of the virtual bridge interface are also added to home, as described by Add Bridges to Homes and Rooms.
Controls the smart appliances at the bottom of the virtual bridge interface
The steps for controlling the smart appliances at the bottom of the virtual bridge interface are consistent with the steps for direct control of the smart appliances, as described in Controlling Accessories in HomeKit Accessory Simulator, except that you select the smart appliances directly under the virtual bridge interface.
Test in a multi-device and multi-user environment
In iOS Emulator you can't test sharing a HomeKit database to multiple iOS devices and users. Y ou should install your app to multiple iOS devices, enter your iCloud certificate in those devices, and then run your app. Or, use the ad hoc license to test your app on multiple enrollment devices, as described in Distributing Your App Using Ad Hoc Provisioning in App Distribution Guide.
- To test a single-user multi-device environment, you should use the same iCloud account to log on to multiple devices.
- To test smart appliances that multi-user use in the same home, you should log in with different iCloud accounts on multiple devices.
Your app should allow a user to invite guests to your home, as described by Managing Users.