WeChat small program cloud development database
May 20, 2021 WeChat Mini Program Development Document
Table of contents
As described in The Basic Introduction to Cloud Development Databases, Cloud Development provides a JSON database, and this chapter describes the following:
- Get started: Create my first collection with the console and insert my first data
- Data type: Understand the type of data provided by the database
- Permission control: Controls the read and write permissions of collections and records
- Initialization: Initialize the database API
- Insert the data
- Read data: Read data
- Build query conditions: Build simple or complex query conditions
- Update data: Local and replacement updates to data
- Delete the data
- Index management: Add an index to a field for efficient read and write
You can also refer to the database API documentation on the small terminal and the cloud function side
Get started with the cloud database
In this section, we'll show you how to create our first database collection in the console, insert data into the collection, and view the data just inserted in the console.
Create the first collection
Open the console, select the Database tab, and create a collection through the Add Collections portal. S uppose we're going to create a to-do gadget, and we're going to create a collection called todos. Once created, you can see the todos collection management interface, where we can add records, find records, manage indexes, and manage permissions.

Create the first record
The console provides an interactive interface for visualizing the addition of data, clicking "Add Records" to add our first to-do:
{
  // 描述,String 类型
  "description": "learn mini-program cloud service",
  // 截止时间,Date 类型
  "due": Date("2018-09-01"),
  // 标签,Array 类型
  "tags": [
    "tech",
    "mini-program",
    "cloud"
  ],
  // 个性化样式,Object 类型
  "style": {
    "color": "red"
  },
  // 是否已完成,Boolean 类型
  "done": false
}
Once added, you can see the data you just added in the console.
Import the data
The cloud console supports uploading files to import existing data, so check out the import guidelines to learn how.
Next, let's look at what data types are available in the next database.
The data type
The cloud development database provides the following data types:
- String: String
- Number: Numbers
- Object: Object
- Array: Array
- Bool: Boolean value
- GeoPoint: Location point
- Date: Time
- Null
Below are a few fields that require additional instructions to do the next additional instructions.
Date
The Date type is used to represent time, accurate to milliseconds, and can be created on a small program side using JavaScript's built-in Date object. I t is important to note that the time created on the small terminal is client time, not service-side time, which means that the time on the small terminal does not necessarily coincide with the service-side time, if you need to use the serverDate object provided in the API, you should use the serverDate object provided in the API to create a service-side current time tag, when the request using the serverDate object arrives at the service-side processing, the field will be converted to the service-side current time, and even better, we are constructing ServerDate objects can also mark an offset millisecond offset time by passing in an object with an offset field, so that we can achieve, for example, the effect of specifying a field as the service side time for an hour later.
So when we need to use client time, is storing date objects and storing milliseconds the same effect? No, our database has optimizations for date types, and it is recommended that you construct time objects with Date or serverDate when using them.
GeoPoint
The GeoPoint type is used to represent geographic location points and uniquely marks a point with longitude and latitude, which is a special data storage type. Note that if you need to look for fields of type geographic location, be sure to index geographic locations.
Specific geo-location APIs can be referenced in the Geo API documentation
Null
null is equivalent to a placeholder, indicating that a field exists but the value is empty.
Permission control
The permissions of the database are divided into the small terminal and the management side, which includes the cloud function side and the console. T he small terminal runs in the small program, the read and write database is restricted by the permission control, the management side runs on the cloud function, has all the permissions to read and write the database. T he cloud console has the same permissions as the management side and has all the permissions. Small terminal operating databases should be subject to strict security rules.
Initially, we opened the following permission configurations to the operational database, each of which can have a permission configuration, and the rules for the permission configuration are applied to each record of the collection. F or ease of use and security reasons, cloud development does a deep integration of small programs for cloud databases, and each database record created in a small program carries information about the creator of the record (that is, the user of the applet) and holds the user's openid in the _openid field in each record created by the corresponding user. As a result, permission control is expanded around whether a user should have permission to manipulate data created by other users.
The following is arranged from wide to tight by permission level:
- Only the creator can write, everyone can read: the data can only be written by the creator, everyone can read;
- Only creators can read and write: data can only be read and written by the creator, and other users are not readable and written;
- Only the management side can be written, everyone can read: the data can only be written by the management side, everyone can read;
- Management-only readable and writeable: This data is read-and-write only on the management side;
In short, the management side always has permission to read and write all the data, the small terminal can never write data created by others, the small terminal record read and write permissions are actually divided into "all people readable, only the creator can write," "only the creator can read and write," "all people read, only the management side can write," "all people are unreadable, only the management side readable."
For a user, the permissions of different patterns on the small and administrative side are as follows:
| Mode |
Small terminal
Read the data you created |
Small terminal
Write the data you created |
Small terminal
Read data created by others |
Small terminal
Write data created by others |
The management side
Read and write any data |
|---|---|---|---|---|---|
| Only the creator can write, everyone can read | √ | √ | √ | × | √ |
| Only creators can read and write | √ | √ | × | × | √ |
| Only the management side is writeable and readable by everyone | √ | × | √ | × | √ |
| Management-only readable and writeable: This data is readable and write-only to the management side | × | × | × | × | √ |
Collection permissions should be set with caution to prevent oversthrese.
Initialization
Before you can start using the database API for addition and deletion, you need to get a reference to the database. The following calls get a reference to the database of the default environment:
const db = wx.cloud.database()
To get a database reference to another environment, you can pass in an object parameter at the time of the call, where the env field specifies the environment to use. The method returns a reference to the test environment database.
Example: If you have an environment called test that you use as a test environment, you can get the test environment database as follows:
const testDB = wx.cloud.database({
  env: 'test'
})
To manipulate a collection, you first need to get a reference to it. Once you have obtained a reference to the database, you can get a reference to a collection through the collection method on the database reference, such as a collection of to-do lists:
const todos = db.collection('todos')
Getting a reference to a collection does not initiate a network request to pull its data, and we can use this reference to add and censor on the collection, in addition to obtaining a reference to a record in the collection with a specified ID through the doc method on the collection. Similarly, references to records can be used to update and delete specific records.
Suppose we have a to-do ID of todo-identifiant-aleatoire, then we can get its reference by the doc method:
const todo = db.collection('todos').doc('todo-identifiant-aleatoire')
Next, let's look at how to insert data into the collection.
Insert the data
You can insert a record into a collection by calling the add method on the collection object. Or use an example of a to-do list, such as when we want to add a to-do list:
db.collection('todos').add({
  // data 字段表示需新增的 JSON 数据
  data: {
    // _id: 'todo-identifiant-aleatoire', // 可选自定义 _id,在此处场景下用数据库自动分配的就可以了
    description: "learn cloud database",
    due: new Date("2018-09-01"),
    tags: [
      "cloud",
      "database"
    ],
    // 为待办事项添加一个地理位置(113°E,23°N)
    location: new db.Geo.Point(113, 23),
    done: false
  },
  success: function(res) {
    // res 是一个对象,其中有 _id 字段标记刚创建的记录的 id
    console.log(res)
  }
})
Of course, the Promise style is also supported, and as long as there is no success, fail, or complete in the incoming object, the add method returns a Promise:
db.collection('todos').add({
  // data 字段表示需新增的 JSON 数据
  data: {
    description: "learn cloud database",
    due: new Date("2018-09-01"),
    tags: [
      "cloud",
      "database"
    ],
    location: new db.Geo.Point(113, 23),
    done: false
  }
})
.then(res => {
  console.log(res)
})
Both callback style and Promise style calls are supported by the database's add-and-delete API.
After the creation is successful, we can see the new data in the console.
The full API definition can be found in the add API documentation.
Next, we'll learn how to use the API to query the data you just inserted.
Read the data
Both records and collections have data that provides a get method for getting multiple records in a single record or collection.
Suppose we already have a collection todos that contains the following format records:
[
  {
    _id: 'todo-identifiant-aleatoire',
    _openid: 'user-open-id', // 假设用户的 openid 为 user-open-id
    description: "learn cloud database",
    due: Date("2018-09-01"),
    progress: 20,
    tags: [
      "cloud",
      "database"
    ],
    style: {
      color: 'white',
      size: 'large'
    },
    location: Point(113.33, 23.33), // 113.33°E,23.33°N
    done: false
  },
  {
    _id: 'todo-identifiant-aleatoire-2',
    _openid: 'user-open-id', // 假设用户的 openid 为 user-open-id
    description: "write a novel",
    due: Date("2018-12-25"),
    progress: 50,
    tags: [
      "writing"
    ],
    style: {
      color: 'yellow',
      size: 'normal'
    },
    location: Point(113.22, 23.22), // 113.22°E,23.22°N
    done: false
  }
  // more...
]
Gets the data for a record
Let's first look at how to get data for a record, assuming we already have a record on the collection todos with an ID of todo-identifiant-aleatoire, then we can get the data for this to-do by calling the get method by reference to that record:
db.collection('todos').doc('todo-identifiant-aleatoire').get({
  success: function(res) {
    // res.data 包含该记录的数据
    console.log(res.data)
  }
})
You can also call it in Promise style:
db.collection('todos').doc('todo-identifiant-aleatoire').get().then(res => {
  // res.data 包含该记录的数据
  console.log(res.data)
})
Get data for multiple records
We can also get multiple records at once. You can specify a query condition by calling the where method on the collection, and then calling the get method to return only records that meet the specified query criteria, such as getting all the outstanding to-dos of the user:
db.collection('todos').where({
  _openid: 'user-open-id',
  done: false
})
.get({
  success: function(res) {
    // res.data 是包含以上定义的两条记录的数组
    console.log(res.data)
  }
})
Where method receives an object parameter, each field in the object and its value constitute a matching condition to be satisfied, and the relationship between the fields is a "and" relationship, which is required to satisfy these matching criteria at the same time, in this case, to query the record in the todos collection where _openid is equal to user-open-id and done is equal to false. In query conditions we can also specify values that match a nested field, such as finding our own to-dos marked yellow:
db.collection('todos').where({
  _openid: 'user-open-id',
  style: {
    color: 'yellow'
  }
})
.get({
  success: function(res) {
    console.log(res.data)
  }
})
You can also use "point notation" to represent nested fields:
db.collection('todos').where({
  _openid: 'user-open-id',
  'style.color': 'yellow'
})
.get({
  success: function(res) {
    console.log(res.data)
  }
})
Gets the data for a collection
If you want to get data from a collection, such as getting all the records on a todos collection, you can call the get method on the collection, but this is generally not recommended, and in a small program we need to try to avoid getting too much data at once, only the necessary data. T o prevent misoperation and protect the small program experience, the server defaults once when acquiring collection data and returns up to 20 records, which is 100 on the cloud function side. Developers can specify the number of records that need to be obtained through the limit method, but the small terminal cannot exceed 20 and the cloud functional side cannot exceed 100.
db.collection('todos').get({
  success: function(res) {
    // res.data 是一个包含集合中有权限访问的所有记录的数据,不超过 20 条
    console.log(res.data)
  }
})
You can also call it in Promise style:
db.collection('todos').get().then(res => {
  // res.data 是一个包含集合中有权限访问的所有记录的数据,不超过 20 条
  console.log(res.data)
})
The following is an example of getting all records in a collection on the cloud function side, because there is a limit of up to 100 at a time, so it is likely that a request cannot take out all the data and needs to be taken in batches:
const cloud = require('wx-server-sdk')
cloud.init()
const db = cloud.database()
const MAX_LIMIT = 100
exports.main = async (event, context) => {
  // 先取出集合记录总数
  const countResult = await db.collection('todos').count()
  const total = countResult.total
  // 计算需分几次取
  const batchTimes = Math.ceil(total / 100)
  // 承载所有读操作的 promise 的数组
  const tasks = []
  for (let i = 0; i < batchTimes; i++) {
    const promise = db.collection('todos').skip(i * MAX_LIMIT).limit(MAX_LIMIT).get()
    tasks.push(promise)
  }
  // 等待所有
  return (await Promise.all(tasks)).reduce((acc, cur) => {
    return {
      data: acc.data.concat(cur.data),
      errMsg: acc.errMsg,
    }
  })
}
Next, we'll learn how to use advanced query criteria to complete simple or complex queries.
Build query criteria
Using the where method provided by the database API, we can construct complex query conditions to accomplish complex query tasks.
Query instructions
Assuming that we need to query to-do items with progress greater than 30%, the way the incoming object represents an equal match cannot be satisfied, and the query instruction is used. T he database API provides a variety of query instructions, large or smaller, that are exposed to db.command objects. For example, query to-do items with progress greater than 30%:
const _ = db.command
db.collection('todos').where({
  // gt 方法用于指定一个 "大于" 条件,此处 _.gt(30) 是一个 "大于 30" 的条件
  progress: _.gt(30)
})
.get({
  success: function(res) {
    console.log(res.data)
  }
})
The API provides the following query instructions:
| Query instructions | Description |
|---|---|
| eq | Equals |
| neq | Not equal to |
| lt | Less than |
| Lte | Less than or equal to |
| gt | Greater than |
| gte | Is greater than or equal to |
| in | The field value is in a given array |
| nin | The field value is not in a given array |
Specific query instructions API documentation can be referenced to the database API documentation.
Logical instructions
In addition to specifying a field to meet a condition, we can also query to-do items with progress between 30% and 70% by specifying a field that needs to meet multiple conditions at the same time:
const _ = db.command
db.collection('todos').where({
  // and 方法用于指定一个 "与" 条件,此处表示需同时满足 _.gt(30) 和 _.lt(70) 两个条件
  progress: _.gt(30).and(_.lt(70))
})
.get({
  success: function(res) {
    console.log(res.data)
  }
})
Now that there is and, of course, there are ors, for example, to-do items with a progress of 0 or 100:
const _ = db.command
db.collection('todos').where({
  // or 方法用于指定一个 "或" 条件,此处表示需满足 _.eq(0) 或 _.eq(100)
  progress: _.eq(0).or(_.eq(100))
})
.get({
  success: function(res) {
    console.log(res.data)
  }
})
If we need to do "or" across fields, can we do it? The answer is yes, or the instruction can also be used to accept multiple (up to two) query criteria, indicating that any of the multiple query criteria need to be met, such as to-do items where our query progress is less than or equal to 50% or the color is white or yellow:
const _ = db.command
db.collection('todos').where(_.or([
  {
    progress: _.lte(50)
  },
  {
    style: {
      color: _.in(['white', 'yellow'])
    }
  }
]))
.get({
  success: function(res) {
    console.log(res.data)
  }
})
Specific logical query instructions API documentation can be referenced to the database API documentation.
Next, let's learn how to update the data.
Update the data
Now let's look at how to use the database API to complete the data update.
There are two main ways to update data:
| Api | Description |
|---|---|
| update | Locally update one or more records |
| set | Replace and update a record |
Local updates
Using the update method, you can locally update a record or a record in a collection, which means that only the specified fields are updated and the other fields are not affected.
For example, we can put a to-do item as complete with the following code:
db.collection('todos').doc('todo-identifiant-aleatoire').update({
  // data 传入需要局部更新的数据
  data: {
    // 表示将 done 字段置为 true
    done: true
  },
  success: function(res) {
    console.log(res.data)
  }
})
In addition to updating fields with specified values, the database API provides a series of update instructions for more complex update operations, which can be obtained through db.command:
| Update the instruction | Description |
|---|---|
| set | Set the field to specify a value |
| remove | Delete the field |
| inc | Atomic self-increase field value |
| mul | Atomic self-multiplication field value |
| push | If the field value is an array, add the specified value to the end of the array |
| pop | If the field value is an array, remove an element from the end of the array |
| shift | If the field value is an array, remove an element from the head of the array |
| unshift | If the field value is an array, add the specified value to the head of the array |
For example, we can put the progress of a to-do item by 10%:
const _ = db.command
db.collection('todos').doc('todo-identifiant-aleatoire').update({
  data: {
    // 表示指示数据库将字段自增 10
    progress: _.inc(10)
  },
  success: function(res) {
    console.log(res.data)
  }
})
The advantage of using the inc instruction instead of taking out the value and adding 10 to it is that the write is an atomic operation and will not be affected by the co-write, for example, two users, A and B, take the same field value and then add 10 and 20 to the database, respectively, and the end result of the field will be 20 instead of 30. You won't have this problem if you use the inc directive.
If the field is an array, then we can use push, pop, shift, and unshift to update the array atomically, such as tagging a to-do item:
const _ = db.command
db.collection('todos').doc('todo-identifiant-aleatoire').update({
  data: {
    tags: _.push('mini-program')
  },
  success: function(res) {
    console.log(res.data)
  }
})
Perhaps the reader has noticed that we have provided the set instruction, what is the use of this instruction? T he use of this instruction is to update the value of one field to another object. For example, the following statement is to update the style.color field to 'blue' instead of updating the style field to the object of 'color: 'blue':
const _ = db.command
db.collection('todos').doc('todo-identifiant-aleatoire').update({
  data: {
    style: {
      color: 'blue'
    }
  },
  success: function(res) {
    console.log(res.data)
  }
})
If you need to update this style field to another object, you can use the set directive:
const _ = db.command
db.collection('todos').doc('todo-identifiant-aleatoire').update({
  data: {
    style: _.set({
      color: 'blue'
    })
  },
  success: function(res) {
    console.log(res.data)
  }
})
If you need to update multiple data, you need to operate on the Server side (cloud function), and the same call to the update method after the where statement, such as a 10% increase in the progress of all outstanding to-do items:
// 使用了 async await 语法
const cloud = require('wx-server-sdk')
const db = cloud.database()
const _ = db.command

exports.main = async (event, context) => {
  try {
    return await db.collection('todos').where({
      done: false
    })
    .update({
      data: {
        progress: _.inc(10)
      },
    })
  } catch(e) {
    console.error(e)
  }
}
More complete and detailed update instructions can be referred to the database API documentation
Replace the update
If you need to replace an updated record, you can use the set method on the record, and replacing the update means replacing the specified record with an incoming object:
const _ = db.command
db.collection('todos').doc('todo-identifiant-aleatoire').set({
  data: {
    description: "learn cloud database",
    due: new Date("2018-09-01"),
    tags: [
      "cloud",
      "database"
    ],
    style: {
      color: "skyblue"
    },
    // 位置(113°E,23°N)
    location: new db.Geo.Point(113, 23),
    done: false
  },
  success: function(res) {
    console.log(res.data)
  }
})
If the record with the specified ID does not exist, the record is automatically created and the record will have the specified ID.
Next, we'll learn how to delete records together.
Delete the data
Let's see how we use the database API to complete data deletion.
Delete a record
Use the remove method for records to delete the record, such as:
db.collection('todos').doc('todo-identifiant-aleatoire').remove({
  success: function(res) {
    console.log(res.data)
  }
})
Delete multiple records
If you need to update multiple data, you need to operate on the Server side (cloud function). M ultiple records can be deleted by selecting a where statement, and only records that have permission to be deleted are deleted. For example, delete all completed to-dos:
// 使用了 async await 语法
const cloud = require('wx-server-sdk')
const db = cloud.database()
const _ = db.command

exports.main = async (event, context) => {
  try {
    return await db.collection('todos').where({
      done: true
    }).remove()
  } catch(e) {
    console.error(e)
  }
}
In most cases, we want users to be able to manipulate only their own data (their own representative matters) and not other people's data (other people's to-dos), which requires the introduction of permission control.
Next, let's look at how to control the read and write permissions of collections and records to protect your data.
Index management
Indexing is an important means to ensure database performance and program experience. W e should index all the fields that need to be query criteria. The indexed portal is in the console, where you can index the fields of each collection individually.
Single-field index
For fields that need to be filtered as query criteria, we can create a single-field index. I f you need to index nested fields, you can connect the names of nested fields with points through Point Notation. For example, when we need to index the color field in a record in the following format, we can use style.color.
{
  _id: '',
  style: {
    color: ''
  }
}
When you set up a single-field index, it doesn't matter if you specify that the sort is ascending or descending. When you need to sort the index fields, the database is able to sort the fields correctly, regardless of whether the index is set to ascending or descending.
The combined index
A combined index is an index that contains multiple fields. W hen a query condition uses a field that is included in all fields or prefix fields defined by the index, the index is hit to optimize query performance. The index prefix is the first 1 to more fields defined in the fields of the combined index, and if there are composite indexes A, B, C, and three fields defined in A, B, C, then A and A, B all belong to the prefix of the index.
The combined index has the following characteristics:
1. The order of the fields determines the effect of the index
When you define a combined index, you have different index effects when you have different orders between fields. F or example, two fields, A and B, are indexed, and the combined index is defined as A, and B is different from the combined index is B, and A is different. W hen the combined index is defined as A, B, the index is sorted by A field and then by B field. S o when the combined index is set to A, B, even if we don't index field A separately, queries to field A can hit the A, B index. It is important to note that the query for field B cannot hit the A, B index at this time because B does not belong to one of the prefixes of index A, B.
2. Field sorting determines whether the sort query can hit the index
Join us in indexing fields A and B as follows:
A: 升序
B: 降序
So when our query needs to sort A, B, we can specify that the sort result is A ascending B descending or A descending B ascending, but not A ascending B ascending or A descending B descending.
Index property
Uniqueness limitations
When you create an index, you can specify an increase in uniqueness limits, and an index with uniqueness limits requires that the indexed collection cannot have two records with the same value of the indexed field. T hat is, for any index I with uniqueness restrictions, assuming that its index fields are slt;F1, F2, ..., Fn,, then for any two records in collection S, R1 and R2, the condition R1 must be met. F 1 != R2. F 1 && R1. F 2 != R2. F 2 && ... & amp;& R1.Fn != R2.Fn。 It is important to note that if a field does not exist in the record, its value defaults to null for the index field, and if the index has a uniqueness limit, two or more records with the field are not allowed to be empty / the field does not exist.
Select Unique when the index is created to add uniqueness restrictions.
Database import
The cloud development console supports importing existing data from files. Currently, only file data in CSV and JSON formats is supported.
To import data, open the cloud development console, switch to the Database tab, and select the collection of data to import, click the "Import" button.
Select the CSV or JSON file to import, as well as conflict handling mode, and click the "Import" button to start importing.
The file format
JSON, CSV files must be encoded in UTF-8 and have content similar to MongoDB's export format, such as:
Json:
{
    "_id": "xxxxxx",
    "age": 45
}
{
    "_id": "yyyyyy",
    "age": 21
}
Csv:
_id,age
xxxxxx,45
yyyyyy,21
The following points need to be noted:
1, JSON data is not an array, but similar to JSON Lines, that is, the individual record objects are separated by the use of . . . instead of commas;
2, JSON data each key value pair of the key name can not be ., such as ".a", "abc.", and can not contain more than one consecutive ., for example, "a.. b";
3, the key name can not be repeated, and can not be ambiguous, for example, "a": 1, "a": 2" or "a": "b": 1", "a.b": 2;
4, the time format must be ISODate format, such as "date": "$date": "2018-08-31T17:30:00.882Z";
5, when using Insert conflict processing mode, the same file can not have duplicate _id field, or the same as the database _id field;
6, CSV format data by default to the first row as the import of all key names, the remaining row is the first row key name one-to-one corresponding key value records.
Insert and Upsert are currently available in two conflict-handling modes. Insert mode always inserts a new record when imported, and Upsert determines if there is a record, and if so, updates the record, or a new record is inserted.
Once the import is complete, you can see this import record in the prompt message.
Database export
The cloud development console supports exporting data that already exists in the collection. Currently, only file data in CSV and JSON formats is supported for export.
To export data, open the cloud development console, switch to the Database tab, and select a collection of data to export, click on the Export link.
Select the format to export, where to save, and the fields, and click the "Export" button to begin the export process.
When you select the export format as JSON, all data is exported by default if the field item is not filled in.
When the export format is selected as CSV, the field is required. Fields are separated by English commas, such as:
_id,name,age,genderDatabase backup and back file
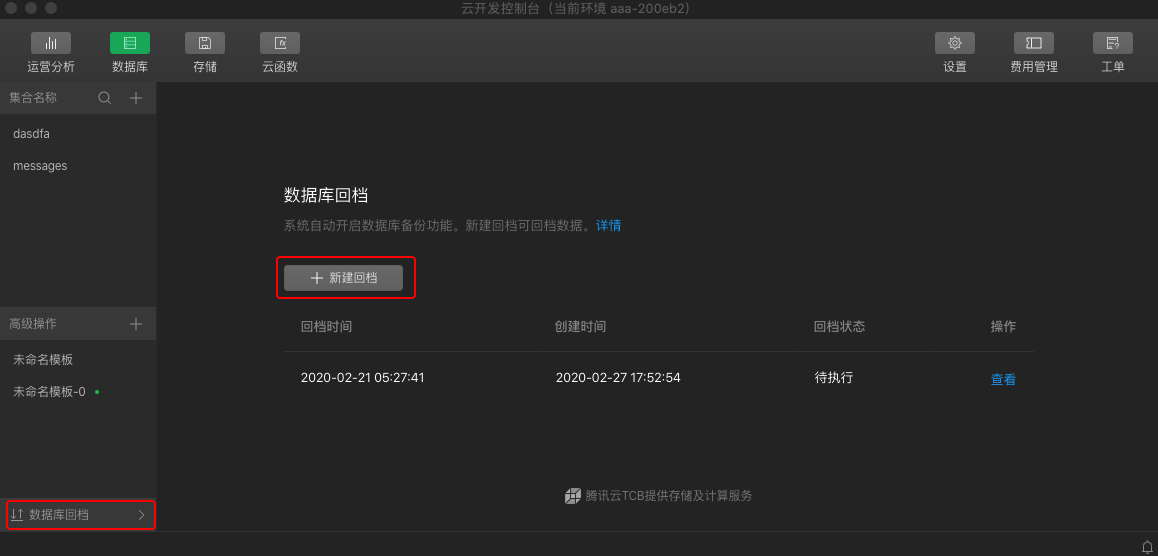
Starting with developer tool version 1.02.202002282, cloud development provides database back-up capabilities. D atabase backups are automatically turned on and are automatically backed up every morning for up to 7 days. If necessary, developers can return the collection to a specified point in time by creating a new backshift task on the cloud console.
Data access to the database is not affected during back-file. When the backsliding is complete, developers can see the original database collection and the post-reverse collection in the collection list.
Create a new backshift
- Sign in to the cloud development console of WeChat Developer Tools.
- Once you click on the database back file on the database page, you can create a new back file task.
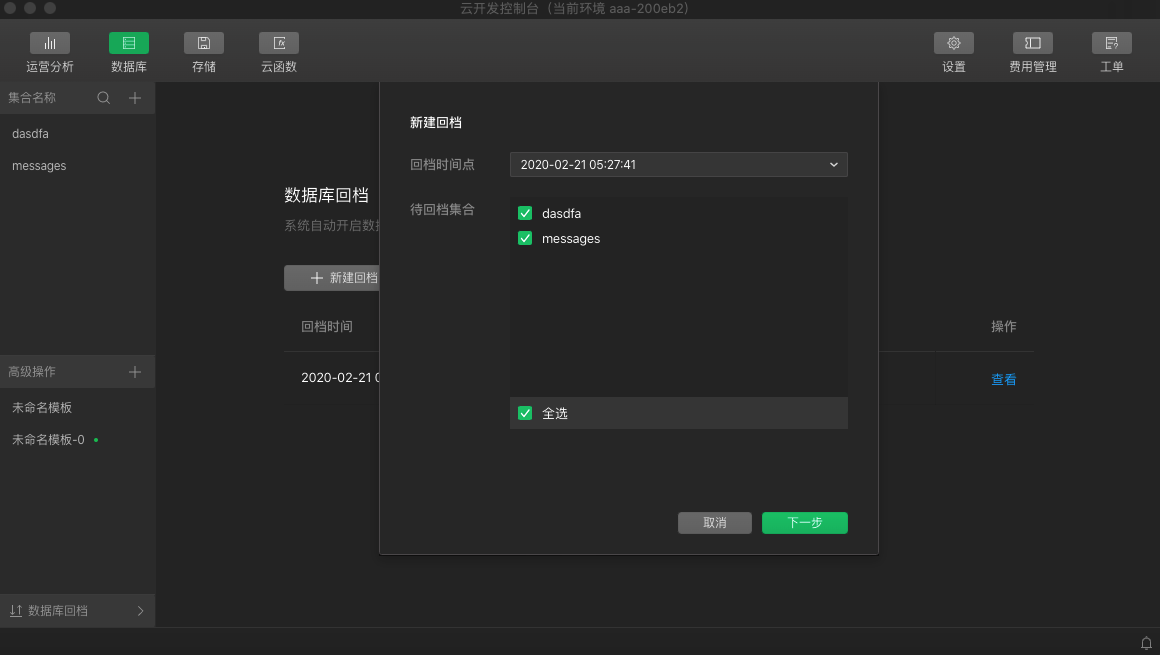
- When you click New Back gear, you can select the point in time you want to return gear and the collection that you want back gear. Please note:
- One backshift task can only set a backshift time, all the return time of the collection to be returned to this point in time;
- Multiple collections can be selected at once for a back-up task, and all collections in the environment can be returned by clicking Full Selection.
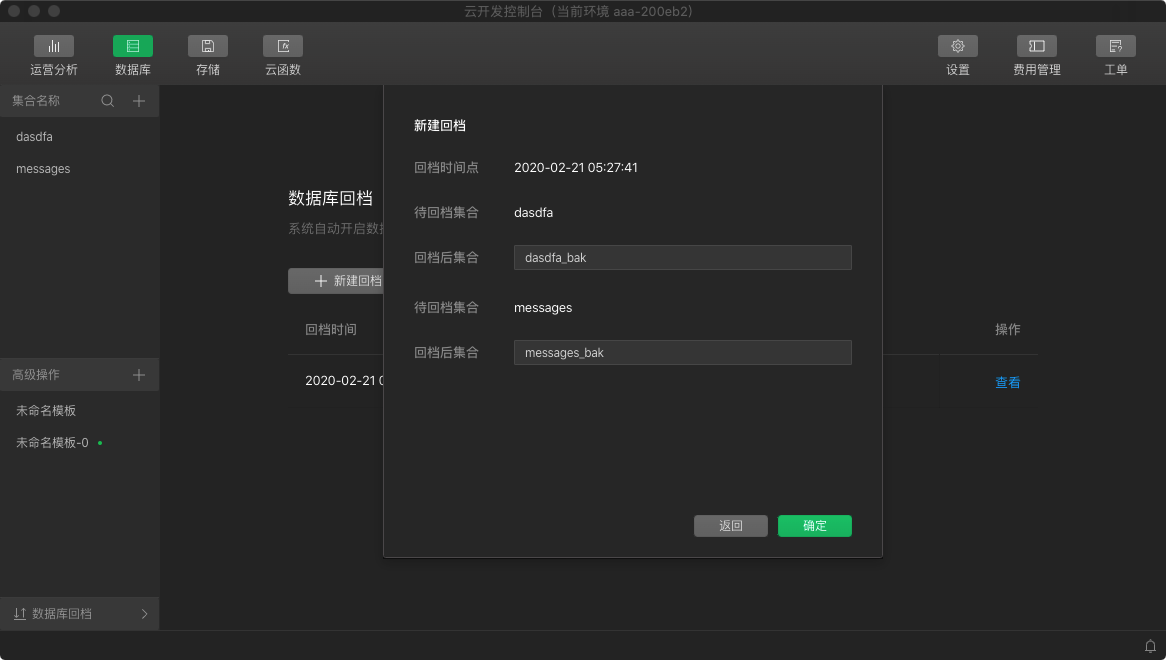
- After clicking Next to set the post-reverse collection name, please note:
- Each collection to be returned can be set separately after the return collection name;
- The collection name after the return file is generated by default, and the generation rule is: the name of the collection to be returned _bak;
- The collection name cannot be duplicated with an existing collection name after the return.
- Once click OK, the developer can view the back file progress on the database back file page. Please note:
- To avoid data conflicts, new backshift tasks cannot be created when a return task is currently in operation;
- When the backsliding is complete, developers can see the original database collection and the post-reverse collection in the collection list.
Rename the collection
Once the back file is complete, the developer can select the corresponding collection in the collection list and right-click to rename the collection name if necessary.