UI plug-in API
May 07, 2021 Vue CLI
Table of contents
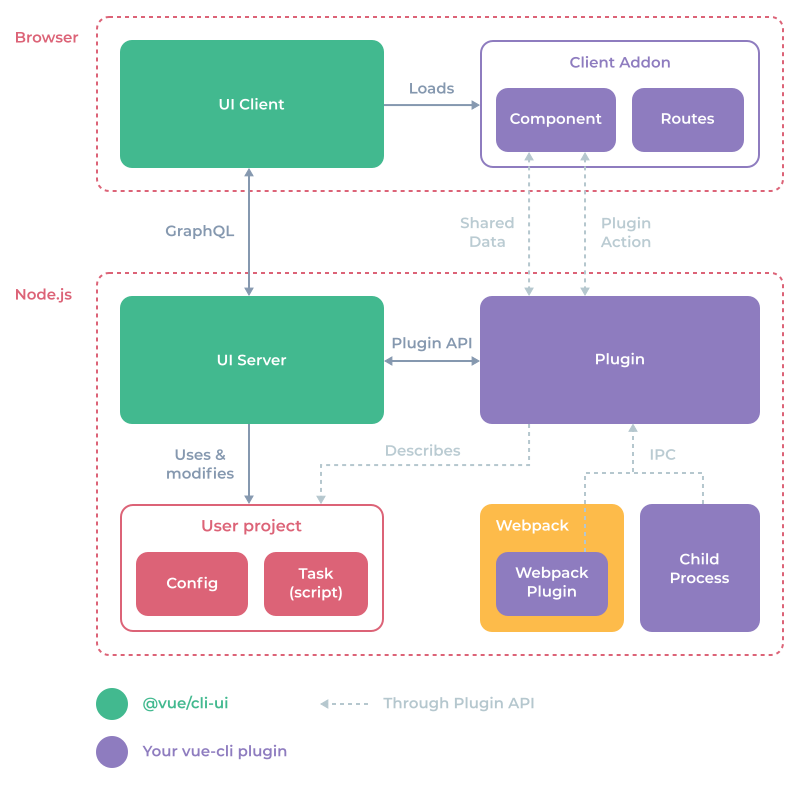
This cli-ui exposes an API that allows you to enhance the configuration and tasks of your project, as well as share data and communicate between processes.
UI file
In each installed vue-cli plug-in, cli-ui tries to load an optional ui-ui file from the root of .js plug-in. Note that you can also use folders (such as ui/index .js).
The file should export a function that uses the API object as the first argument:
module.exports = api => {
  // 在这里使用 API...
}
Warning
These files are reloaded when you try to get a list of plug-ins in Project Plugins. Click the Project Plugins button on the left sidebar of the UI to apply the changes.
Here is an example of a folder structure using the vue-cli plug-in of the UI API:
- vue-cli-plugin-test
  - package.json
  - index.js
  - generator.js
  - prompts.js
  - ui.js
  - logo.png
The plug-in that is local to the project
If you need to access the plug-in API in your project without having to create a full plug-in, you can use the vuePlugins.ui option in the package.json file:
{
  "vuePlugins": {
    "ui": ["my-ui.js"]
  }
}
Each file needs to expose a function and carry the plug-in API as the first argument.
Development mode
When building your own plug-ins, you might want to run cli-ui in a development environment, so running this outputs more useful logs:
vue ui --dev
Or:
vue ui -D
The configuration of the project
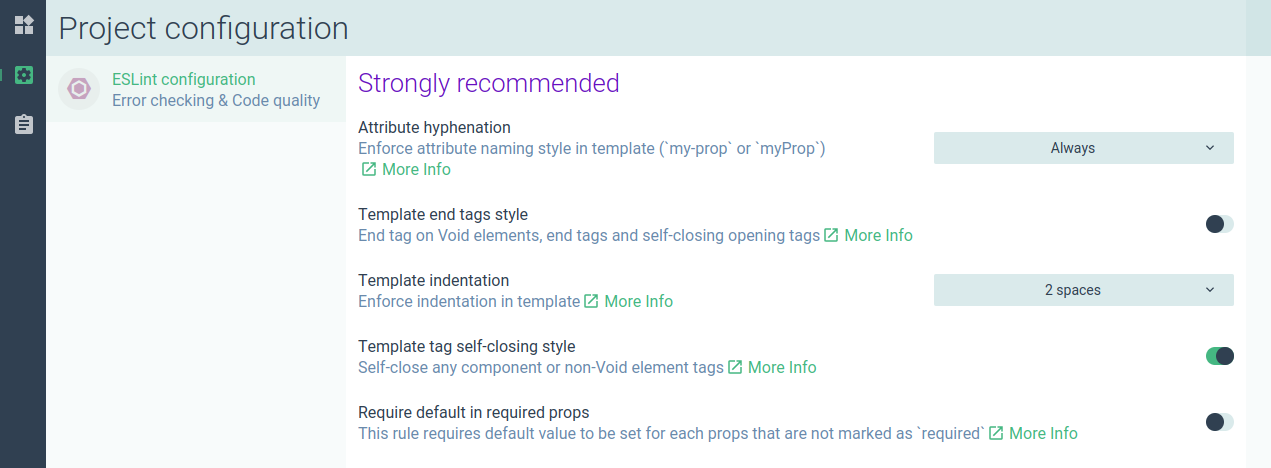
You can add a project configuration using the api.describeConfig method.
First you need to pass in some information:
api.describeConfig({
  // 唯一的配置 ID
  id: 'org.vue.eslintrc',
  // 展示名称
  name: 'ESLint configuration',
  // 展示在名称下方的描述
  description: 'Error checking & Code quality',
  // “更多信息 (More info)”链接
  link: 'https://eslint.org'
})
Dangerous
Make sure you set the correct namespace for id because it needs to be unique across all plug-ins. We recommend using reverse domain name notation.
Configure the icon
It can be a Material icon code or a custom picture (see Public Static File for details):
api.describeConfig({
  /* ... */
  // 配置图标
  icon: 'application_settings'
})
If you don't have a defined icon, show the logo that the plug-in might have (see Logo for details).
Profile
By default, the configuration UI may read or write one or more profiles, such as .eslintrc and vue.config.js.
You can provide files that may need to be detected in a user project:
api.describeConfig({
  /* ... */
  // 该配置所有可能的文件
  files: {
    // eslintrc.js
    eslint: {
      js: ['.eslintrc.js'],
      json: ['.eslintrc', '.eslintrc.json'],
      // 会从 `package.json` 读取
      package: 'eslintConfig'
    },
    // vue.config.js
    vue: {
      js: ['vue.config.js']
    }
  },
})
The types supported are: json, yaml, js, package. This order is important: if this configuration does not exist, the first file in the list is created.
Show configuration prompts
Use the onRead hook to return a list of prompts to configure the presentation:
api.describeConfig({
  /* ... */
  onRead: ({ data, cwd }) => ({
    prompts: [
      // 提示符对象
    ]
  })
})
These prompts are displayed in the details panel of the configuration.
Check the prompt for more information.
This data object contains the JSON results for each profile content.
For example, suppose a user has the following .js vue.config in their project:
module.exports = {
  lintOnSave: false
}
We declare profiles like this in the plug-in:
api.describeConfig({
  /* ... */
  // 该配置所有可能的文件
  files: {
    // vue.config.js
    vue: {
      js: ['vue.config.js']
    }
  },
})
The data object would be:
{
  // 文件
  vue: {
    // 文件数据
    lintOnSave: false
  }
}
Example of multiple files: If we add the following eslintrc files to the user.js project:
module.exports = {
  root: true,
  extends: [
    'plugin:vue/essential',
    '@vue/standard'
  ]
}
Then change the files option in our plug-in to:
api.describeConfig({
  /* ... */
  // 该配置所有可能的文件
  files: {
    // eslintrc.js
    eslint: {
      js: ['.eslintrc.js'],
      json: ['.eslintrc', '.eslintrc.json'],
      // 会从 `package.json` 读取
      package: 'eslintConfig'
    },
    // vue.config.js
    vue: {
      js: ['vue.config.js']
    }
  },
})
The data object would be:
{
  eslint: {
    root: true,
    extends: [
      'plugin:vue/essential',
      '@vue/standard'
    ]
  },
  vue: {
    lintOnSave: false
  }
}
Configure the tab
You can organize these prompts into several tabs:
api.describeConfig({
  /* ... */
  onRead: ({ data, cwd }) => ({
    tabs: [
      {
        id: 'tab1',
        label: 'My tab',
        // 可选的
        icon: 'application_settings',
        prompts: [
          // 提示符对象们
        ]
      },
      {
        id: 'tab2',
        label: 'My other tab',
        prompts: [
          // 提示符对象们
        ]
      }
    ]
  })
})
Save configuration changes
Use the onWrite hook to write data to the profile (or execute any node .js code):
api.describeConfig({
  /* ... */
  onWrite: ({ prompts, answers, data, files, cwd, api }) => {
    // ...
  }
})
Parameters:
- prompts: Run-time objects for current prompts (see below)
- answers: Answer data from user input
- data: Read-only initialization data read from the profile
- files: The descriptor of the found file (type: 'json', path: '...')
- cwd: The current working directory
- api: onWrite API (see below)
The runtime object of the prompt:
{
  id: data.name,
  type: data.type,
  name: data.short || null,
  message: data.message,
  group: data.group || null,
  description: data.description || null,
  link: data.link || null,
  choices: null,
  visible: true,
  enabled: true,
  // 当前值 (未被过滤的)
  value: null,
  // 如果用户修改过了则为 true
  valueChanged: false,
  error: null,
  tabId: null,
  // 原始的 inquirer 提示符对象
  raw: data
}
onWrite API:
- assignData (fileId, newData): Use Object.assign to update the profile before writing.
- setData (fileId, newData): Each key of newData is set deep on the configuration data (or removed when the value is undefined) before it is written.
- async getAnswer (id, mapper): Get a reply for a given prompt id and map the mapper function (such as JSON.parse) that may be provided.
Example (from the ESLint plug-in):
api.describeConfig({
  // ...

  onWrite: async ({ api, prompts }) => {
    // 更新 ESLint 规则
    const result = {}
    for (const prompt of prompts) {
      result[`rules.${prompt.id}`] = await api.getAnswer(prompt.id, JSON.parse)
    }
    api.setData('eslint', result)
  }
})
The task of the project
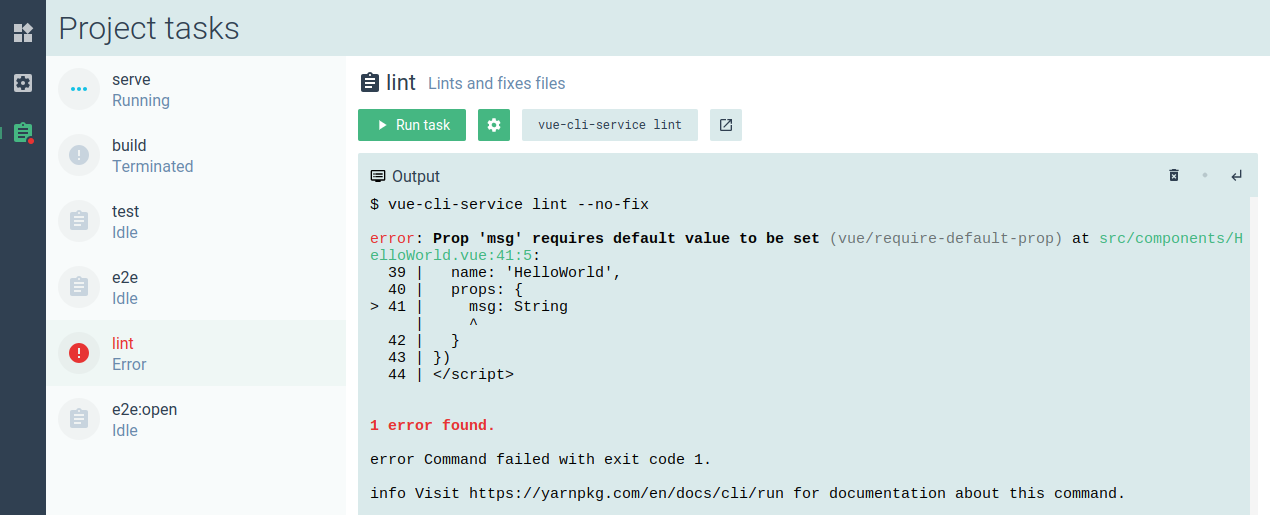
The task is generated from the scripts field of the project package.json file.
Because of the api.describeTask method, you can "enhance" additional information and hooks for tasks:
api.describeTask({
  // 用于匹配脚本命令的 RegExp 对象,来选择要被描述的任务
  match: /vue-cli-service serve/,
  description: 'Compiles and hot-reloads for development',
  // “More info”链接
  link: 'https://github.com/vuejs/vue-cli/blob/dev/docs/cli-service.md#serve'
})
The task icon
It can be a Material icon code or a custom picture (see Public Static File for details):
api.describeTask({
  /* ... */
  // 任务图标
  icon: 'application_settings'
})
If you don't have a defined icon, show the logo that the plug-in might have (see Logo for details).
The task parameters
You can add prompts to modify command parameters. They are displayed in a Parameter modal box.
Example:
api.describeTask({
  // ...

  // 选填参数 (inquirer 提示符)
  prompts: [
    {
      name: 'open',
      type: 'confirm',
      default: false,
      description: 'Open browser on server start'
    },
    {
      name: 'mode',
      type: 'list',
      default: 'development',
      choices: [
        {
          name: 'development',
          value: 'development'
        },
        {
          name: 'production',
          value: 'production'
        },
        {
          name: 'test',
          value: 'test'
        }
      ],
      description: 'Specify env mode'
    }
  ]
})
See the prompt for details.
Task hook
There are some hooks available:
- onBeforeRun
- onRun
- onExit
For example, you can add the answer to the (above) prompt as a new parameter on the command:
api.describeTask({
  // ...

  // 钩子
  // 在这里修改参数
  onBeforeRun: async ({ answers, args }) => {
    // 参数
    if (answers.open) args.push('--open')
    if (answers.mode) args.push('--mode', answers.mode)
    args.push('--dashboard')
  },
  // 任务运行之后立即执行
  onRun: async ({ args, child, cwd }) => {
    // child: Node 子进程
    // cwd: 进程所在目录
  },
  onExit: async ({ args, child, cwd, code, signal }) => {
    // code: 退出码
    // signal: 可能会被使用的杀进程信号
  }
})
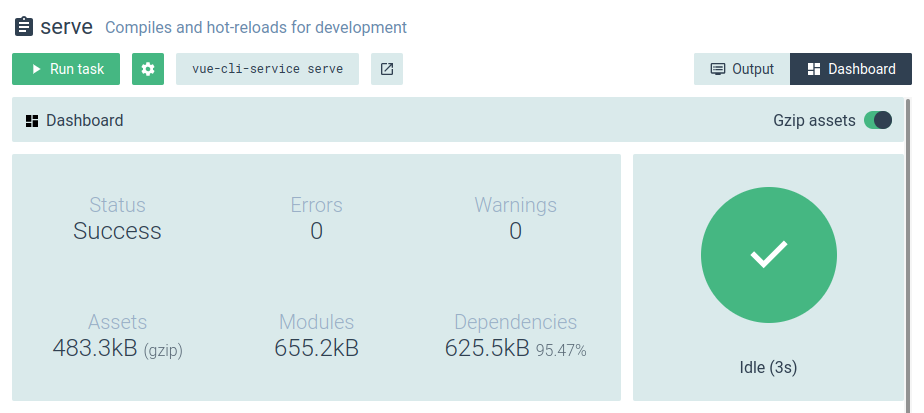
The task view
You can use the ClientAddon API to present custom views in the Task Details panel:
api.describeTask({
  // ...

  // 额外的视图 (例如 webpack 仪表盘)
  // 默认情况下,这里是展示终端输出的 `output` 视图
  views: [
    {
      // 唯一 ID
      id: 'vue-webpack-dashboard-client-addon',
      // 按钮文字
      label: 'Dashboard',
      // 按钮图标
      icon: 'dashboard',
      // 要加载的动态组件 (详见下述“客户端 addon”章节)
      component: 'vue-webpack-dashboard'
    }
  ],
  // 展示任务详情时默认选择的视图 (默认是 `output`)
  defaultView: 'vue-webpack-dashboard-client-addon'
})
See client addon for more information.
New tasks
Instead of using api.describeTask, you can add a brand new task that is not in the package.json script through api.addTask. These tasks only appear in the cli UI.
You need to provide a command option instead of the match option.
Example:
api.addTask({
  // 必填
  name: 'inspect',
  command: 'vue-cli-service inspect',
  // 选填
  // 其余部分类似 `describeTask` 但是没有 `match` 选项
  description: '...',
  link: 'https://github.com/vuejs/vue-cli/...',
  prompts: [ /* ... */ ],
  onBeforeRun: () => {},
  onRun: () => {},
  onExit: () => {},
  views: [ /* ... */ ],
  defaultView: '...'
})
Warning
Command will run a Node context. That means you can call Node's bin command as you would in a package.json script.
Prompt
The prompt object must be a legitimate inquirer object.
However, you can also add the following additional fields (options that will only be used by the UI):
{
  /* ... */
  // 用来将提示符按章节分组
  group: 'Strongly recommended',
  // 附加描述
  description: 'Enforce attribute naming style in template (`my-prop` or `myProp`)',
  // “More info”链接
  link: 'https://github.com/vuejs/eslint-plugin-vue/blob/master/docs/rules/attribute-hyphenation.md',
}
The types of inquirer supported are: checkbox, check, input, password, list, rawlist.
In addition, the UI supports special types that only work here:
- Color: Show a color picker.
Switch example
{
  name: 'open',
  type: 'confirm',
  default: false,
  description: 'Open the app in the browser'
}
Select example
{
  name: 'mode',
  type: 'list',
  default: 'development',
  choices: [
    {
      name: 'Development mode',
      value: 'development'
    },
    {
      name: 'Production mode',
      value: 'production'
    },
    {
      name: 'Test mode',
      value: 'test'
    }
  ],
  description: 'Build mode',
  link: 'https://link-to-docs'
}
Input example
{
  name: 'host',
  type: 'input',
  default: '0.0.0.0',
  description: 'Host for the development server'
}
Checkbox example
Show multiple switch.
{
  name: 'lintOn',
  message: 'Pick additional lint features:',
  when: answers => answers.features.includes('linter'),
  type: 'checkbox',
  choices: [
    {
      name: 'Lint on save',
      value: 'save',
      checked: true
    },
    {
      name: 'Lint and fix on commit' + (hasGit() ? '' : chalk.red(' (requires Git)')),
      value: 'commit'
    }
  ]
}
An example of a color picker
{
  name: 'themeColor',
  type: 'color',
  message: 'Theme color',
  description: 'This is used to change the system UI color around the app',
  default: '#4DBA87'
}
The improvement of the prompt
In a vue-cli plug-in, you might already have a prompts.js file that asks the user some questions when installing the plug-in (with the CLI or UI). You can add the above fields that only support the UI to those prompt objects, so that you can see more information if the user uses the UI.
Warning
Currently, those unsupported inquirer types do not work properly in the UI.
Client addon
Client addon is a JS package that is dynamically loaded into cli-ui. Used to load custom components and routes.
Create a client addon
The recommended way to create a client addon is to create a new project through vue cli. You can also do this in subdirectts of plug-ins or in different npm packages.
As a development dependent installation @vue/cli-ui.
Then add a vue.config .js file with the following:
const { clientAddonConfig } = require('@vue/cli-ui')

module.exports = {
  ...clientAddonConfig({
    id: 'org.vue.webpack.client-addon',
    // 开发环境端口 (默认值 8042)
    port: 8042
  })
}
This clientAddonConfig method will generate the required vue-cli configuration. In addition, it disables CSS extraction and outputs the code to the ./dist/index code in the .js.
Dangerous
Make sure you set the correct namespace for id because it needs to be unique across all plug-ins. We recommend using reverse domain name notation.
Then modify the .eslintrc.json file to add some allowed global objects:
{
  // ...
  "globals": {
    "ClientAddonApi": false,
    "mapSharedData": false,
    "Vue": false
  }
}
You can now run serve scripts in a development environment, or you can run build scripts when you're ready to publish.
ClientAddonApi
Open the main file file in the client addon .js and remove all code.
Warning
Don't import Vue in the client addon source file, use the global Vue object from the browser window.
Here's an example code .js the main code:
import VueProgress from 'vue-progress-path'
import WebpackDashboard from './components/WebpackDashboard.vue'
import TestView from './components/TestView.vue'

// 你可以安装额外的 Vue 插件
// 使用全局的 'Vue' 变量
Vue.use(VueProgress, {
  defaultShape: 'circle'
})

// 注册一个自定义组件
// (工作原理类似 'Vue.component')
ClientAddonApi.component('org.vue.webpack.components.dashboard', WebpackDashboard)

// 在 vue-router 中为 /addon/<id> 添加子路由。
// 例如,addRoutes('foo', [ { path: '' }, { path: 'bar' } ])
// 将会向路由器添加 /addon/foo/ 和 /addon/foo/bar。
// 我们在此用 'test-webpack-route' 名称创建一个新的 '/addon/vue-webpack/' 路由
ClientAddonApi.addRoutes('org.vue.webpack', [
  { path: '', name: 'org.vue.webpack.routes.test', component: TestView }
])

// 你可以翻译插件组件
// (通过使用 vue-i18n) 加载语言文件
const locales = require.context('./locales', true, /[a-z0-9]+\.json$/i)
locales.keys().forEach(key => {
  const locale = key.match(/([a-z0-9]+)\./i)[1]
  ClientAddonApi.addLocalization(locale, locales(key))
})
Dangerous
Make sure you set the correct namespace for id because it needs to be unique across all plug-ins. We recommend using reverse domain name notation.
Cli-ui registers Vue and ClientAddon Api as global variables within the window scope.
You can use @vue/ui and @vue/cli-ui all components and CSS class in your own components to maintain consistency in style and experience. You can also translate strings with the built-in vue-i18n.
Register the client addon
Back to the .js file, using the api.addClientAddon method and with a require string pointing to the built folder:
api.addClientAddon({
  id: 'org.vue.webpack.client-addon',
  // 包含构建出来的 JS 文件的文件夹
  path: '@vue/cli-ui-addon-webpack/dist'
})
This uses node.js's require.resolve API to find folders and start a server for file index .js client addon.
Or specify a URL when developing a plug-in (ideally you'll need to do this in Vue-cli-ui.js Vue's test project)
// 用于开发环境
// 如果已经在插件中定义过,则会覆写路径
api.addClientAddon({
  id: 'org.vue.webpack.client-addon',
  // 使用你之前配置过低同样的端口
  url: 'http://localhost:8042/index.js'
})
Use the client addon
Now you can use client addon in these views. For example, you can specify a view in a described task:
api.describeTask({
  /* ... */
  // 额外的视图 (例如 webpack dashboard)
  // 默认情况下,这是展示终端输出的 'output' 视图
  views: [
    {
      // 唯一的 ID
      id: 'org.vue.webpack.views.dashboard',
      // 按钮文字
      label: 'Dashboard',
      // 按钮图标 (material-icons)
      icon: 'dashboard',
      // 加载的动态组件,会用 ClientAddonApi 进行注册
      component: 'org.vue.webpack.components.dashboard'
    }
  ],
  // 展示任务详情时默认选择的视图 (默认情况下就是 output)
  defaultView: 'org.vue.webpack.views.dashboard'
})
This is a client addon code that registers the ''org.vue.webpack.components.dashboard' component (as we've seen before):
/* 在 `main.js` 中 */
// 导入组件
import WebpackDashboard from './components/WebpackDashboard.vue'
// 注册自定义组件
// (工作原理类似 'Vue.component')
ClientAddonApi.component('org.vue.webpack.components.dashboard', WebpackDashboard)
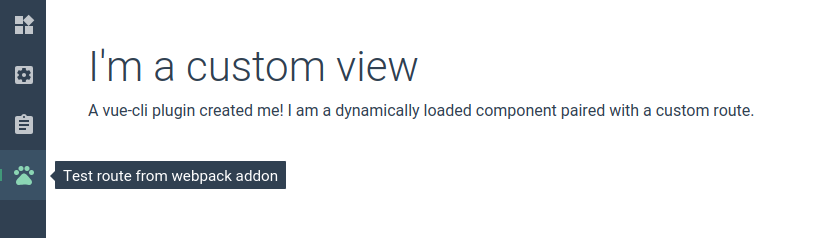
Custom view
You can use the api.addView method to add a new view under the standard Project plugins, Project configurations, and Project tasks:
api.addView({
  // 唯一的 id
  id: 'org.vue.webpack.views.test',

  // 路由名称 (来自 Vue Router)
  // 使用 'ClientAddonApi.addRoutes' 方法中相同的名字 (详见之前的客户端 addon 章节)
  name: 'org.vue.webpack.routes.test',

  // 按钮图标 (material-icons)
  icon: 'pets',
  // 你也可以指定一个自定义图片 (详见之前的公共静态文件章节):
  // icon: 'http://localhost:4000/_plugin/%40vue%2Fcli-service/webpack-icon.svg',

  // 按钮的提示文字
  tooltip: 'Test view from webpack addon'
})
Here's the code in the client addon that registered 'org.vue.webpack.routes.test' (as seen before):
/* 在 `main.js` 里 */
// 导入组件
import TestView from './components/TestView.vue'
// 在 vue-router 中为 /addon/<id> 添加子路由
// 例如,addRoutes('foo', [ { path: '' }, { path: 'bar' } ])
// 将为 Vue Router 添加 /addon/foo/ 和 /addon/foo/bar 路由。
// 我们这里创建一个新的 '/addon/vue-webpack/' 路由,并命名为 'test-webpack-route'。
ClientAddonApi.addRoutes('org.vue.webpack', [
  { path: '', name: 'org.vue.webpack.routes.test', component: TestView }
])
Shared data
An easy way to exchange information between components through shared data.
For example, the webpack dashboard shares built statistics between the UI client and the UI service side through this API.
In the plug-.js ui (node .js):
// 设置或更新
api.setSharedData('com.my-name.my-variable', 'some-data')

// 获取
const sharedData = api.getSharedData('com.my-name.my-variable')
if (sharedData) {
  console.log(sharedData.value)
}

// 移除
api.removeSharedData('com.my-name.my-variable')

// 侦听变化
const watcher = (value, id) => {
  console.log(value, id)
}
api.watchSharedData('com.my-name.my-variable', watcher)
// 取消侦听
api.unwatchSharedData('com.my-name.my-variable', watcher)

// 带命名空间的版本
const {
  setSharedData,
  getSharedData,
  removeSharedData,
  watchSharedData,
  unwatchSharedData
} = api.namespace('com.my-name.')
Dangerous
Make sure you set the correct namespace for id because it needs to be unique across all plug-ins. We recommend using reverse domain name notation.
In its custom components:
// Vue 组件
export default {
  // 同步共享的数据
  sharedData () {
    return {
      // 你可以在模板中使用 `myVariable`
      myVariable: 'com.my-name.my-variable'
      // 也可以映射带命名空间的共享数据
      ...mapSharedData('com.my-name.', {
        myVariable2: 'my-variable2'
      })
    }
  },

  // 手动方法
  async created () {
    const value = await this.$getSharedData('com.my-name.my-variable')

    this.$watchSharedData(`com.my-name.my-variable`, value => {
      console.log(value)
    })

    await this.$setSharedData('com.my-name.my-variable', 'new-value')
  }
}
If you use the sharedData option, the shared data can be updated when a corresponding property is assigned.
<template>
  <VueInput v-model="message"/>
</template>

<script>
export default {
  sharedData: {
    // 将会在服务端同步 'my-message' 共享的数据
    message: 'com.my-name.my-message'
  }
}
</script>
This feature is useful, for example, when creating a setup component.
The action of the plug-in
The plug-in's action is a direct call to the cli-ui (browser) .js plug-in (node).
For example, you might have a button in a custom component (see client addon) that calls some Node code to the service side .js API.
In the ui-.js file of the plug.js plug-in (Node), you can use two methods from PluginApi:
// 调用一个 action
api.callAction('com.my-name.other-action', { foo: 'bar' }).then(results => {
  console.log(results)
}).catch(errors => {
  console.error(errors)
})
// 监听一个 action
api.onAction('com.my-name.test-action', params => {
  console.log('test-action called', params)
})
Dangerous
Make sure you set the correct namespace for id because it needs to be unique across all plug-ins. We recommend using reverse domain name notation.
You can use a version with a namespace (similar to shared data) through api.namespace:
const { onAction, callAction } = api.namespace('com.my-name.')
In the client addon component (browser), you can access the $onPluginActionCalled, $onPluginActionResolved, and $callPluginAction:
// Vue 组件
export default {
  created () {
    this.$onPluginActionCalled(action => {
      // 当 action 被调用时
      // 且在运行之前
      console.log('called', action)
    })
    this.$onPluginActionResolved(action => {
      // 当 action 运行完毕之后
      console.log('resolved', action)
    })
  },

  methods: {
    testPluginAction () {
      // 调用一个插件的 action
      this.$callPluginAction('com.my-name.test-action', {
        meow: 'meow'
      })
    }
  }
}
Inter-Process Communication (IPC)
IPC is an abbreviation for Inter-Process Communication. The system allows you to easily send messages from sub-processes, such as tasks, and is lightweight and fast.
To present data on the webpack dashboard UI, the serve and build commands for @vue/cli-service send IPC messages to the cli-ui Node.js server when the --dashboard parameter is passed in.
In process code (which can be a webpack plug-in or a Node.js task script), you can use the IpcMessenger class in @vue/cli-shared-utils:
const { IpcMessenger } = require('@vue/cli-shared-utils')

// 创建一个新的 IpcMessenger 实例
const ipc = new IpcMessenger()

function sendMessage (data) {
  // 发送一条消息给 cli-ui 服务器
  ipc.send({
    'com.my-name.some-data': {
      type: 'build',
      value: data
    }
  })
}

function messageHandler (data) {
  console.log(data)
}

// 监听消息
ipc.on(messageHandler)

// 不再监听
ipc.off(messageHandler)

function cleanup () {
  // 从 IPC 网络断开连接
  ipc.disconnect()
}
Manual connection:
const ipc = new IpcMessenger({
  autoConnect: false
})

// 这条消息会被放入队列
ipc.send({ ... })

ipc.connect()
Automatic disconnect when idle (after no messages have been available for some time):
const ipc = new IpcMessenger({
  disconnectOnIdle: true,
  idleTimeout: 3000 // 默认值
})

ipc.send({ ... })

setTimeout(() => {
  console.log(ipc.connected) // false
}, 3000)
Connect to another IPC network:
const ipc = new IpcMessenger({
  networkId: 'com.my-name.my-ipc-network'
})
In a ui-.js vue-cli plug-in file, you can use the ipcOn, ipcOff, and ipcSend methods:
function onWebpackMessage ({ data: message }) {
  if (message['com.my-name.some-data']) {
    console.log(message['com.my-name.some-data'])
  }
}

// 监听任何 IPC 消息
api.ipcOn(onWebpackMessage)

// 不监听任何消息
api.ipcOff(onWebpackMessage)

// 向所有已连接的 IpcMessenger 实例发送一条消息
api.ipcSend({
  webpackDashboardMessage: {
    foo: 'bar'
  }
})
Local storage
A plug-in can save and load data from the lowdb database, which is local to the UI server.
// 向本地的数据库存入一个值
api.storageSet('com.my-name.an-id', { some: 'value' })

// 从本地的数据库取回一个值
console.log(api.storageGet('com.my-name.an-id'))

// 完整的 lowdb 实例
api.db.get('posts')
  .find({ title: 'low!' })
  .assign({ title: 'hi!'})
  .write()

// 带命名空间的辅助函数
const { storageGet, storageSet } = api.namespace('my-plugin.')
Dangerous
Make sure you set the correct namespace for id because it needs to be unique across all plug-ins. We recommend using reverse domain name notation.
Notification
You can display notifications based on the notification system of the user's operating system:
api.notify({
  title: 'Some title',
  message: 'Some message',
  icon: 'path-to-icon.png'
})
Here are some built-in icons;
- 'done'
- 'error'
Progress interface
You can show the progress interface with some text or progress bars:
api.setProgress({
  status: 'Upgrading...',
  error: null,
  info: 'Step 2 of 4',
  progress: 0.4 // 从 0 到 1, -1 表示隐藏进度条
})
Remove the progress interface:
api.removeProgress()
Hook
Hooks can be used to respond to certain cli-ui events.
onProjectOpen
Triggered when the plug-in is first loaded in the current project.
api.onProjectOpen((project, previousProject) => {
  // 重置数据
})
onPluginReload
Triggered when the plug-in is reloaded.
api.onPluginReload((project) => {
  console.log('plugin reloaded')
})
onConfigRead
Triggered when a configuration interface is opened or refreshed.
api.onConfigRead(({ config, data, onReadData, tabs, cwd }) => {
  console.log(config.id)
})
onConfigWrite
Triggered when the user saves in the save interface.
api.onConfigWrite(({ config, data, changedFields, cwd }) => {
  // ...
})
onTaskOpen
Triggered when the user opens the details panel for a task.
api.onTaskOpen(({ task, cwd }) => {
  console.log(task.id)
})
onTaskRun
Triggered when a user runs a task.
api.onTaskRun(({ task, args, child, cwd }) => {
  // ...
})
onTaskExit
Triggered when a task exits. It fires regardless of whether the task succeeds or fails.
api.onTaskExit(({ task, args, child, signal, code, cwd }) => {
  // ...
})
onViewOpen
Triggered when a user opens a view, such as 'Plugins', 'Configurations', or 'Tasks'.
api.onViewOpen(({ view, cwd }) => {
  console.log(view.id)
})
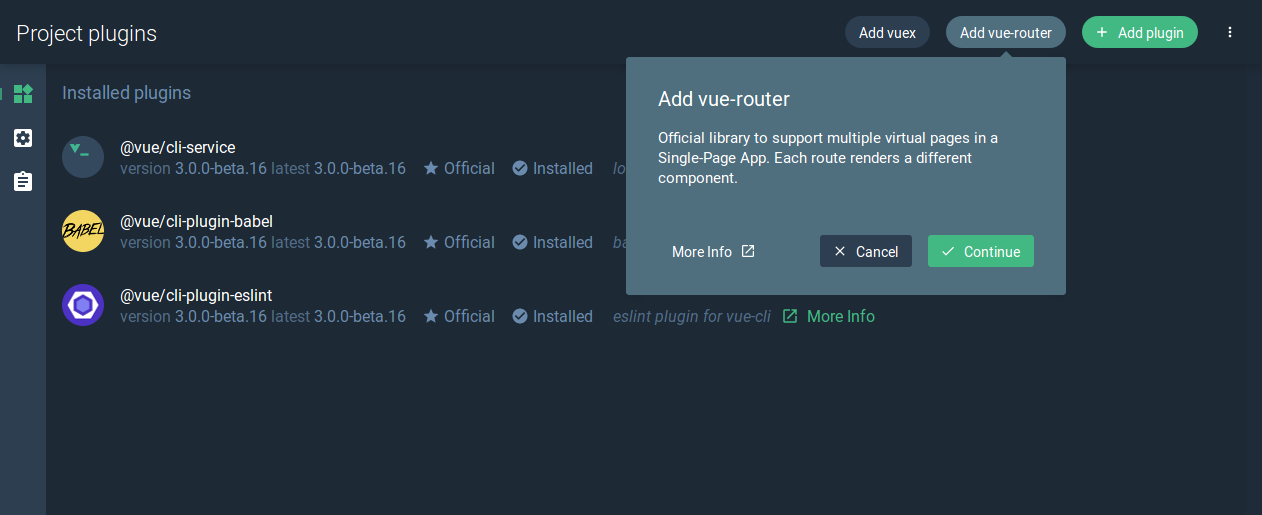
Suggestions
The suggestion here is to propose a button to perform action for the user. T hey are displayed on the top bar of the interface. For example, we can put a button that suggests installing a Vue Router package when it is not detected in the app.
api.addSuggestion({
  id: 'com.my-name.my-suggestion',
  type: 'action', // 必填 (未来会加入更多类型)
  label: 'Add vue-router',
  // 该消息会展示在一个详情模态框里
  message: 'A longer message for the modal',
  link: 'http://link-to-docs-in-the-modal',
  // 可选的图片
  image: '/_plugin/my-package/screenshot.png',
  // 当该项建议被用户激活时调用的函数
  async handler () {
    // ...
    return {
      // 默认移除这个按钮
      keep: false
    }
  }
})
Dangerous
Make sure you set the correct namespace for id because it needs to be unique across all plug-ins. We recommend using reverse domain name notation.
You can then remove the suggestion:
api.removeSuggestion('com.my-name.my-suggestion')
You can also add actionLink to the suggestion, and when the user activates it, it opens a page between:
api.addSuggestion({
  id: 'com.my-name.my-suggestion',
  type: 'action', // Required
  label: 'Add vue-router',
  // 打开一个新标签
  actionLink: 'https://vuejs.org/'
})
Typically, you'll choose the appropriate context to present the recommendations with a hook:
const ROUTER = 'vue-router-add'

api.onViewOpen(({ view }) => {
  if (view.id === 'vue-project-plugins') {
    if (!api.hasPlugin('vue-router')) {
      api.addSuggestion({
        id: ROUTER,
        type: 'action',
        label: 'org.vue.cli-service.suggestions.vue-router-add.label',
        message: 'org.vue.cli-service.suggestions.vue-router-add.message',
        link: 'https://router.vuejs.org/',
        async handler () {
          await install(api, 'vue-router')
        }
      })
    }
  } else {
    api.removeSuggestion(ROUTER)
  }
})
In this example, if Vue Router is not installed, we will only show the recommendations for installing Vue Router in the plug-in view.
Attention
AddSuggestion and removeSuggestion can specify namespaces through api.namespace().
Other methods
hasPlugin
True is returned if the project uses the plug-in.
api.hasPlugin('eslint')
api.hasPlugin('apollo')
api.hasPlugin('vue-cli-plugin-apollo')
getCwd
Gets the current working directory.
api.getCwd()
resolve
Resolve a file under the current project:
api.resolve('src/main.js')
getProject
The currently open project is derived.
api.getProject()
Public static files
You may need to expose some static files (usually specifying icons for custom views) on an HTTP server built into the cli-ui.
You can optionally place a ui-public folder in the plug-in package root, where any files are exposed to http routing for /_plugin/:id/?
For example, if you place a my-logo.png file into a vue-cli-plugin-hello/ui-public/folder, the cli-ui can be accessed through the URL of /_plugin/vue-cli-plugin-hello/my-logo.png when loading the plug-in.
api.describeConfig({
  /* ... */
  // 自定义图片
  icon: '/_plugin/vue-cli-plugin-hello/my-logo.png'
})