Storm got off to a good start
May 17, 2021 Storm getting Started
Table of contents
Get ready to start
Get ready to start
In this chapter, we're going to create a Storm project and our first Storm topology.
NOTE: Let's assume that your JRE version is above 1.6. W e recommend JRE from Oracle. You can download http://www.java.com/downloads/ the website.
The operating mode
Before you begin, it's important to understand how Storm operates. There are two ways.
Local mode
In local mode, the Storm topology runs on a single JVM process on the local computer. T his pattern is used for development, testing, and debugging because it is the easiest way to see how all components work together. I n this mode, we can adjust the parameters to see how our topology works in different Storm configuration environments. T o run in local mode, we're downloading storm development dependencies to develop and test our topology. Once we created our first Storm project, we'll soon understand how to use the local pattern.
NOTE: In local mode, it looks like running in a cluster environment. However, it is important to make sure that all components are thread-safe, because when they are deployed to remote mode, they may run on different JVM processes or even on different physical machines, when there is no direct communication or shared memory between them.
We want to run all the examples of this chapter in local mode.
Remote mode
In remote mode, we submit a topology to the Storm cluster, which typically consists of many processes running on different machines. R emote mode does not have debugging information, so it is also called production mode. However, it is a good idea to build a Storm cluster on a single developer that can be used to confirm that the topology has no problems in the cluster environment before deploying to production.
You'll learn more about remote mode in Chapter 6 and how to install a Storm cluster in Appendix B.
Hello World
We create a simple topology in this project, counting the number of words. W e can think of this as Storm's Hello World. H owever, this is a very powerful topology because it can scale to an almost infinite scale and require only minor modifications to build a statistical system with it. For example, we can modify the project to find hot topics on Twitter.
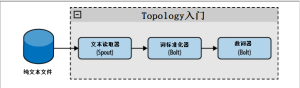
To create this topology, we're going to read the text with one spout, the first bolt to standardize the word, and the second bolt to count the words, as shown in Figure 2-1.
You can download the source compression package from this URL and https://github.com/storm-book/examples-ch02-getting_started/zipball/master.
NOTE
: If you
use git
(a distributed version control and source management tool), you can perform
      git clone

       [email protected]

      :storm-book/examples-ch02-getting_started.git
check out the source code to the directory you specify.
Java installation check
The first step in building a Storm run environment is to check the version of Java that you installed. O pen a console window and execute the command: java -version. The console should look something like this:
    java -version

    java version "1.6.0_26"
    Java(TM) SE Runtime Enviroment (build 1.6.0_26-b03)

    Java HotSpot(TM) Server VM (build 20.1-b02, mixed mode)
If this is not the case, check your Java installation. (Reference http://www.java.com/download/)
Create a project
Before you begin, build a directory for the app (as you would normally do for a Java app). This directory is used to store engineering source code.
Next we're going to download the Storm dependency package, which is some jar packages, and we're going to add them to the app class path. You can do this in one of two ways:
- Download all dependencies, unzip them, and add them to the class path
- Use Apache Maven
NOTE : Maven is a comprehensive tool for software project management. I t can be used to manage many aspects of a project's development cycle, from package dependencies to the release process. I n this book, we will make extensive use of it. R un mvn on the command line if you want to check if maven is already installed. If you don't have an installation, http://maven.apache.org/download.html download it.
There's no need to be a Maven expert before you can use Storm, but it's still helpful to learn the basics of how Maven works. You can find more information on Apache Maven's website (http://maven.apache.org/).
NOTE: Storm's Maven dependency refers to all libraries running Storm local mode.
To run our topology, we can write a pom file that contains .xml components.
    <project xmlns="http://maven.apache.org/POM/4.0.0"
             xmlns:xsi="http://www.w3.org/2001/XMLSchema-instance"
             xsi:schemaLocation="http://maven.apache.org/POM/4.0.0
             http://maven.apache.org/xsd/maven-4.0.0.xsd">
             <modelVersion>4.0.0</modelVersion>
             <groupId>storm.book</groupId>
             <artifactId>Getting-Started</artifactId>
             <version>0.0.1-SNAPSHOT</version>
             <build>
                 <plugins>
                     <plugin>
                         <groupId>org.apache.maven.plugins</groupId>
                         <artifactId>maven-compiler-plugin</artifactId>
                         <version>2.3.2</version>
                         <configuration>
                             <source>1.6</source>
                             <target>1.6</target>
                             <compilerVersion>1.6</compilerVersion>
                         </configuration>
                     </plugin>
                 </plugins>
             </build>
             <repositories>

                 <repository>
                     <id>clojars.org</id>
                     <url>http://clojars.org/repo</url>
                 </repository>
             </repositories>
             <dependencies>

                 <dependency>
                     <groupId>storm</groupId>
                     <artifactId>storm</artifactId>
                     <version>0.6.0</version>
                 </dependency>
             </dependencies>
    </project>
The first few lines specify the project name and version number. T hen we added a compiler plug-in and told Maven that our code was going to be compiled in Java 1.6. N ext we defined the Maven warehouse( Maven supports specifying multiple warehouses for the same project). C lojars is a repository on which Storm depends. Maven automatically downloads all the necessary sub-package dependencies to run local mode.
A typical Maven Java project would have the following structure:
我们的应用目录/
         ├── pom.xml
         └── src
               └── main
                  └── java
               |  ├── spouts
               |  └── bolts
               └── resources
The subdirecto under the java directory contains our code, and we save the files to count the number of words in the resource directory.
NOTE: The command mkdir -p creates all the required parent directories.
Create our first Topology
We'll create all the necessary classes for running word counts. Some parts of this example may not be clear at this point, but we'll cover it further in a later section.
Spout
The pout WordReader class implements the IRichSpout interface. W e'll see more details in Chapter 4. WordReader is responsible for reading text line by line from the file and providing the line of text to the first bolt.
NOTE: A spout publishes a list of defined domains. This schema allows you to read data from the same spout stream using different bolts, and their output can also be used as a definition domain for other bolts, and so on.
Examples 2-1 contain the full code of the WordRead class (we'll analyze each part of the code below).
       /
           例2-1.src/main/java/spouts/WordReader.java
         /
        package spouts;

        import java.io.BufferedReader;
        import java.io.FileNotFoundException;
        import java.io.FileReader;
        import java.util.Map;
        import backtype.storm.spout.SpoutOutputCollector;
        import backtype.storm.task.TopologyContext;
        import backtype.storm.topology.IRichSpout;
        import backtype.storm.topology.OutputFieldsDeclarer;
        import backtype.storm.tuple.Fields;
        import backtype.storm.tuple.Values;

        public class WordReader implements IRichSpout {
            private SpoutOutputCollector collector;
            private FileReader fileReader;
            private boolean completed = false;
            private TopologyContext context;
            public boolean isDistributed() {return false;}
            public void ack(Object msgId) {
                    System.out.println("OK:"+msgId);
            }
            public void close() {}
            public void fail(Object msgId) {
                 System.out.println("FAIL:"+msgId);
            }
            /
              这个方法做的惟一一件事情就是分发文件中的文本行
             /
            public void nextTuple() {
            /
              这个方法会不断的被调用,直到整个文件都读完了,我们将等待并返回。
             /
                 if(completed){
                     try {
                         Thread.sleep(1000);
                     } catch (InterruptedException e) {
                         //什么也不做
                     }
                    return;
                 }
                 String str;
                 //创建reader
                 BufferedReader reader = new BufferedReader(fileReader);
                 try{
                     //读所有文本行
                    while((str = reader.readLine()) != null){
                     /
                       按行发布一个新值
                      /
                         this.collector.emit(new Values(str),str);
                     }
                 }catch(Exception e){
                     throw new RuntimeException("Error reading tuple",e);
                 }finally{
                     completed = true;
                 }
             }
             /
               我们将创建一个文件并维持一个collector对象
              /
             public void open(Map conf, TopologyContext context, SpoutOutputCollector collector) {
                     try {
                         this.context = context;
                         this.fileReader = new FileReader(conf.get("wordsFile").toString());
                     } catch (FileNotFoundException e) {
                         throw new RuntimeException("Error reading file ["+conf.get("wordFile")+"]");
                     }
                     this.collector = collector;
             }
             /
               声明输入域"word"
              /
             public void declareOutputFields(OutputFieldsDeclarer declarer) {
                 declarer.declare(new Fields("line"));
             }
        }
The first spout methods called are public void open (Map conf, TopologyContext context, SpoutOutputCollector). I t receives the following parameters: configuration objects, which are created in defining topology objects, TopologyContext objects that contain all topological data, and SpoutOutputCollector objects, which allow us to publish data that is handed over to bolts for processing. The following code master is the implementation of this method.
    public void open(Map conf, TopologyContext context,
        SpoutOutputCollector collector) {
        try {
            this.context = context;
            this.fileReader = new FileReader(conf.get("wordsFile").toString());
        } catch (FileNotFoundException e) {
            throw new RuntimeException("Error reading file ["+conf.get("wordFile")+"]");
        }
        this.collector = collector;
    }
We created a FileReader object in this method to read the file. N ext we're going to implement public void nextTuple(), and we're going to publish the pending data to bolts through it. In this example, this method reads the file and publishes the data line by line.
    public void nextTuple() {
        if(completed){
            try {
                Thread.sleep(1);
            } catch (InterruptedException e) {
                //什么也不做
            }
            return;
        }
        String str;
        BufferedReader reader = new BufferedReader(fileReader);
        try{
            while((str = reader.readLine()) != null){
                this.collector.emit(new Values(str));
            }
        }catch(Exception e){
            throw new RuntimeException("Error reading tuple",e);
        }finally{
            completed = true;
        }
    }
NOTE: Values is an ArrarList implementation whose elements are the parameters of the incoming constructor.
NextTuple() is periodically called by ack() and fail() within the same loop. W hen there is no task, it must release control of the thread before other methods have a chance to execute. T herefore, the first line of nextTuple checks to see if it has been processed. I f done, to reduce the processor load, it sleeps for one millisecond before returning. If the task is complete, each line in the file is read out and distributed.
NOTE: Tuple is a list of named values that can be any java object (as long as it is serialized). By default, Storm serializes types such as strings, byte arrays, ArrayList, HashMap, and HashSet.
Bolts
Now we have a spout that reads files by row and publishes one tuogroup per row, and creates two bolts to work with them (see Figure 2-1). Bolts implements the interface backtype.storm.topology.IRichBolt.
The most important method of bolt is void execute (Tuple input), which is called once each time a tuple is received, and several more tuples are published.
NOTE: Bolt or spout publishes several tups whenever necessary. W hen nextTuple or execute methods are called, they may publish 0, perhaps more than one tuple. You'll learn more about this in Chapter 5.
The first bolt, WordNormalizer, is responsible for getting and standardizing each line of text. It breaks the lines of text into words, converts capitals into lesscase, and removes the head-to-tail blank character.
First we're going to declare the ginseng of bolt:
    public void declareOutputFields(OutputFieldsDeclarer declarer){
        declarer.declare(new Fields("word"));
    }
Here we declare that bolt will publish a domain called "word".
Next we implement public void execute (Tuple input) to handle incoming tuples:
    public void execute(Tuple input){
        String sentence=input.getString(0);
        String[] words=sentence.split(" ");
        for(String word : words){
            word=word.trim();
            if(!word.isEmpty()){
                word=word.toLowerCase();
                //发布这个单词
                collector.emit(new Values(word));
            }
        }
        //对元组做出应答
        collector.ack(input);
    }
The first line reads the value from the metagroup. V alues can be read by location or name. T he next value is processed and published with the colector object. Finally, the ack() method of the collyctor object is called each time to confirm that a group has been successfully processed.
Example 2-2 is the complete code for this class.
    //例2-2 src/main/java/bolts/WordNormalizer.java
    package bolts;
    import java.util.ArrayList;
    import java.util.List;
    import java.util.Map;
    import backtype.storm.task.OutputCollector;
    import backtype.storm.task.TopologyContext;
    import backtype.storm.topology.IRichBolt;
    import backtype.storm.topology.OutputFieldsDeclarer;
    import backtype.storm.tuple.Fields;
    import backtype.storm.tuple.Tuple;
    import backtype.storm.tuple.Values;
    public class WordNormalizer implements IRichBolt{
        private OutputCollector collector;
        public void cleanup(){}
        /
           bolt从单词文件接收到文本行,并标准化它。
           文本行会全部转化成小写,并切分它,从中得到所有单词。
         /
        public void execute(Tuple input){
            String sentence = input.getString(0);
            String[] words = sentence.split(" ");
            for(String word : words){
                word = word.trim();
                if(!word.isEmpty()){
                    word=word.toLowerCase();
                    //发布这个单词
                    List a = new ArrayList();
                    a.add(input);
                    collector.emit(a,new Values(word));
                }
            }
            //对元组做出应答
            collector.ack(input);
        }
        public void prepare(Map stormConf, TopologyContext context, OutputCollector collector) {
            this.collector=collector;
        }

        /
           这个bolt只会发布“word”域
          /
        public void declareOutputFields(OutputFieldsDeclarer declarer) {
            declarer.declare(new Fields("word"));
        }
    }
NOTE: With this example, we learned about publishing multiple dTs in one execute call. If this method receives the sentence "This is the Storm book" in one call, it will publish five d'groups.
The next bolt, WordCounter, is responsible for counting words. At the end of this topology (when the cleanup() method is called), we will display the number of each word.
NOTE : The bolt in this example is not published at all, it saves the data in the map, but in the real world the data can be saved to the database.
package bolts;

import java.util.HashMap;
import java.util.Map;
import backtype.storm.task.OutputCollector;
import backtype.storm.task.TopologyContext;
import backtype.storm.topology.IRichBolt;
import backtype.storm.topology.OutputFieldsDeclarer;
import backtype.storm.tuple.Tuple;

public class WordCounter implements IRichBolt{
    Integer id;
    String name;
    Map counters;
    private OutputCollector collector;

    /
       这个spout结束时(集群关闭的时候),我们会显示单词数量
      /
    @Override
    public void cleanup(){
        System.out.println("-- 单词数 【"+name+"-"+id+"】 --");
        for(Map.Entry entry : counters.entrySet()){
            System.out.println(entry.getKey()+": "+entry.getValue());
        }
    }

    /
       为每个单词计数
     /
@Override
public void execute(Tuple input) {
    String str=input.getString(0);
    /**
      如果单词尚不存在于map,我们就创建一个,如果已在,我们就为它加1
     /
    if(!counters.containsKey(str)){
        counters.put(str,1);
    }else{
        Integer c = counters.get(str) + 1;
        counters.put(str,c);
    }
    //对元组作为应答
    collector.ack(input);
}    /      初始化     /    @Override    public void prepare(Map stormConf, TopologyContext context, OutputCollector collector){        this.counters = new HashMap();        this.collector = collector;        this.name = context.getThisComponentId();        this.id = context.getThisTaskId();    }    @Override    public void declareOutputFields(OutputFieldsDeclarer declarer) {}}
The execute method uses a map to collect words and count them. A t the end of the topology, the clearup() method is called to print the counter map. ( Although this is just one example, in general, when the topology is closed, you should use the cleanup() method to close active connections and other resources.) )
The main class
You can create a topology and a local cluster object in the main class to facilitate local testing and debugging. lets you experiment with different cluster configurations with config objects. F or example, when you test your topology with a different number of work processes, you can find errors if you accidentally use a global or class variable. (See Chapter 3 for more information)
NOTE: The processes of all topology nodes must be able to run independently without relying on shared data (that is, there are no global or class variables), because when the topology runs in a real cluster environment, these processes may run on different machines.
Next, TopologyBuilder will be used to create a topology that determines how Storm arranges nodes and how they exchange data.
    TopologyBuilder builder = new TopologyBuilder();
    builder.setSpout("word-reader", new WordReader());
    builder.setBolt("word-normalizer", new WordNormalizer()).shuffleGrouping("word-reader");
    builder.setBolt("word-counter", new WordCounter()).shuffleGrouping("word-normalizer");
Connect between spout and bolts via the shuffleGrouping method. This grouping determines that Storm sends messages from the source node to the target node in a randomly assigned manner.
Next, create a Config object that contains the topology configuration, which is merged with the cluster configuration at runtime and sent to all nodes via the prepare method.
    Config conf = new Config();
    conf.put("wordsFile", args[0]);
    conf.setDebug(true);
The file name of the file read by spout, assigned to the wordFile property. Because the debug property is set to true during the development phase, Strom prints all messages exchanged between nodes, as well as other debug data that helps you understand how the topology works.
As mentioned earlier, you want to run this topology with a LocalCluster object. In a production environment, the topology continues to run, but for this example, you can see the results as long as you run it for a few seconds.
    LocalCluster cluster = new LocalCluster();
    cluster.submitTopology("Getting-Started-Topologie", conf, builder.createTopology());
    Thread.sleep(2000);
    cluster.shutdown();
Call createTopology and submitTopology, run the topology, hibernate for two seconds (the topology runs on another thread), and then close the cluster.
Example 2-3 is the complete code
    //例2-3 src/main/java/TopologyMain.java
    import spouts.WordReader;
    import backtype.storm.Config;
    import backtype.storm.LocalCluster;
    import backtype.storm.topology.TopologyBuilder;
    import backtype.storm.tuple.Fields;
    import bolts.WordCounter;
    import bolts.WordNormalizer;

    public class TopologyMain {
        public static void main(String[] args) throws InterruptedException {
        //定义拓扑
            TopologyBuilder builder = new TopologyBuilder());
            builder.setSpout("word-reader", new WordReader());
            builder.setBolt("word-normalizer", new WordNormalizer()).shuffleGrouping("word-reader");
            builder.setBolt("word-counter", new WordCounter(),2).fieldsGrouping("word-normalizer", new Fields("word"));

        //配置
            Config conf = new Config();
            conf.put("wordsFile", args[0]);
            conf.setDebug(false);

        //运行拓扑
             conf.put(Config.TOPOLOGY_MAX_SPOUT_PENDING, 1);
            LocalCluster cluster = new LocalCluster();
            cluster.submitTopology("Getting-Started-Topologie", conf, builder.createTopology();
            Thread.sleep(1000);
            cluster.shutdown();
        }
    }
Observe the operation
You are ready to run your first topology. C reate a file below this directory, /src/main/resources/words.txt, a line of words, and then run the topology with the following command: mvn exec:java-java-Dexec.mainClass-"TopMaologyin" -Dexec.args="src/main/resources/words.txt. ing: S torm test great is an Storm simple application but very powerful really Storm is great you should see something like this in the log: is: 2 application: 1 but: 1 great: 1 test: 1 simple: 1 Storm: 3 really: 1 are: 1 great: 1 an: 1 powerful: 1 very: 1 in this example, there is only one instance of each type of node. B ut what if you have a very large log file? Y ou can easily change the number of nodes in your system to work in parallel. At this point, you're going to create two WordCounter instances.
builder.setBolt("word-counter", new WordCounter(),2).shuffleGrouping("word-normalizer"); When the program returns, you'll see: - Word-counter-2 - application: 1 is: 1 great: 1 are: 1 powerful: 1 Storm: 3 - Word-counter-3 - really: 1 is: 1 but: 1 great: 1 test: 1 simple: 1 an: 1 very: 1 great! M odifying parallelity is too easy (in practice, of course, each instance runs on a separate machine). B ut there seems to be a problem: the words is great are counted once for each WordCounter. H ow did this happen? W hen you call shuffleGrouping, it is determined that Storm sends a message to your bolt instance in a randomly assigned manner. I n this example, it is ideal to send the same word question to the same WordCounter instance. Y ou can do that by replacing shuffle Grouping ("word-normalizer") with fieldsgrouping ("word-normalizer", new Fields ("word"). T ry it again, re-run the program, and confirm the results. You'll learn more about grouping and message flow types in subsequent chapters.
Conclusion
We've discussed the differences between Storm's local and remote operating patterns, as well as Storm's powerful and easy-to-develop features. You've also learned some of storm's basic concepts, which we'll cover in depth in the next chapters.