Meteor animation
May 10, 2021 Meteor
Table of contents
Animation
We now have real-time polls, ratings and rankings. H owever, the user experience is not stable because the post bounces around on the home page. We use animation to smooth this transition.
Introduction _uihooks
_uihooks
relatively new, and the Blaze document does not contain this feature.
As its name suggests, it provides hooks that can be triggered whenever an element is inserted, deleted, or animated.
Hooks' full list is as follows:
-
insertElement: Called when a new element is inserted. -
moveElementCalled when an element is moved. -
removeElementCalled when an element is deleted.
Once defined, these hooks replace Meteor's default behavior. In other words, Meteor replaces the default act of inserting, moving, or deleting elements with the behavior we specify ———— it's up to us to determine that the behavior really works!
Meteor and DOM
Before we get started with the interesting part (moving things around), we need to understand how Meteor interacts with the DOM (Document Object Model———— a collection of HTML elements that make up the content of the page.
The most important thing to keep in mind is that DOM elements cannot really be "moved"; So to give element A and B the illusion of interchange positions, Meteor actually deletes element B and inserts a completely new copy (B') in front of element A.
This makes the animation a bit cumbersome because we can't just move the B animation to a new location, because B disappears when Meteor re-renders the page (which happens instantaneously due to responsiveness). But don't worry, we'll find a solution.
Soviet runner
But first, let's tell a story.
In 1980, it was the Cold War. T he Olympic Games were being held in Moscow, and the Soviet Union was determined to win the gold medal in the 100-meter dash at any cost. So a group of clever Soviet scientists equipped one of the athletes with a transmitter, and as soon as the shots rang out, the athlete disappeared instantly and appeared directly at the finish line through the continuous effects of time and space.
Fortunately, race officials immediately noticed the violation, and the athlete had no choice but to move back to the starter instantaneously to be allowed to race like the others.
My historical information is not so reliable, so you should be half-convinced of the story. But try to remember the metaphor of a Soviet runner with a transmitter, and we'll use that in this chapter.
Decomposition
When Meteor receives an update and changes the DOM in real time, our post is immediately delivered to its destination, just like the Soviet runner. B ut we can't move anything in a moment, whether it's in the Olympics or in our applications. So we need to transfer the component back to the "starter" and make it "run" (in other words, "animation" it) to the end.
So swap posts A and B (in p1 and p2 locations, respectively), and we'll go through the following steps:
- Delete B
- In doM, create B' before A
- Transfer B' to p2 position
- Transfer the A to p1 position
- Animation A to p2 positions
- Animation B' to p1 position
The following chart explains the steps in detail:
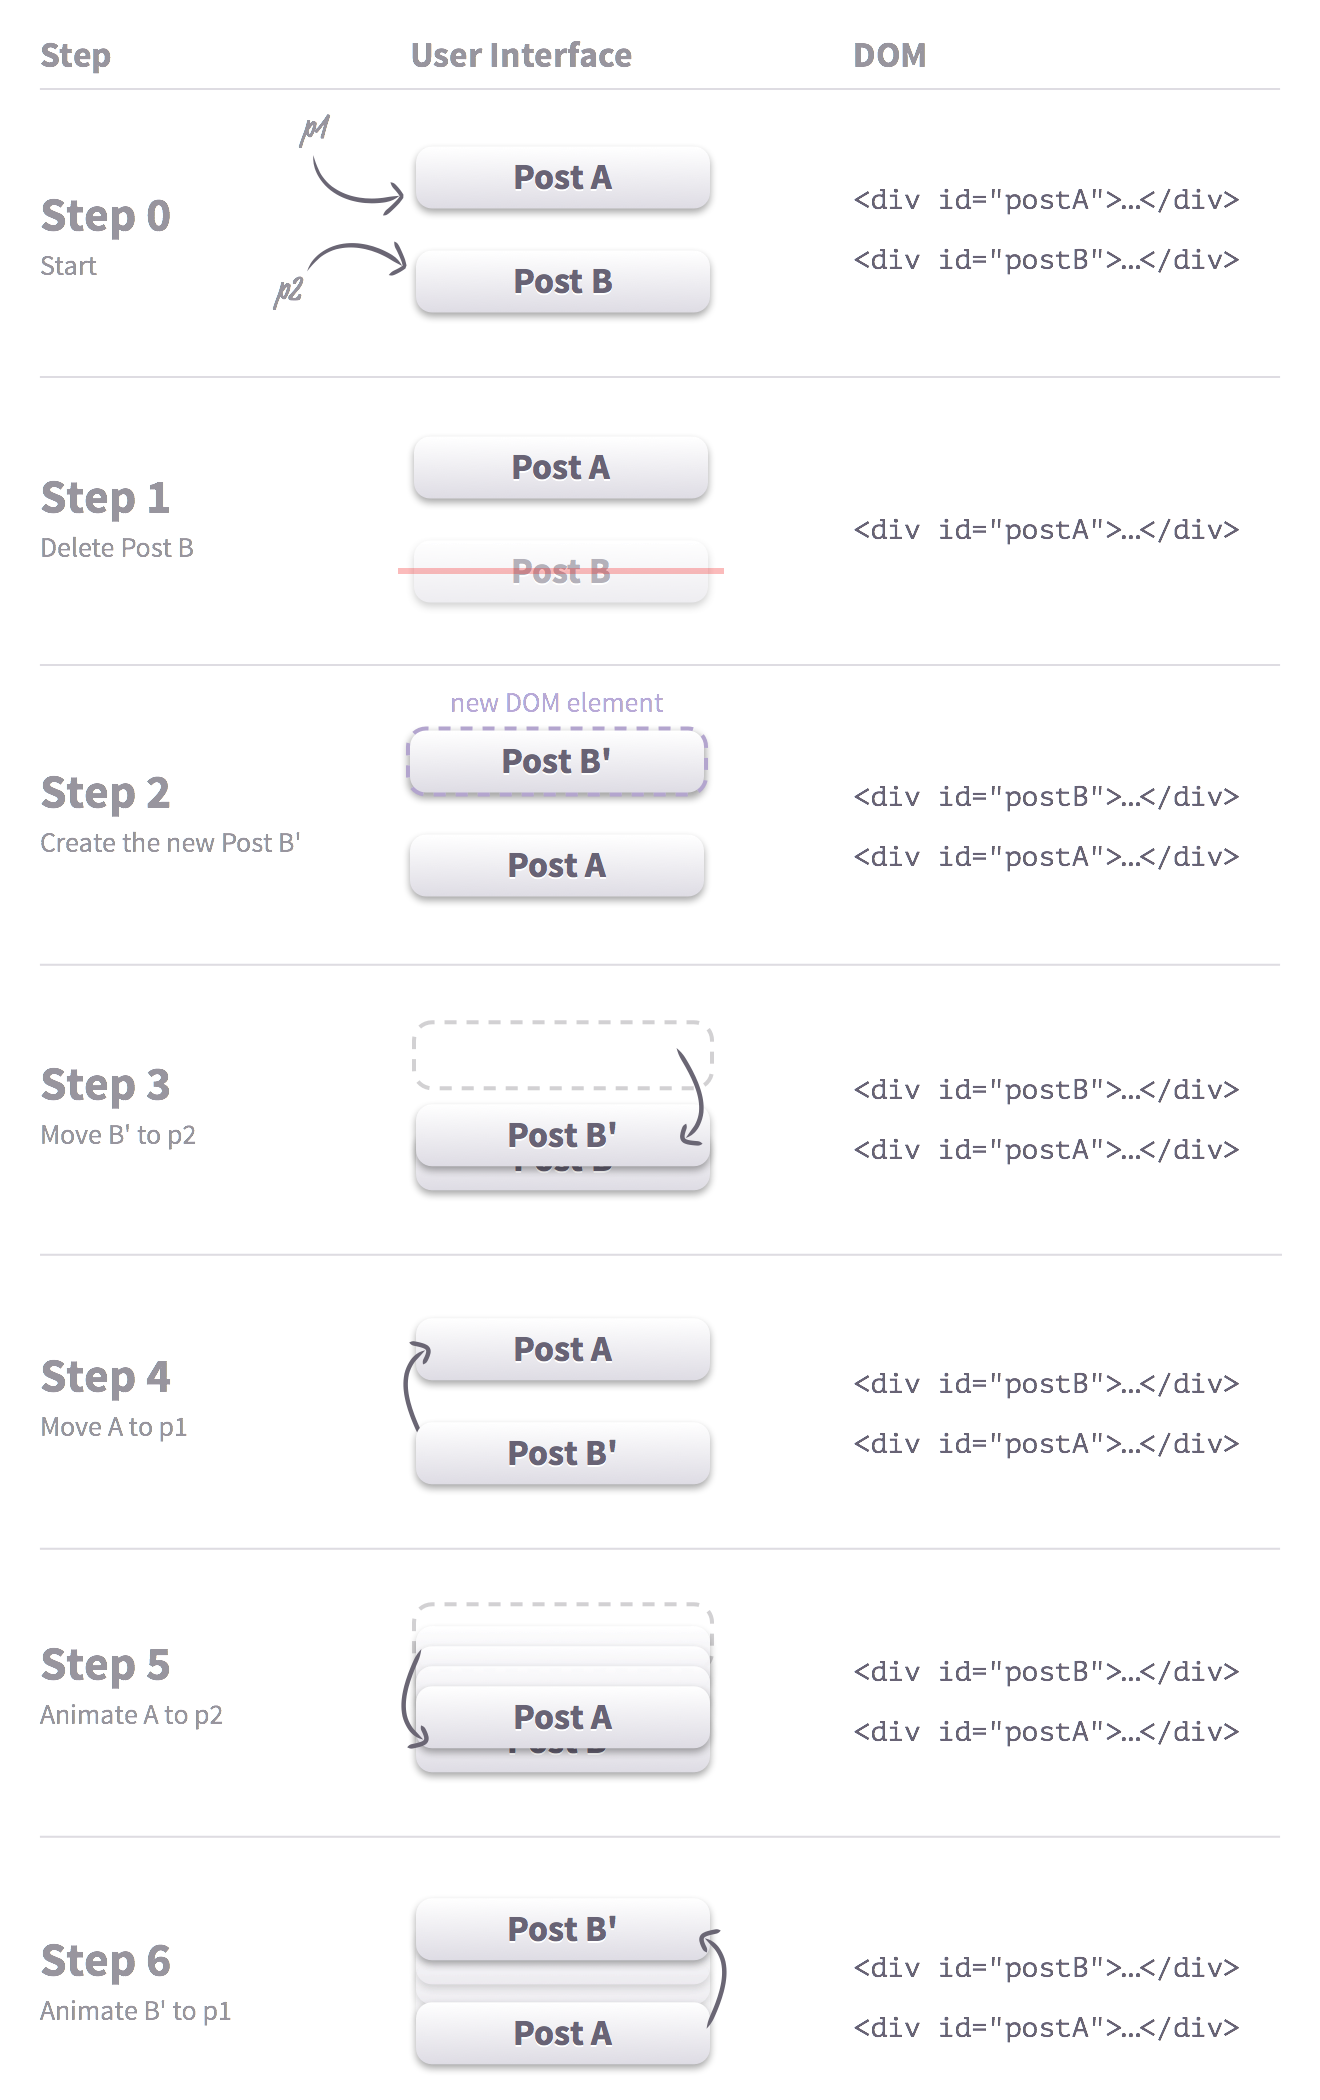
Again, in steps 3 and 4, instead of animate A and B' to their positions, we "transmitted" them instantaneously. Because this happens instantaneously, this creates the illusion that B is not deleted, and the two elements are animated to their new positions.
By default, Meteor is responsible for steps 1 and 2, which we can easily re-implement ourselves. I n steps 5 and 6 all we're doing is moving elements to the right place. So the only thing we really need to worry about is steps 3 and 4, that is, sending elements to the beginning of the animation.
CSS positioning
In order to animate posts on the page, we have to use CSS style. Let's take a quick look at CSS positioning in order.
The page element uses static positioning by default. Statically positioned elements adapt to the page content flow, and their coordinates on the screen cannot be changed or animated.
On the other hand, relative positioning is that elements are also adapted to the page content flow, but can be positioned relative to the original location.
Absolute positioning 10 steps further, allowing you to specify the x/y coordinates of an element relative to the document or the parent element of the first absolute or relative positioning.
We use relative targeting to animate our posts. We've got CSS ready for you, and all you need to do is add the code to your style sheet:
.post{
  position:relative;
}
.post.animate{
  transition:all 300ms 0ms ease-in;
}
Note that we only
.animate
CSS.
Control whether to add animations by adding or removing CSS names.
This makes steps 5 and 6 simple: all we need to do
top
coordinate value to
0px
(the default) and the posts will return to their "normal" positions.
Basically, our only challenge is to figure out where the elements are going to start animating relative to their new positions (steps 3 and 4), in other words, how much they're going to offset. But it's not hard: the correct offset is the original position of the post minus its new location.
Use _uihooks
Now that we understand the various factors that animate a post list, we're ready to start adding animation.
We first need to put the post list in
.wrapper
container element:
<template name="postsList">
  <div class="posts page">
    <div class="wrapper">
      {{#each posts}}
        {{> postItem}}
      {{/each}}
    </div>

    {{#if nextPath}}
      <a class="load-more" href="{{nextPath}}">Load more</a>
    {{else}}
      {{#unless ready}}
        {{> spinner}}
      {{/unless}}
    {{/if}}
  </div>
</template>
Now
_uihooks
In the
onRendered
callback function,
.wrapper
div and define a
moveElement
Template.postsList.onRendered(function () {
  this.find('.wrapper')._uihooks = {
    moveElement: function (node, next) {
      // 现在不做任何事情
    }
  }
});
The
moveElement
called when the element position changes, replacing Blaze's default behavior.
Since the function is still empty, it means
that nothing will happen.
Try it: Open the Best Best Posts page and vote for some posts: Post sorting doesn't change unless you force a refresh (refresh the page or change the path).
We've
_uihooks
work, now let's animate it!
The animated effect of the post sort
moveElement
hook accepts two parameters:
node
and
next
-
nodeis a DOM element that is currently moving to a new location -
nextis thenodeafter the node moves the new position
With this in check, we can implement the following animation process one by one (if you need to refresh your memory, refer to the previous example of "Soviet Runner"). When a new position change occurs, we will:
-
Insert
nextbeforenodeother words, if we don'tmoveElementhooks, the default behavior will occur). -
Move
nodeto its starting position. -
nodenextand next to makenodefor node. - All elements of the animation return to their new default position.
We do these things with the magic of jQuery, which is by far the best JavaScript library for doM. jQuery is out of the book, but let's take a quick look at the jQuery method we're about to use:
-
$(): Makes any DOM element a jQuery object. -
offset()the element relative to the current position of the document and returns the object thattopandleftproperties. -
outerHeight()the height of the "outer" element (including padding and optional margins). -
nextUntil(selector)element that matchesselectorafter all target elements have been obtained and do not contain them. -
insertBefore(selector)another element before matching the element ofselector -
removeClass(class)element has aclassCSS class, delete it. -
css(propertyName, propertyValue)Set the CSSpropertyNamepropertyValue -
height()the height of the element. -
addClass(class)CSSclassto elements.
Template.postsList.onRendered(function () {
  this.find('.wrapper')._uihooks = {
    moveElement: function (node, next) {
      var $node = $(node), $next = $(next);
      var oldTop = $node.offset().top;
      var height = $node.outerHeight(true);

      // 找出 next 与 node 之间所有的元素
      var $inBetween = $next.nextUntil(node);
      if ($inBetween.length === 0)
        $inBetween = $node.nextUntil(next);

      // 把 node 放在预订位置
      $node.insertBefore(next);

      // 测量新 top 偏移坐标
      var newTop = $node.offset().top;

      // 将 node *移回*至原始所在位置
      $node
        .removeClass('animate')
        .css('top', oldTop - newTop);

      // push every other element down (or up) to put them back
      $inBetween
        .removeClass('animate')
        .css('top', oldTop < newTop ? height : -1 * height);

      // 强制重绘
      $node.offset();

      // 动画,重置所有元素的 top 坐标为 0
      $node.addClass('animate').css('top', 0);
      $inBetween.addClass('animate').css('top', 0);
    }
  }
});
Annotations:
-
We calculate the
$nodethe data, so that we know how$inBetweenthe element you want to offset. We useouterHeight(true)margins and padding to the calculation. -
In DOM, we
nextwhether next is before or afternodeso we $inBetween$inBetweencases when defining the definition of node. -
In order to convert between the "transfer teleporting" and "animated animating" elements, we simply toggle
animateCSS class (the actual animation is defined in the CSS style sheet). -
Because we use relative positioning, we can always reset the top property
topof any element to 0 to place the element where it should be.
Force Redraw
You might be thinking
$node.offset()
line of code.
Why don't
$node
move and care about its location?
Think about it this way: If you tell a robot with perfect logic to run 5 kilometers north and run back to the starting point, it might think that since you're back to the starting point, why not save energy and stay where you are.
So to make sure the robot can run 10 kilometers, we'll tell it to record its coordinates when it runs 5 kilometers to turn.
The browser works in a similar way: if we give only
css('top', oldTop - newTop)
and
css('top', 0)
at the same time, the new coordinates simply replace the old coordinates and nothing happens.
If we want to really see the animation, we need to force the browser to redraw the element after it changes position.
A simple method of forced redrawing is for the browser to check the
offset
property of ———— to redraw the element again in order for the browser to recognize it.
Let's try again. Go back to the Best Posts page and vote for the post: You should now be able to see the post swipe up and down gracefully like a ballet.
Can't Fade Me
Now that we've made it harder to reorder, the animation of inserting and deleting posts is a piece of cake!
First, let's move on to a new post (note that for simplicity, we're using JavaScript animation here):
Template.postsList.onRendered(function () {
  this.find('.wrapper')._uihooks = {
    insertElement: function (node, next) {
      $(node)
        .hide()
        .insertBefore(next)
        .fadeIn();
    },
    moveElement: function (node, next) {
      //...
    }
  }
});
To get a better look, we'll test the animation by inserting a new post from the console:
Meteor.call('postInsert', {url: 'http://apple.com', title: 'Testing Animations'})Second, we animated out deleted posts:
Template.postsList.onRendered(function () {
  this.find('.wrapper')._uihooks = {
    insertElement: function (node, next) {
      $(node)
        .hide()
        .insertBefore(next)
        .fadeIn();
    },
    moveElement: function (node, next) {
      //...
    },
    removeElement: function(node) {
      $(node).fadeOut(function() {
        $(this).remove();
      });
    }
  }
});
Again, test the animation
Posts.remove('somePostId')
Page transition
So far, we've animated elements within the page. But what if we want to add transition animations between pages?
Page transitions are Iron Router's task.
Click on a
{{> yield}}
to automatically change the contents of the helper.
Just as we change Blaze's default behavior for the post
{{> yield}}
we can do the same thing for .
If we want to fade into the fade-in pages, we have to make sure that they appear above each other.
We wrapped each page template with the
.page
div that added the
position:absolute
property.
But we can't absolutely target our page relative to the window, because it overrides the app's header.
So we
#main
position:relative
file div so that the
position:absolute
.page
div gets its correct location.
To save time, we've added .css CSS code to the
sytle.css
code:
//...

#main{
  position: relative;
}
.page{
  position: absolute;
  top: 0px;
  width: 100%;
}

//...
It's time to add page transition code. The code looks familiar because it's exactly the same as the one we added and deleted when we added and deleted the post:
Template.layout.onRendered(function() {
  this.find('#main')._uihooks = {
    insertElement: function(node, next) {
      $(node)
        .hide()
        .insertBefore(next)
        .fadeIn();
    },
    removeElement: function(node) {
      $(node).fadeOut(function() {
        $(this).remove();
      });
    }
  }
});
We just looked at some patterns for adding animated elements to meteor apps. Although this is not an exhaustive list, it is hoped that this will provide a basis for building more complex transition animations on it.