Learn Vue 3.0, starting with building the environment
Jun 01, 2021 Article blog
Table of contents
This article will take you from scratch to build a
Vue3.0
development environment based on
Vue3.0
and
vite
and as you learn from this article, you will learn the following:
-
Initialize the
Vue3.0project withvite -
Configure
ts -
Configure
vue-router -
Configure
vuex -
Use
Vue3.0to develop aTodoListexample
Use
vite
to initialize the project
Vite introduction
vite
is a tool especially big in this year's new drumming, especially the description of
vite
is this: Vite is an opinionated web de build that tool serves you code via native ES Module imports inge dev and bundles it with Roll for production. T
ranslated as Chinese:
Vite
is a native
ES Module
Web
development and build tool.
Browser-native
ES imports
are developed in a development environment and
Rollup
packaging in a production environment.
The above paragraph mentions the keyword
ES Module
what is this? A
detailed description can be viewed developer.mozilla.org/zh-CN/docs/Web/JavaScript/Guide/Modules. H
ere we have a long story to short.
In the earliest days, there was no front-end engineering, and then we wrote
javascript
are written to a file, and then referenced by
script
tag, and then as the front end grew, the dependencies between
js
became more and more complex, and this required a mechanism to maintain this dependency
JavaScript 程序拆分为可按需导入的单独模块
which led to
AMD
CMD
and so on, and
ES Module
was the native module-dependent feature supported by the browser.
Why use vite
Why the introduction of
vite
when we use
webpack
each development time to start the project takes tens of seconds or even more than a minute, relatively slow, and hot update is relatively slow, and the main feature of
vite
is fast, the characteristics of the official website for
vite
is described as such
- Fast cold start
- Instant module hot updates
- True on-demand compilation
How fast is it, let's try a new project first
Initialize the vite project
-
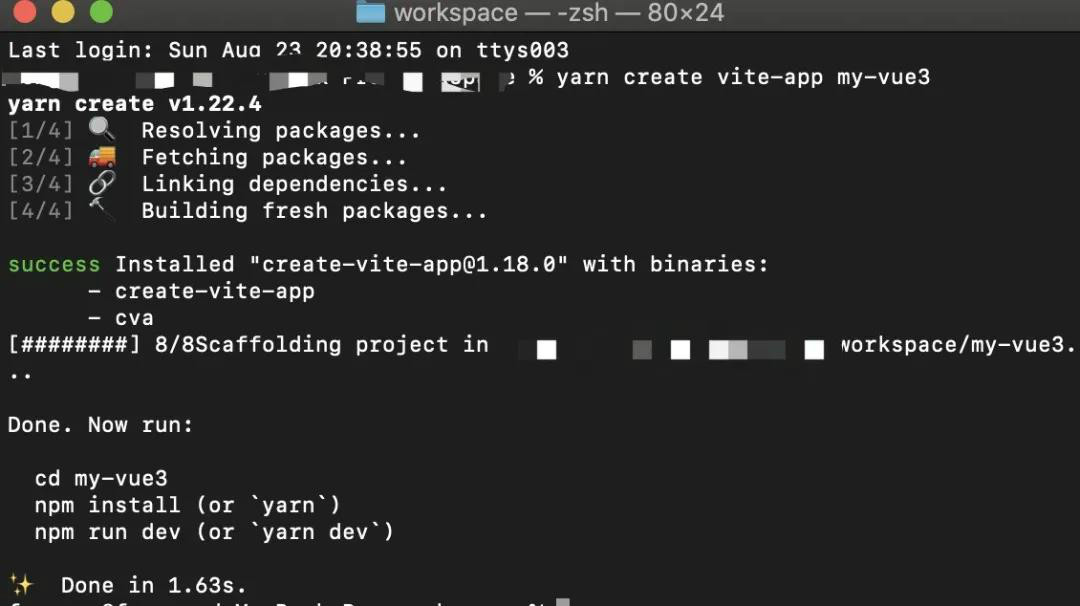
Initialize the project, open the terminal window in the workspace,
cmdforwindowuser, and then execute the following command
yarn create vite-app my-vue3
After execution, the following is output, and you can see that the new project is particularly fast, with only
1.63s

-
After initializing the project, proceed to the project via
cd my-vue3and then performyarninstallation dependency (Taobao mirroring is recommended here, relatively fast)
-
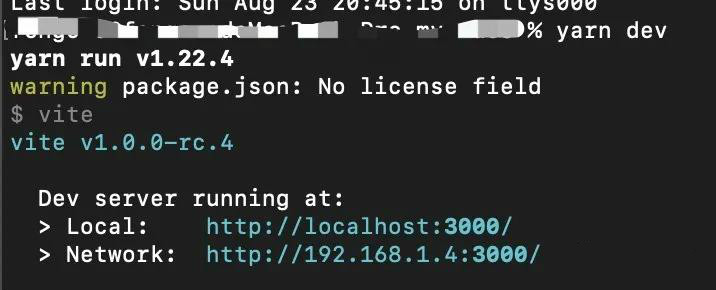
Depending on the installation requires the project to be started via
yarn dev

Is it an instant experience of the second start project feeling, after starting can
http://localhost:3000
to access the project
View the project structure
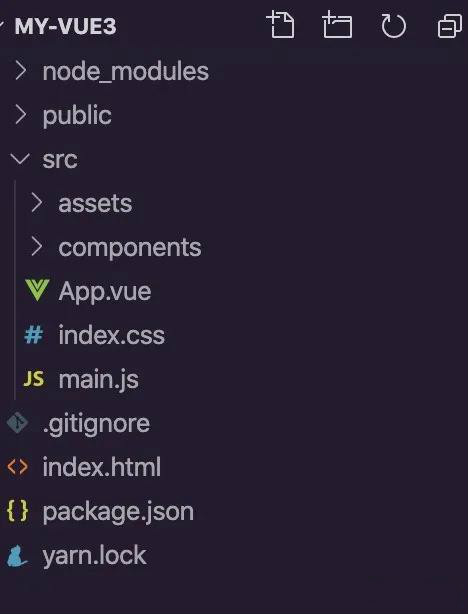
After you open a project with
vscode
you can see that the newly created project structure is essentially the same as the project structure created by
vue-cli4
and that we are familiar with
App.vue
and
main.js

View the contents of the main .js file
Open
main.js
import { createApp } from 'vue'
import App from './App.vue'
import './index.css'


createApp(App).mount('#app')
Discover that the way
Vue
was created has changed, originally by initializing
Vue
through the new
new Vue
approach, and in
Vue3.0
in order to modify the way
Vue3.0
is used more through
createApp
we'll show you over time in a series of articles.
(Recommended tutorial: Vue 2 tutorial)
Configure typescript
typescript
is now one of the front-end must-have skills, and a large number of projects are starting to be developed based on
typescript
W
hen using
Vue2.0
it's a bit awkward to use
ts
development feature because
Vue2.0
doesn't support
typescript
B
ut when it comes to
Vue3
its own source code is
ts
so it's inherently well supported for
ts
Configuring
typescript
with
vite
is simple and requires only the following steps.
-
Install
typescript
yarn add typescript -D
-
Initialize
tsconfig.json
   # 然后在控制台执行下面命令
   npx tsc --init
-
Change
main.jstomain.tsand the references in the indexindex.htmltomain.tsby also modifyingApp.vueandHelloWorld.vuefiles
   <!--将 <script> 修改为 <script lang="ts">-->
   <script lang="ts">
   import HelloWorld from './components/HelloWorld.vue'


   export default {
     name: 'App',
     components: {
       HelloWorld
     }
   }
   </script>
Once the modifications are complete, the restart is ready to access the project.
Although this configuration is possible,
ts
opening
main.ts
that
import App from App.vue
will report an error:
Cannot find module './App.vue' or its corresponding type declarations.
vue
Next you can happily use
ts
in the component
-
-
Add the
shim.d.tsfile at the root of the project
-
Add the
- Add the following
      declare module "*.vue" {
        import { Component } from "vue";
        const component: Component;
        export default component;
      }
Configure
vue-router
In
Vue2.0
our routes generally choose to use
vue-router
and
vue-router
is still available in
Vue3.0
although the current version of
vue-router
like
Vue3.0
is also a
beta
version, which at the time of writing is
4.0.0-beta7
Install
vue-router
Because the current
vue-router
version is for
vue3.0
or
beta
it cannot be installed directly through
yarn add vue-router
but requires a version number
yarn add vue-router@4.0.0-beta7
Configure vue-router
Create a new
router
directory under the project
src
directory, and then add
index.ts
file to add the following to the file
import {createRouter, createWebHashHistory} from 'vue-router'


// 在 Vue-router新版本中,需要使用createRouter来创建路由
export default createRouter({
  // 指定路由的模式,此处使用的是hash模式
  history: createWebHashHistory(),
  // 路由地址
  routes: []
})
As with the new
Vue3.0
initialization method,
vue-router
initialization method has also changed, becoming an initial route through
createRouter
Introduce
router
into
main.ts
The
main.ts
file is modified as follows
import { createApp } from 'vue'
import App from './App.vue'
import './index.css'
import router from './router/index'


const  app = createApp(App)
// 通过use 将 路由插件安装到 app 中
app.use(router)
app.mount('#app')
Configure vuex
Like
vue-router
the new
vuex
is currently in
beta
version, which is
4.0.0-beta.4
Install vuex
yarn add vuex@4.0.0-beta.4
Configure vuex
Create a new
store
directory under the project
src
directory and add
index.ts
file, which adds the following
import { createStore } from 'vuex'


interface State {
  userName: string
}


export default createStore({
  state(): State {
    return {
      userName: "子君",
    };
  },
});
Introduced into
main.ts
import { createApp } from 'vue'
import App from './App.vue'
import './index.css'
import router from './router/index'
import store from './store/index'


const  app = createApp(App)
app.use(router)
app.use(store)
app.mount('#app')
Develop TodoList
With a series of operations above, our development environment is already configured, and then we'll develop a
TodoList
through the new development environment to verify that it's working.
Add
todolist
page
-
First we create a new
viewsdirectory under thesrcdirectory, and then create a new filetodo-list.vueand add the following to the file
   <template>
     <div class="todo-list">
       <div>
         <label>新增待办</label>
          <input v-model="state.todo" @keyup.enter="handleAddTodo">
       </div>
       <div>
         <h3>待办列表({{todos.length}})</h3>
         <ul>
           <li v-for="item in todos" :key="item.id" @click="handleChangeStatus(item, true)">
             <input type="checkbox">
             <label>{{item.text}}</label>
           </li>
         </ul>
       </div>
       <div><h3>已办列表({{dones.length}})</h3></div>
       <ul>
         <li v-for="item in dones" :key="item.id" @click="handleChangeStatus(item, false)">
             <input type="checkbox" checked>
             <label>{{item.text}}</label>
           </li>
       </ul>
     </div>
   </template>
   <script lang="ts">
    // 在vue2中 data 在vue3中使用 reactive代替
   import { reactive, computed } from 'vue'
   import { useRouter } from 'vue-router'
   export default {
     // setup相当于vue2.0的 beforeCreate和 created,是vue3新增的一个属性,所有的操作都在此属性中完成
     setup(props, context) {
       // 通过reactive 可以初始化一个可响应的数据,与Vue2.0中的Vue.observer很相似
       const state = reactive({
         todoList: [{
           id: 1,
           done: false,
           text: '吃饭'
         },{
           id: 2,
           done: false,
           text: '睡觉'
         },{
           id: 3,
           done: false,
           text: '打豆豆'
         }],
         todo: ''
       })
       // 使用计算属性生成待办列表
       const todos = computed(() => {
         return state.todoList.filter(item => !item.done)
       })


       // 使用计算属性生成已办列表
       const dones = computed(() => {
         return state.todoList.filter(item => item.done)
       })


       // 修改待办状态
       const handleChangeStatus = (item ,status) => {
         item.done = status
       }


       // 新增待办
       const handleAddTodo = () => {
         if(!state.todo) {
           alert('请输入待办事项')
           return
         }
         state.todoList.push({
           text: state.todo,
           id: Date.now(),
           done: false
         })
         state.todo = ''
       }


        // 在Vue3.0中,所有的数据和方法都通过在setup 中 return 出去,然后在template中使用
       return {
         state,
         todos,
         dones,
         handleChangeStatus,
         handleAddTodo
       }
     }
   }
   </script>
   <style scoped>
   .todo-list{
     text-align: center;
   }


   .todo-list ul li {
     list-style: none;
   }
   </style>
Adjust the route
a. First modify the contents of the
App.vue
file to
lt; t emplate& lt; router-view&</router-view& lt;/template&
<script lang="ts">


export default {
  name: 'App'
}
</script>
b. Then modify
router/index.ts
file and add a new route
import {createRouter, createWebHashHistory} from 'vue-router'
// 在 Vue-router新版本中,需要使用createRouter来创建路由
export default createRouter({
  // 指定路由的模式,此处使用的是hash模式
  history: createWebHashHistory(),
  // 路由地址
  routes: [{
    path: '/todolist',
    // 必须添加.vue后缀
    component: () => import('../views/todo-list.vue')
  }]
})
That's when we can access
TodoList
through
http://localhost:3000/#/todolist
as shown in the following image

(Recommended micro-class: Vue 2.x micro-class)
summary
At this point, our
Vue3.0
development environment is built, and of course there are a lot of things to improve, such as we need to adjust the configuration of
typescript
and then add
eslint
and so on.
At the same time how to jump routes in a component, using
vuex
hasn't been explained yet, but at least we're already getting started.
Article Source: Public Number - Play at the front end
Author: Front-end hitter
The above is
W3Cschool编程狮
about learning Vue 3.0, starting with the construction environment related to the introduction, I hope to help you.