jQuery EasyUI window - Customize dialog boxes with toolbars and buttons
May 09, 2021 jQuery EasyUI
Table of contents
jQuery EasyUI window - Customize dialog boxes with toolbars and buttons
In the last section, we showed you how to create a simple dialog box in jQuery EasyUI, and in this section you'll learn how to add toolbars and buttons to a dialog box.
You can create a dialog with toolbar and button, which can be created from HTML tags.
The following example describes how to add toolbar and button to dialog without using any javascript code.
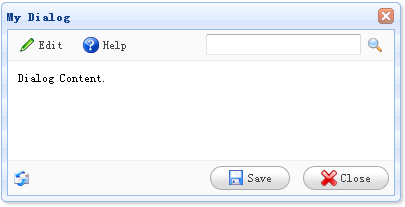
Create a dialog box
	<div id="dd" class="easyui-dialog" title="My Dialog" style="width:400px;height:200px;padding:10px" toolbar="#dlg-toolbar" buttons="#dlg-buttons">
		Dialog Content.
	</div>
Create a toolbar
	<div id="dlg-toolbar">
		<table cellpadding="0" cellspacing="0" style="width:100%">
			<tr>
				<td>
					<a href="#" class="easyui-linkbutton" iconCls="icon-edit" plain="true">Edit</a>
					<a href="#" class="easyui-linkbutton" iconCls="icon-help" plain="true">Help</a>
				</td>
				<td style="text-align:right">
					<input></input><a href="#" class="easyui-linkbutton" iconCls="icon-search" plain="true"></a>
				</td>
			</tr>
		</table>
	</div>
Create buttons
	<div id="dlg-buttons">
		<table cellpadding="0" cellspacing="0" style="width:100%">
			<tr>
				<td>
					<img src="email.gif"/>
				</td>
				<td style="text-align:right">
					<a href="#" class="easyui-linkbutton" iconCls="icon-save" onclick="javascript:alert('save')">Save</a>
					<a href="#" class="easyui-linkbutton" iconCls="icon-cancel" onclick="javascript:$('#dd').dialog('close')">Close</a>
				</td>
			</tr>
		</table>
	</div>
Note that the toolbar and buttons properties of the dialog can also be specified by the string value, which acts as a selector to select an appropriate DIV element and is appended to the toolbar or buttons position.