jQuery EasyUI Drag-and-Drop - Create a cart for drag-and-drop
May 08, 2021 jQuery EasyUI
Table of contents
jQuery EasyUI Drag-and-Drop - Create a cart for drag-and-drop
In the jQuery EasyUI Drag and Drop - Basic Drag and Drop section, we've seen the basic drag and drop of HTML elements, and in this section, we apply these drag-and-drop features to your Web application.
In this section, we'll show you how to create a shopping cart page that enables users to drag and place items that users want to buy, and when you drag and place items, the items and prices in the basket are updated accordingly.
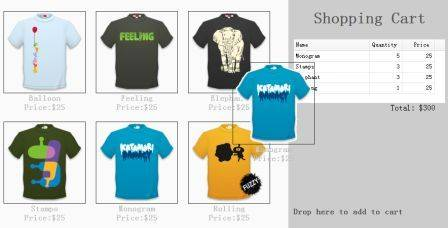
Displays the items on the page
<ul class="products">
	<li>
		<a href="#" class="item">
		<img src="images/shirt1.gif"/>
			<div>
				<p>Balloon</p>
				<p>Price:$25</p>
			</div>
		</a>
		</li>
		<li>
		<a href="#" class="item">
			<img src="images/shirt2.gif"/>
			<div>
				<p>Feeling</p>
				<p>Price:$25</p>
			</div>
		</a>
		</li>
	<!-- other products -->
</ul>
As you can see in the code above, let's add an element that contains some of the elements of the product. A ll items have name and price attributes, which are included in the element.
Create a shopping cart
	<div class="cart">
		<h1>Shopping Cart</h1>
		<table id="cartcontent" style="width:300px;height:auto;">
			<thead>
				<tr>
					<th field="name" width=140>Name</th>
					<th field="quantity" width=60 align="right">Quantity</th>
					<th field="price" width=60 align="right">Price</th>
				</tr>
			</thead>
		</table>
		<p class="total">Total: $0</p>
		<h2>Drop here to add to cart</h2>
	</div>
We use a data grid to display items in the basket.
Drag the cloned item
	$('.item').draggable({
		revert:true,
		proxy:'clone',
		onStartDrag:function(){
			$(this).draggable('options').cursor = 'not-allowed';
			$(this).draggable('proxy').css('z-index',10);
		},
		onStopDrag:function(){
			$(this).draggable('options').cursor='move';
		}
	});
Note that we set the value of the dragable property from 'proxy' to 'clone', so the drag element will be generated by the clone.
Place selected items into your shopping cart
	$('.cart').droppable({
		onDragEnter:function(e,source){
			$(source).draggable('options').cursor='auto';
		},
		onDragLeave:function(e,source){
			$(source).draggable('options').cursor='not-allowed';
		},
		onDrop:function(e,source){
			var name = $(source).find('p:eq(0)').html();
			var price = $(source).find('p:eq(1)').html();
			addProduct(name, parseFloat(price.split(')[1]));
                }
        });
        var data = {"total":0,"rows":[]};
        var totalCost = 0;
        function addProduct(name,price){
            function add(){                 for(var i=0; i<data.total; i++){                     var row = data.rows[i];                     if (row.name == name){                         row.quantity += 1;                         return;                     }                 }                 data.total += 1;                 data.rows.push({                      name:name,                      quantity:1,                      price:price                 });
           }
           add();
           totalCost += price;
           $('#cartcontent').datagrid('loadData', data);
           $('div.cart .total').html('Total: +totalCost);
       }
Whenever we place an item, we first get the product name and price, and then call the 'addProduct' function to update the basket.