Hadoop highly available builds in ultra-detail
May 30, 2021 Article blog
Table of contents
Hadoop highly available builds in ultra-detail
Experimental environment
master:192.168.10.131
slave1:192.168.10.129
slave2:192.168.10.130
操作系统ubuntu-16.04.3
hadoop-2.7.1
zookeeper-3.4.8
The installation step
1. Install jd
- Install jdk in the opt directory
tar -zvxf jdk-8u221-linux-x64.tar.gz
- Configure the environment variables
vim etc/profile
#jdk
export JAVA_HOME=/opt/jdk1.8.0_221
export JRE_HOME=${JAVA_HOME}/jre
export CLASSPATH=.:${JAVA_HOME}/lib:${JRE_HOME}/lib
export PATH=${JAVA_HOME}/bin:$PATH
source etc/profile
2. Modify hostname
The three virtual machines were modified to master, slave1, and slave2 respectively
vim /etc/hostname
3. Modify the hosts map and configure the ssh to log in without privacy
- To modify the host file, each host needs to do the following
vim /etc/hosts
192.168.10.131 master
192.168.10.129 slave1
192.168.10.130 slave2
-
Configure ssh to be secret-free
You first need to turn off the firewall
1、查看端口开启状态
sudo ufw status
2、开启某个端口,比如我开启的是8381
sudo ufw allow 8381
3、开启防火墙
sudo ufw enable
4、关闭防火墙
sudo ufw disable
 5、重启防火墙
 sudo ufw reload
 6、禁止外部某个端口比如80
 sudo ufw delete allow 80
 7、查看端口ip
 netstat -ltn
The cluster needs ssh to log on remotely to another host during start-up, and to avoid entering the password of the other host each time, we need to configure password-free login (prompt the action to press Enter)
ssh-keygen -t rsa
Copy the male keys of each host to yourself and other hosts
ssh-copy-id -i ~/.ssh/id_rsa.pub root@master
ssh-copy-id -i ~/.ssh/id_rsa.pub root@slave1
ssh-copy-id -i ~/.ssh/id_rsa.pub root@slave2
4. Set the time sync
- Install the httpdate service
apt-get install ntpdate
- Modify the ntp profile
vim /etc/ntp.conf

# /etc/ntp.conf, configuration for ntpd; see ntp.conf(5) for help

driftfile /var/lib/ntp/ntp.drift

# Enable this if you want statistics to be logged.
#statsdir /var/log/ntpstats/

statistics loopstats peerstats clockstats
filegen loopstats file loopstats type day enable
filegen peerstats file peerstats type day enable
filegen clockstats file clockstats type day enable

# Specify one or more NTP servers.

# Use servers from the NTP Pool Project. Approved by Ubuntu Technical Board
# on 2011-02-08 (LP: #104525). See http://www.pool.ntp.org/join.html for
# more information.
#pool 0.ubuntu.pool.ntp.org iburst
#pool 1.ubuntu.pool.ntp.org iburst
#pool 2.ubuntu.pool.ntp.org iburst
#pool 3.ubuntu.pool.ntp.org iburst

# Use Ubuntu's ntp server as a fallback.
#pool ntp.ubuntu.com

# Access control configuration; see /usr/share/doc/ntp-doc/html/accopt.html for
# details.  The web page <http://support.ntp.org/bin/view/Support/AccessRestrictions>
# might also be helpful.
#
# Note that "restrict" applies to both servers and clients, so a configuration
# that might be intended to block requests from certain clients could also end
# up blocking replies from your own upstream servers.

# By default, exchange time with everybody, but don't allow configuration.
restrict -4 default kod notrap nomodify nopeer noquery limited
restrict -6 default kod notrap nomodify nopeer noquery limited

# Local users may interrogate the ntp server more closely.
restrict 127.0.0.1
restrict ::1

# Needed for adding pool entries
restrict source notrap nomodify noquery


# Clients from this (example!) subnet have unlimited access, but only if
# cryptographically authenticated.
# 允许局域网内设备与这台服务器进行同步时间.但是拒绝让他们修改服务器上的时间
#restrict 192.168.10.131 mask 255.255.255.0 nomodify notrust
restrict 192.168.10.129 mask 255.255.255.0 nomodify notrust
restrict 192.168.10.130 mask 255.255.255.0 nomodify notrust

# 允许上层时间服务器修改本机时间
#restrict times.aliyun.com nomodify
#restrict ntp.aliyun.com  nomodify
#restrict cn.pool.ntp.org nomodify

# 定义要同步的时间服务器
server 192.168.10.131 perfer
#server times.aliyun.com iburst prefer    # prefer表示为优先,表示本机优先同步该服务器时间
#server ntp.aliyun.com iburst
#server cn.pool.ntp.org iburst

#logfile /var/log/ntpstats/ntpd.log    # 定义ntp日志目录
#pidfile  /var/run/ntp.pid    # 定义pid路径

# If you want to provide time to your local subnet, change the next line.
# (Again, the address is an example only.)
#broadcast 192.168.123.255

# If you want to listen to time broadcasts on your local subnet, de-comment the
# next lines.  Please do this only if you trust everybody on the network!
#disable auth
#broadcastclient

#Changes recquired to use pps synchonisation as explained in documentation:
#http://www.ntp.org/ntpfaq/NTP-s-config-adv.htm#AEN3918

#server 127.127.8.1 mode 135 prefer    # Meinberg GPS167 with PPS
#fudge 127.127.8.1 time1 0.0042        # relative to PPS for my hardware

#server 127.127.22.1                   # ATOM(PPS)
#fudge 127.127.22.1 flag3 1            # enable PPS API
server 127.127.1.0
fudge 127.127.1.0 stratum 10
- Start the ntpd service and view the ntp sync status
service ntpd start  #启动ntp服务
ntpq -p        #观察时间同步状况
ntpstat         #查看时间同步结果
- Restart the service to synchronize with master host time
/etc/init.d/ntp restart
ntpdate 192.168.10.131
5. Install hadoop to/opt/data directory
- Create a new Data directory under /opt directory
cd /opt
mkdir Data
- Download and unzip the hadoop to/opt/data directory
wget https://archive.apache.org/dist/hadoop/common/hadoop-2.7.1/
tar -zvxf hadoop-2.7.1.tar /opt/data
- Configure the environment variables
# HADOOP
export HADOOP_HOME=/opt/Data/hadoop-2.7.1
export HADOOP_CONF_DIR=${HADOOP_HOME}/etc/hadoop
export PATH=${HADOOP_HOME}/bin:${HADOOP_HOME}/sbin:$PATH
export HADOOP_YARN_HOME=$HADOOP_HOME
6. Modify the hadoop profile
File directory hadoop-2.7.1/etc/hadoop
- Modify the hadoop-env.sh
export JAVA_HOME=/opt/jdk1.8.0_221
- Modify the core-site .xml
<configuration>
<!-- 指定hdfs的nameservice为ns1 -->
    <property>
        <name>fs.defaultFS</name>
        <value>hdfs://ns1/</value>
    </property>

<!-- 指定hadoop临时目录 -->
    <property>
        <name>hadoop.tmp.dir</name>
        <value>/opt/Data/hadoop-2.7.1/tmp</value>
    </property>

<!-- 指定zookeeper地址 -->
    <property>
        <name>ha.zookeeper.quorum</name>
        <value>slave1:2181,slave2:2181</value>
    </property>

<!--修改core-site.xml中的ipc参数,防止出现连接journalnode服务ConnectException-->
    <property>
        <name>ipc.client.connect.max.retries</name>
        <value>100</value>
    <description>Indicates the number of retries a client will make to establish a server connection.</description>
    </property>
</configuration>
- Modify the hddfs-site .xml
<configuration>
<!--指定hdfs的nameservice为ns1,需要和core-site.xml中的保持一致 -->
   <property>
      <name>dfs.nameservices</name>
      <value>ns1</value>
   </property>

<!-- ns1下面有两个NameNode,分别是nn1,nn2 -->
   <property>
      <name>dfs.ha.namenodes.ns1</name>
      <value>nn1,nn2</value>
   </property>

<!-- nn1的RPC通信地址 -->
   <property>
      <name>dfs.namenode.rpc-address.ns1.nn1</name>
      <value>master:9820</value>
   </property>

<!-- nn1的http通信地址 -->
   <property>
      <name>dfs.namenode.http-address.ns1.nn1</name>
      <value>master:9870</value>
   </property>

<!-- nn2的RPC通信地址 -->
   <property>
      <name>dfs.namenode.rpc-address.ns1.nn2</name>
      <value>slave1:9820</value>
   </property>

<!-- nn2的http通信地址 -->
   <property>
      <name>dfs.namenode.http-address.ns1.nn2</name>
      <value>slave1:9870</value>
   </property>

<!-- 指定NameNode的日志在JournalNode上的存放位置 -->
   <property>
      <name>dfs.namenode.shared.edits.dir</name>
<value>qjournal://master:8485;slave1:8485;slave2:8485/ns1</value>
   </property>

<!-- 指定JournalNode在本地磁盘存放数据的位置 -->
   <property>
      <name>dfs.journalnode.edits.dir</name>
      <value>/opt/Data/hadoop-2.7.1/journal</value>
   </property>

<!-- 开启NameNode失败自动切换 -->
   <property>
      <name>dfs.ha.automatic-failover.enabled</name>
      <value>true</value>
   </property>

<!-- 配置失败自动切换实现方式 -->
   <property>
      <name>dfs.client.failover.proxy.provider.ns1</name>
<value>org.apache.hadoop.hdfs.server.namenode.ha.ConfiguredFailoverProxyProvider</value>
   </property>

<!-- 配置隔离机制方法,多个机制用换行分割,即每个机制暂用一行-->
   <property>
      <name>dfs.ha.fencing.methods</name>
      <value>
      sshfence
      shell(/bin/true)
     </value>
   </property>

<!-- 使用sshfence隔离机制时需要ssh免登陆 -->
   <property>
      <name>dfs.ha.fencing.ssh.private-key-files</name>
      <value>/root/.ssh/id_rsa</value>
   </property>

<!-- 配置sshfence隔离机制超时时间 -->
   <property>
      <name>dfs.ha.fencing.ssh.connect-timeout</name>
      <value>30000</value>
   </property>

   <!--配置namenode存放元数据的目录,可以不配置,如果不配置则默认放到hadoop.tmp.dir下-->
   <property>
      <name>dfs.namenode.name.dir</name>
      <value>/opt/Data/hadoop-2.7.1/data/name</value>
   </property>

   <!--配置datanode存放元数据的目录,可以不配置,如果不配置则默认放到hadoop.tmp.dir下-->
   <property>
      <name>dfs.datanode.data.dir</name>
      <value>/opt/Data/hadoop-2.7.1/data/data</value>
   </property>

    <!--配置复本数量-->
   <property>
      <name>dfs.replication</name>
      <value>2</value>
   </property>

   <!--设置用户的操作权限,false表示关闭权限验证,任何用户都可以操作-->
   <property>
      <name>dfs.webhdfs.enabled</name>
      <value>true</value>
   </property>

</configuration>
- Modify the mapred-site .xml
将文件名修改为mapred-site.xml
cp mapred-queues.xml.template mapred-site.xml


<configuration>
    <property>
       <name>mapreduce.framework.name</name>
       <value>yarn</value>
    </property>

</configuration>
- Modify the yarn-site .xml
<configuration>
<!-- 指定nodemanager启动时加载server的方式为shuffle server -->
<property>
<name>yarn.nodemanager.aux-services</name>
<value>mapreduce_shuffle</value>
</property>

<!--配置yarn的高可用-->
<property>
<name>yarn.resourcemanager.ha.enabled</name>
<value>true</value>
</property>

<!--执行yarn集群的别名-->
<property>
<name>yarn.resourcemanager.cluster-id</name>
<value>cluster1</value>
</property>

<!--指定两个resourcemaneger的名称-->
<property>
<name>yarn.resourcemanager.ha.rm-ids</name>
<value>rm1,rm2</value>
</property>

<!--配置rm1的主机-->
<property>
<name>yarn.resourcemanager.hostname.rm1</name>
<value>master</value>
</property>

<!--配置rm2的主机-->
<property>
<name>yarn.resourcemanager.hostname.rm2</name>
<value>slave1</value>
</property>

<!--配置2个resourcemanager节点-->
<property>
<name>yarn.resourcemanager.zk-address</name>
<value>slave1:2181,slave2:2181</value>
</property>

<!--zookeeper集群地址-->
<property>
<name>yarn.nodemanager.vmem-check-enabled</name>
<value>false</value>
<description>Whether virtual memory limits will be enforced for containers</description>
</property>

<!--物理内存8G-->
<property>
<name>yarn.nodemanager.vmem-pmem-ratio</name>
<value>8</value>
<description>Ratio between virtual memory to physical memory when setting memory limits for containers</description>
</property>
</configuration>
- Modify slave
master
slave1
slave2
7. Zookeeper cluster installation configuration
- Download and unzip zookeeper-3.4.8 .tar.gz
wget https://archive.apache.org/dist/zookeeper/zookeeper-3.4.8/zookeeper-3.4.8.tar.gz
tar -zvxf zookeeper-3.4.8.tar.gz /opt/Data
- Modify the profile
#zookeeper
export ZOOKEEPER_HOME=/opt/Data/zookeeper-3.4.8
export PATH=$PATH:$JAVA_HOME/bin:$ZOOKEEPER_HOME/bin
Go to the conf directory and copy the zoo-sample .cfg as the zoo .cfg
cp zoo-sample.cfg zoo.cfg
- Modify the zoo .cfg
dataDir=/opt/Data/zookeeper-3.4.8/tmp  //需要在zookeeper-3.4.8目录下新建tmp目录

server.1=master:2888:3888
server.2=slave1:2888:3888
server.3=slave2:2888:3888
- Create a myid file in the tmp directory
vim myid

1     //其他主机需要修改该编号  2,3
8. Start the cluster
- Format the master hostnamenode. Enter the command in the /etc/hadoop directory
hadoop namenode -format
- Copy the Data directory to the other two hosts
scp -r /opt/Data root@slave1:/opt
scp -r /opt/Data root@slave2:/opt
- Start zookeeper and all nodes execute
hadoop-daemon.sh start zkfc
- Format zookeeper and all nodes execute
hdfs zkfc -formatZK
- Start the tournalnode, namenode alternate node is the same (hadoop-2.7.1 directory execution)
hadoop-daemon.sh start journalnode
- Start the cluster
start-all.sh
- View the port
netstat -ntlup #可以查看服务端占用的端口
-
View the process jps
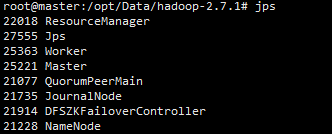
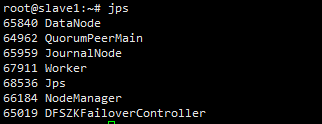
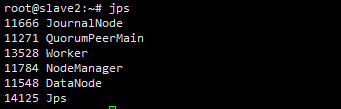
-
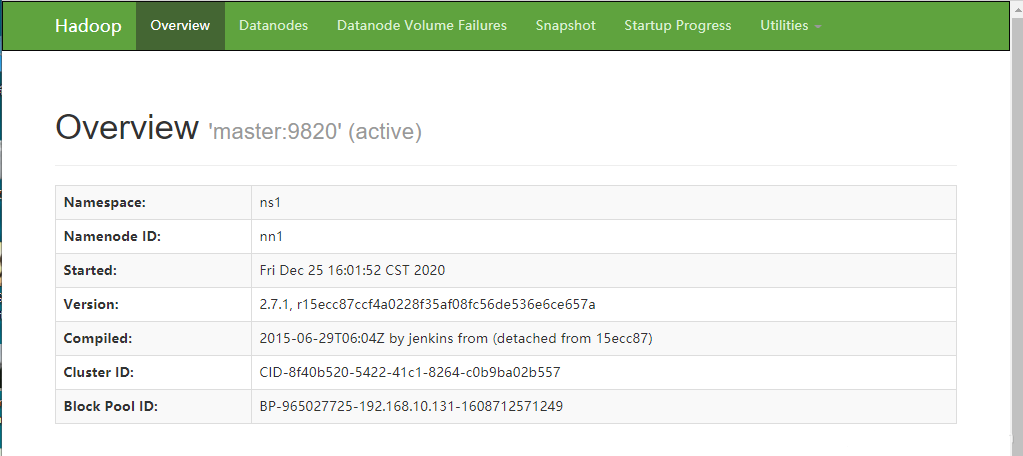
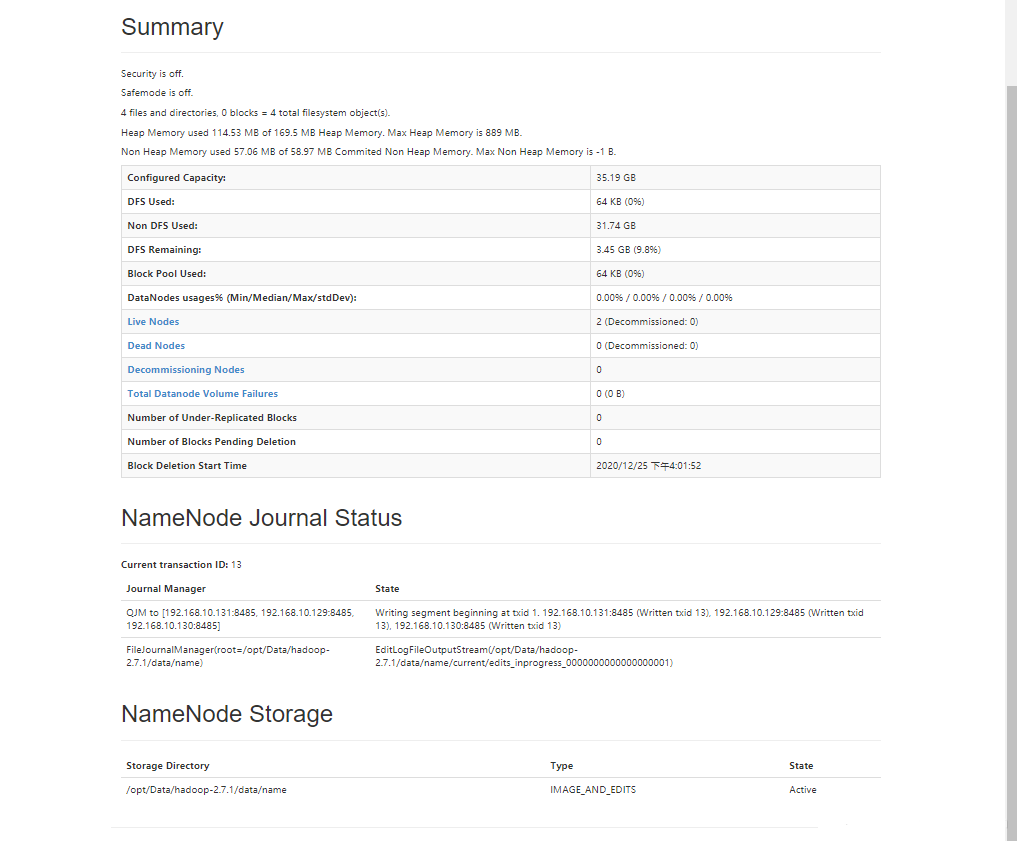
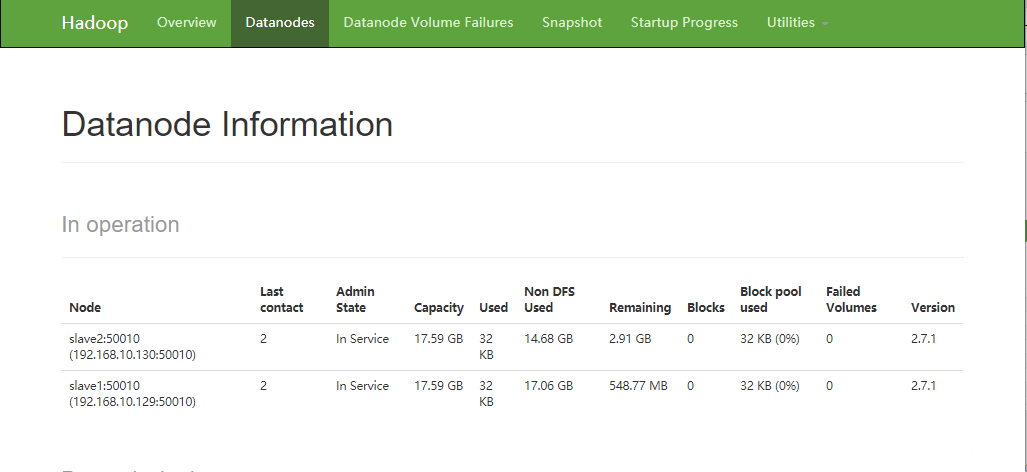
The web views the cluster
(namenode node ip address: 9870)
Recommended lessons: Hadoop tutorials