Flex Quick Guide
May 25, 2021 Flex
Table of contents
5. Step 1 - Verify the Java installation on your computer
6. Step 2 - Install the Java Development Kit (JDK):
7. Step 3 - Set up Adobe Flash Builder 4.5
8. Step 4: Set up Apache Tomcat:
9. The application build process
10.. The application startup process
16.. Step 1 - Create a project
17.. Step 2 - Create an external CSS file
18.. Step 3 - Modify the wrapper HTML page template
19.. Step 4 - Create an internal CSS file
20.. Step 5 - Modify the entry-level class
21.. Step 6 - Build the application
22.. Step 7 - Run the application
23.. The workflow that internationalizes Flex applications
24.. Step 1: Create a folder structure
25.. Step 2: Create a property file
26.. Step 3: Specify the compiler options
27.. An example of internalization
Flex - Overview
What is Flex?
-
Flex is a powerful open source application framework that allows traditional applications to be built for browsers, mobile devices, and desktops using the same programming models, tools, and code base.
-
Flex provides FLEX SDKs and other utilities consisting of Flex Class Library (ActionScript Class), Flex compiler, debugger, MXML, and ActionScript programming languages to build expressive and interactive Internet-rich applications (RIA)
-
Flex is responsible for the user interface (UI) or client functionality of Web applications. Server-side functionality depends on server-side components written in traditional scripting languages (Java/PHP, etc.).
-
Flex-based applications are actually provided as SWF files, much like the HTML/Javascript section of traditional Web applications.
-
Flex applications act as SWF files as well as HTML wrappers, CSS files and any server-side script files (i.e. Java, . C FM,. P HP, etc.) deployed to the server. Like a traditional Web application
-
These resources are delivered from the server to the client browser using the usual HTTP request/response method, in which Flash Player runs the application.
The benefits of Flex
-
Flash Player-based Flex applications can access device features such as GPS, cameras, local databases, and graphical accelerometers.
-
Flex apps can run on Android, BlackBerry Tablet OS, iOS devices.
-
Flex applications can run on browsers and desktops.
-
Flex applications are platform-independent. /b10> The UI can be local to the platform or the same on each platform.
-
Flex applications can use industry standards (e.g. REST, SOAP, JSON, JMS and AMF) with all major server-side technologies (e.g. Java, Spring, Hibernate, PHP, Ruby, .NET, Adobe ColdFusion and SAP)
-
Flex application development ensures a rich user experience by visually interacting with applications to present information in a more visually rich interface.
-
A Flex application is a single-page application where states can be transitioned from one state to another without having to get a new page from the server or refresh the browser.
-
The Flex application significantly reduces the load on the server because it only needs to return the application once, rather than a new page whenever the user changes the view.
The disadvantages of Flex
-
The Flex application is a single-threaded application, but Flex provides an asynchronous programming model to mitigate this problem.
-
Flex is based on actionscript and XML. /b10> Learning these two is what Flex must do.
Flex - Environment settings
This tutorial will show you how to prepare your development environment to get started with Adobe Flex Framework. This tutorial will also teach you how to install JDK and Adobe Flash Builder on your machine before setting up the Flex framework:
System requirements
FLEX requires JDK 1.4 or later, so the first requirement is to install JDK on your computer.
| Jdk | 1.4 or above. |
|---|---|
| Memory | There are no minimum requirements. |
| Disk space | There are no minimum requirements. |
| Operating system | There are no minimum requirements. |
Follow the given steps to set up your environment to start Flex application development.
Step 1 - Verify the Java installation on your computer
Now open the console and execute the following java command.
| Operating system | Task | Command |
|---|---|---|
| Windows | Open the command console | c:\> java -version |
| Linux | Open the command terminal | $ java -version |
| Mac | Open the terminal | Machine: s joseph $ java -version |
Let's verify the output of all operating systems:
| Operating system | The output is generated |
|---|---|
| Windows |
java version "1.6.0-21" Java (TM) SE Runtime Environment (build 1.6.0-21-b07) Java HotSpot (TM) Client VM (Build 17.0-b17, Hybrid Mode, Shared) |
| Linux |
java version "1.6.0-21" Java (TM) SE Runtime Environment (build 1.6.0-21-b07) Java HotSpot (TM) Client VM (Build 17.0-b17, Hybrid Mode, Shared) |
| Mac |
java version "1.6.0-21" Java (TM) SE Runtime Environment (build 1.6.0-21-b07) Java HotSpot (TM) 64-bit server VM (build 17.0-b17, hybrid mode, shared) |
Step 2 - Install the Java Development Kit (JDK):
If Java is not installed, you can install the Java Software Development Kit (SDK): Java SE Downloads download from Oracle's Java site. /b10> You will find instructions for installing JDK in the downloaded file, and follow the given instructions to install and configure the settings. /b11>Finally, PATH and JAVA_HOME environment variables are set to refer to directories containing java and java, usually java_install_dir /bin and java_install_dir.
Set JAVA_HOME environment variable to point to the base directory location where Java is installed on your computer. For example
| Operating system | Output |
|---|---|
| Windows | Set the JAVA_HOME variable to C: Program Files, Java, jdk1.6.0_21 |
| Linux | export JAVA_HOME = / usr / local / java-current |
| Mac | export JAVA_HOME = / Library / Java / Home |
Attach the Java compiler location to the system path.
| Operating system | Output |
|---|---|
| Windows | Attach the JAVA_HOME% to the end of the system variable Path. |
| Linux | export PATH = $ PATH:$ JAVA_HOME / bin / |
| Mac | No, you don't need to |
Step 3 - Set up Adobe Flash Builder 4.5
All the examples in this tutorial were written using the Adobe Flash Builder 4.5 Profession IDE trial. /b10> So I suggest you have the latest version of Adobe Flash Builder installed on your machine on your operating system.
To install the Adobe Flash Builder IDE, unziw the binary distribution package to a convenient location after downloading the installation from the http://www.adobe.com/in/products/flash-builder.html. /b11> For example, on Windows, C: s flash-builder, or linux / Unix on / usr / local / flash-builder, and finally set the PATH variable appropriately.
Flash Builder can be started by executing the following commands on a Windows machine, or by hitting FlashBuilder directly .exe
%C:\flash-builder\FlashBuilder.exe
Flash Builder can be started by executing the following commands on Unix (Solaris, Linux, etc.):
$/usr/local/flash-builder/FlashBuilder
The Adobe Flash Builder trial is available for 60 days. /b10> Accept only the terms and conditions, skip the initial registration step, and continue to use the IDE. /b11> We are using the trial version for teaching purposes.
After a successful startup, if everything is fine, it should show the following results:
Adobe Flash Builder is pre-configured with the FLEX SDK. /b10> We used FLEX SDK 4.5 in our examples, which are provided with Adobe Flash Builder 4.5.
Step 4: Set up Apache Tomcat:
You can download the http://tomcat.apache.org/ version of Tomcat from the website . /b11> After downloading the installation, unziw the binary distribution package to a convenient location. /b12>For example, on Windows, C:\apache-tomcat-6.0.33 or Linux/Unix/usr/local/apache-tomcat-6.0.33, and set the CATALINA_HOME environment variable that points to the installation location.
Tomcat can start by executing the following commands on a Windows machine, or you can double-click .bat
 %CATALINA_HOME%\bin\startup.bat

 or

 C:\apache-tomcat-6.0.33\bin\startup.bat
Tomcat can start by executing the following commands on Unix (Solaris, Linux, etc.):
$CATALINA_HOME/bin/startup.sh

or

/usr/local/apache-tomcat-6.0.33/bin/startup.sh
Once successfully launched, the default Web application contained in Tomcat will be obtained by accessing http:// localhost:8080 /. If everything is fine, then it should show the following results:
For more information about configuring and running Tomcat, see the documentation contained here and the Tomcat website: http://tomcat.apache.org
Tomcat can be stopped by executing the following command on a Windows machine:
%CATALINA_HOME%\bin\shutdown

or

C:\apache-tomcat-5.5.29\bin\shutdown
Tomcat can be stopped by executing the following commands on Unix (Solaris, Linux, etc.) machines:
$CATALINA_HOME/bin/shutdown.sh

or

/usr/local/apache-tomcat-5.5.29/bin/shutdown.sh
Flex - Environment settings ...
Before we get started with Flash Builder to create an actual HelloWorld application, let's look at the actual part of the Flex application. The Flex application consists of four important sections, the last of which is optional, but the first three are mandatory:
-
Flex Framework Library
-
The client code
-
Public Resources (HTML / JS / CSS)
-
Server-side code
Examples of different parts of HelloWord, a typical Flex application, are as follows:
| Name | Position |
|---|---|
| The root of the project | HelloWorld/ |
| Flex Framework Library | Build the path |
| Public resources | html-template |
| The client code | table table-bordered / com / tutorialspoint / client |
| Server-side code | table table-bordered / com / tutorialspoint / server |
The application build process
Flex applications require a Flex framework library. /b10> Flash Builder automatically adds libraries to the build path.
When we build code with Flash Builder, Flash Builder does the following
-
Compile the source code into a HelloWorld .swf file.
-
Compile HelloWorld files (wrapped files for swf files.html) from files stored in the html-template folder .html index.template)
-
Copy the HelloWorld and HelloWorld .swf files in the .html folder, bin-debug.
-
Copy the swfobject .js, a javascript code responsible for dynamically loading the swf file, bin-debug, in the HelloWorld .html in the target folder
-
Copy the framework library frameworks_xxx.swf, bin-debug, as a swf file named "Swf" in the destination folder
-
Copy other flex modules in the destination folder (.swf files, such as sparkskins_xxx.swf, textLayout_xxx.swf).
The application startup process
-
Open helloWorld's file in any web browser in the HelloWorld's .html folder.
-
HelloWorld .swf will load automatically and the application will start running.
Flex Framework Library
Here are a few brief details of the important framework libraries.
Use the .swc notation in the flex library
| S.N. | The node and describe |
|---|---|
| 1 |
playerglobal.swc This library is dedicated to Flash Player installed on your computer and contains the local methods supported by Flash Player. |
| 2 |
textlayout.swc This library supports text layout-related features. |
| 3 |
framework.swc This is the core feature of the Flex framework library that contains Flex. |
| 4 |
mx.swc This library stores the definition of the mx UI control. |
| 5 |
charts.swc This library supports chart controls. |
| 6 |
spark.swc This library stores the definition of the spark UI control. |
| 7 |
sparkskins.swc This library supports skin change for spark UI controls. |
The client code
Flex application code can be written in MXML and ActionScript.| S.N. | The type and describe |
|---|---|
| 1 |
MXML MXML is an XML tag language that we will use to lay out user interface components. MXML is compiled into ActionScript during the build process. |
| 2 |
ActionScript ActionScript is an object-oriented, process programming language based on the draft language specification of ECMAScript (ECMA-262) Version 4. |
-
Use MXML tags to lay out user interface components
-
Use MXML to declare non-visual aspects of an application, such as accessing data sources on a server
-
Use MXML to create data bindings between user interface components and data sources on the server.
-
Use ActionScript to define event listeners in MXML event properties.
-
Add a script block label with .lt; mx:Script.
-
Includes external ActionScript files.
-
Import the ActionScript class.
-
Create actionScript components.
Public resources
These are secondary files referenced by Flex applications, such as Host HTML pages, CSS, or images located under the html-template folder. It contains the following files
| S.N. | The file name and description |
|---|---|
| 1 |
index.template.html Host HTML page with placeholders. /b10> Flash Builder uses this template to build the actual .swf HelloWorld using HelloWorld's .html. |
| 2 |
playerProductInstall.swf This is a Flash utility for installing Flash Player in quick mode. |
| 3 |
swfobject.js This is the version of Flash Player that Javascript is responsible for checking for installation and loading helloworld .html on the HelloWorld .swf. |
| 4 |
html-template / history This folder contains resources for history management for your application. |
HelloWorld.mxml
This is the actual Written MXML/ACTIONScript code that implements the business logic of the application, and the Flex compiler converts to a SWF file, which will be executed by the Flash player in the browser. The example HelloWorld Entry class would look like this:
<?xml version="1.0" encoding="utf-8"?>
<s:Application xmlns:fx="http://ns.adobe.com/mxml/2009"
   xmlns:s="library://ns.adobe.com/flex/spark"
   xmlns:mx="library://ns.adobe.com/flex/mx"
   width="100%" height="100%"
   minWidth="500" minHeight="500"
   initialize="application_initializeHandler(event)">

   <fx:Script>
      <![CDATA[
         import mx.controls.Alert;
         import mx.events.FlexEvent;
         protected function btnClickMe_clickHandler(event:MouseEvent):void
         {
            Alert.show("Hello World!");
         }

         protected function application_initializeHandler(event:FlexEvent):void
         {
            lblHeader.text = "My Hello World Application";
         }
      ]]>
   </fx:Script>
   <s:VGroup horizontalAlign="center" width="100%" height="100%"
   paddingTop="100" gap="50">
      <s:Label id="lblHeader" fontSize="40" color="0x777777"/>
      <s:Button label="Click Me!" id="btnClickMe"
      click="btnClickMe_clickHandler(event)" />
   </s:VGroup>
</s:Application>
The following table gives a description of all the labels used in the above code script.
| S.N. | The node and describe |
|---|---|
| 1 |
Application Define the application container that is always the root tag for the Flex application. |
| 2 |
Script Contains business logic in the ActionScript language. |
| 3 |
VGroup Define vertically grouped containers that can contain Flex UI controls vertically. |
| 4 |
Label Represents the Label control, a very simple user interface component that displays text. |
| 5 |
Button Represents the Button control, which you can click to do something about. |
Server-side code
This is the server-side part of the application and is very optional. /b10>If you do not perform any back-end processing in your application, you do not need this section, but if the back-end requires some processing and your client application interacts with the server, you will have to develop these components.
The next chapter uses all of these concepts to create the Hello World application using Flash Builder.
Flex - Create an application
We'll create a Flex application using Flash Builder 4.5. Let's start with a simple HelloWorld application:
Step 1 - Create a project
The first step is to create a simple Flex project using the Flash Builder IDE. /b10> Use the option File and New and Flex Project. Now use the wizard window to name your project HelloWorld, as follows:
If not, select the application type web (running in Adobe Flash Player) and leave the other default values, and then click the Finish button. After the project is created successfully, your project explorer will include the following:
Here's a brief description of all the important folders:
| Clip | Position |
|---|---|
| Table border |
|
| bin-debug |
|
| html-template |
|
Step 2 - Create an external CSS file
Create a CSS file styles for the Wrapper HTML page in the html-template .css.
html, body  {
   height:100%;
}
body {
   margin:0;
   padding:0;
   overflow:auto;
   text-align:center;
}
object:focus {
   outline:none;
}
#flashContent {
   display:none;
}

.pluginHeader {
   font-family:Arial, Helvetica, sans-serif;
   font-size:14px;
   color:#9b1204;
   text-decoration:none;
   font-weight:bold;
}

.pluginInstallText {
   font-family:Arial, Helvetica, sans-serif;
   font-size:12px;
   color:#000000;
   line-height:18px;
   font-style:normal;
}

.pluginText {
   font-family:Arial, Helvetica, sans-serif;
   font-size:12px;
   color:#000000;
   line-height:18px;
   font-style:normal;
}
Step 3 - Modify the wrapper HTML page template
Modify the encapsulated HTML page template index.template in the html-template .html. /b10>Flash Builder will create a default Wrapper HTML web template html-template / index.template .html, which will be compiled as HelloWorld .html. /b11> This file contains placeholders that Flash Builder replaces during compilation, such as the Flash Player version, application name, and so on.
Let's modify this file to display a custom message if the flash plug-in is not installed.
<!DOCTYPE html PUBLIC "-//W3C//DTD XHTML 1.0 Transitional//EN"
"http://www.w3.org/TR/xhtml1/DTD/xhtml1-transitional.dtd">
<html xmlns="http://www.w3.org/1999/xhtml"  xml:>
<head>
<title>${title}</title>
<meta name="google" value="notranslate" />
<meta http-equiv="Content-Type" content="text/html; charset=utf-8" />
<link rel="stylesheet" href="styles.css" type="text/css"></link>
<link rel="stylesheet" type="text/css" href="history/history.css" />
<script type="text/javascript" table table-bordered="history/history.js"></script>
<script type="text/javascript" table table-bordered="swfobject.js"></script>
<script type="text/javascript">
   // For version detection, set to min. required Flash Player version,
   //or 0 (or 0.0.0), for no version detection.
   var swfVersionStr = "${version_major}.${version_minor}.${version_revision}";
   // To use express install, set to playerProductInstall.swf,
   //otherwise the empty string.
   var xiSwfUrlStr = "${expressInstallSwf}";
   var flashvars = {};
   var params = {};
   params.quality = "high";
   params.bgcolor = "${bgcolor}";
   params.allowscriptaccess = "sameDomain";
   params.allowfullscreen = "true";
   var attributes = {};
   attributes.id = "${application}";
   attributes.name = "${application}";
   attributes.align = "middle";
   swfobject.embedSWF(
   "${swf}.swf", "flashContent",
   "${width}", "${height}",
   swfVersionStr, xiSwfUrlStr,
   flashvars, params, attributes);
   // JavaScript enabled so display the flashContent div in case
   //it is not replaced with a swf object.
   swfobject.createCSS("#flashContent", "display:block;text-align:left;");
</script>
</head>
<body>
<div id="flashContent">
   <p style="margin:100px;">
   <table  width="700" cellpadding="10" cellspacing="2" border="0">
      <tr><td class="pluginHeader">Flash Player Required</td></tr>
      <tr><td class="pluginText">The Adobe Flash Player version
      10.2.0 or greater is required.</td></tr>
      <tr><td class = "pluginInstallText" align="left">
         <table border="0" width="100%">
         <tr class = "pluginInstallText" >
         <td>Click here to download and install Adobe Flash Player:</td>
         <td> </td>
         <td align="right">	<script type="text/javascript">
         var pageHost
         =((document.location.protocol == "https:") ? "https://" : "http://");
         document.write("<a target='_blank'"
         +" href='http://get.adobe.com/flashplayer/'><"
         +"img style='border-style: none' table table-bordered='"
         +pageHost
         +"www.adobe.com/images/shared/download_buttons/get_flash_player.gif'"
         +" alt='Get Adobe Flash player' /></a>" );
         </script>
         </td>
         </tr>
         </table>
         </td>
      </tr>
   </table>
   </p>
</div>
<noscript>
   <object classid="clsid:D27CDB6E-AE6D-11cf-96B8-444553540000"
   width="${width}" height="${height}" id="${application}">
   <param name="movie" value="${swf}.swf" />
   <param name="quality" value="high" />
   <param name="bgcolor" value="${bgcolor}" />
   <param name="allowScriptAccess" value="sameDomain" />
   <param name="allowFullScreen" value="true" />
   <!--[if !IE]>-->
   <object type="application/x-shockwave-flash" data="${swf}.swf"
   width="${width}" height="${height}">
   <param name="quality" value="high" />
   <param name="bgcolor" value="${bgcolor}" />
   <param name="allowScriptAccess" value="sameDomain" />
   <param name="allowFullScreen" value="true" />
   <!--<![endif]-->
   <!--[if gte IE 6]>-->
   <p>
      <p style="margin:100px;">
      <table  width="700" cellpadding="10" cellspacing="2" border="0">
      <tr><td class="pluginHeader">Flash Player Required</td></tr>
      <tr><td class="pluginText">The Adobe Flash Player version
      10.2.0 or greater is required.</td></tr>
      <tr><td class = "pluginInstallText" align="left">
         <table border="0" width="100%">
         <tr class = "pluginInstallText" >
         <td>Click here to download and install Adobe Flash Player:</td>
         <td> </td>
         <td align="right">	<script type="text/javascript">
         var pageHost
         = ((document.location.protocol == "https:") ? "https://" : "http://");
         document.write("<a target='_blank'"
         +" href='http://get.adobe.com/flashplayer/'><"
         +"img style='border-style: none' table table-bordered='"
         +pageHost
         +"www.adobe.com/images/shared/download_buttons/get_flash_player.gif'"
         +" alt='Get Adobe Flash player' /></a>" );
         </script>
         </td>
         </tr>
         </table>
         </td>
      </tr>
   </table>
   </p>
   </p>
   <!--<![endif]-->
     <p style="margin:100px;">
      <table  width="700" cellpadding="10" cellspacing="2" border="0">
      <tr><td class="pluginHeader">Flash Player Required</td></tr>
      <tr><td class="pluginText">The Adobe Flash Player version
      10.2.0 or greater is required.</td></tr>
      <tr><td class = "pluginInstallText" align="left">
         <table border="0" width="100%">
         <tr class = "pluginInstallText" >
         <td>Click here to download and install Adobe Flash Player:</td>
         <td> </td>
         <td align="right">	<script type="text/javascript">
         var pageHost
         = ((document.location.protocol == "https:") ? "https://" : "http://");
         document.write("<a target='_blank'"
         +" href='http://get.adobe.com/flashplayer/'><"
         +"img style='border-style: none' table table-bordered='"
         +pageHost
         +"www.adobe.com/images/shared/download_buttons/get_flash_player.gif'"
         +" alt='Get Adobe Flash player' /></a>" );
         </script>
         </td>
         </tr>
         </table>
         </td>
      </tr>
   </table>
   </p>
   <!--[if !IE]>-->
   </object>
   <!--<![endif]-->
   </object>
</noscript>
</body>
</html>
Step 4 - Create an internal CSS file
Create a CSS file style for HelloWorld.mxml in the table-table-bordered/com/tutorialspoint .css. /b10> Flex provides a similar CSS style for its UI controls because there are CSS styles for HTML UI controls.
/* CSS file */
@namespace s "library://ns.adobe.com/flex/spark";
@namespace mx "library://ns.adobe.com/flex/mx";

.heading
{
   fontFamily: Arial, Helvetica, sans-serif;
   fontSize: 17px;
   color: #9b1204;
   textDecoration:none;
   fontWeight:normal;
}

.button {
   fontWeight: bold;
}

.container {
   cornerRadius :10;
   horizontalCenter :0;
   borderColor: #777777;
   verticalCenter:0;
   backgroundColor: #efefef;
}
Step 5 - Modify the entry-level class
Flash Builder will create a default mxml file table-table-bordered / com.tutorialspoint / HelloWorld.mxml, which has the root tag of the application. /b11> Let's modify this file to show "Hello, World! ":
<?xml version="1.0" encoding="utf-8"?>
<s:Application xmlns:fx="http://ns.adobe.com/mxml/2009"
   xmlns:s="library://ns.adobe.com/flex/spark"
   xmlns:mx="library://ns.adobe.com/flex/mx"
   width="100%" height="100%"
   minWidth="500" minHeight="500"
   initialize="application_initializeHandler(event)">
   <fx:Style source="/com/tutorialspoint/client/Style.css"/>
   <fx:Script>
      <![CDATA[
       import mx.controls.Alert;
       import mx.events.FlexEvent;
       protected function btnClickMe_clickHandler(event:MouseEvent):void
       {
          Alert.show("Hello World!");
       }

       protected function application_initializeHandler(event:FlexEvent):void
       {
          lblHeader.text = "My Hello World Application";
       }
      ]]>
   </fx:Script>
   <s:BorderContainer width="500" height="500" id="mainContainer"
      styleName="container">
      <s:VGroup width="100%" height="100%" gap="50" horizontalAlign="center"
         verticalAlign="middle">
         <s:Label id="lblHeader" fontSize="40" color="0x777777"
            styleName="heading"/>
         <s:Button label="Click Me!" id="btnClickMe"
            click="btnClickMe_clickHandler(event)" styleName="button" />
      </s:VGroup>
   </s:BorderContainer>
</s:Application>
You can create more mxml or actionscript files in the same source directory to define new applications or define helpers.
Step 6 - Build the application
Flash Builder is selected auto-build by default. /b10> Just check the problem to see if there are any errors. /b11> When you're done with your changes, you won't see any errors.
Step 7 - Run the application
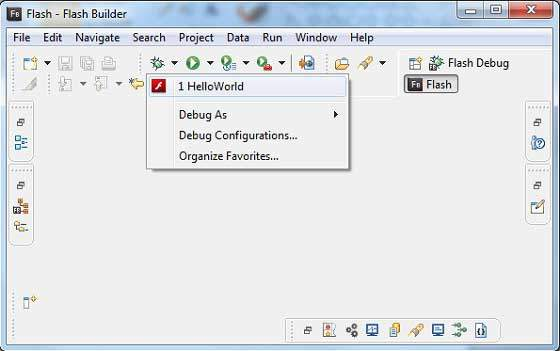
Now
 click on the Debug Application menu and select
the HelloWorld app
to debug the application.
click on the Debug Application menu and select
the HelloWorld app
to debug the application.
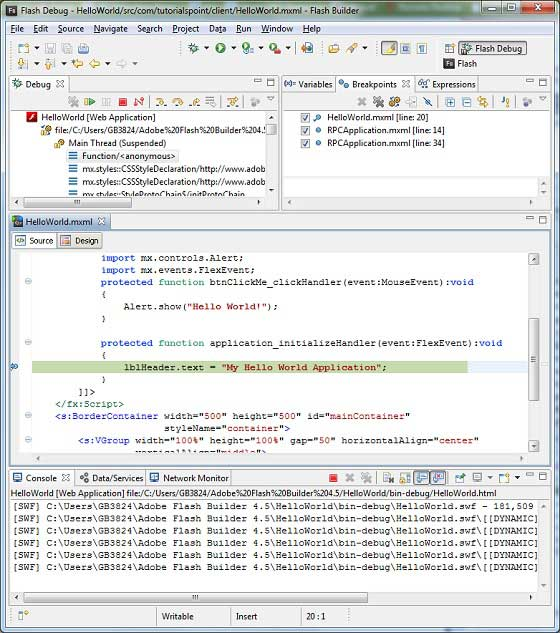
If all goes well, the application will start in the browser and you will see the following debug logs in the Flash Builder console
[SWF] \HelloWorld\bin-debug\HelloWorld.swf
- 181,509 bytes after decompression
[SWF] \HelloWorld\bin-debug\HelloWorld.swf\[[DYNAMIC]]\1
- 763,122 bytes after decompression
[SWF] \HelloWorld\bin-debug\HelloWorld.swf\[[DYNAMIC]]\2
- 1,221,837 bytes after decompression
[SWF] \HelloWorld\bin-debug\HelloWorld.swf\[[DYNAMIC]]\3
- 1,136,788 bytes after decompression
[SWF] \HelloWorld\bin-debug\HelloWorld.swf\[[DYNAMIC]]\4
- 2,019,570 bytes after decompression
[SWF] \HelloWorld\bin-debug\HelloWorld.swf\[[DYNAMIC]]\5
- 318,334 bytes after decompression
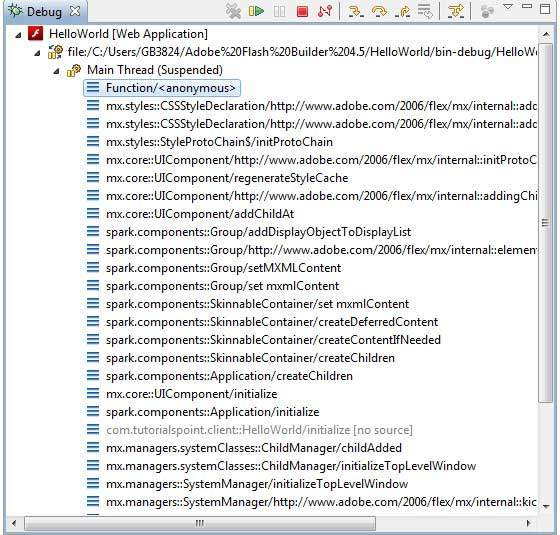
Once the application starts, you'll see the focus on the Flash Builder break point because we've placed the break point on application_initializeHandler the first line of the method.
You can see the stacktrace of the suspended thread.
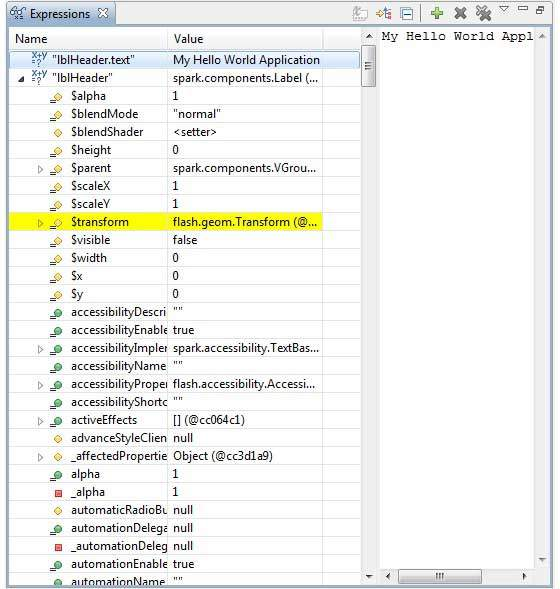
You can view the value of the expression.
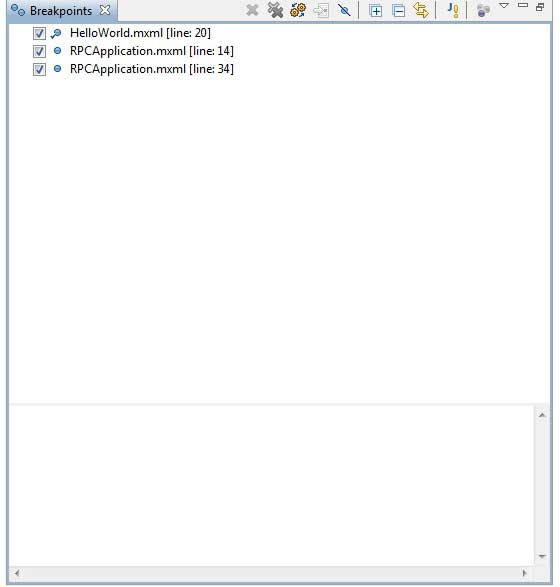
You can see a list of placed break points.
Now continue to press F6 until you reach application_initializeHandler line of the () method. /b10> As a reference to the function keys, F6 checks the code line by line, F5 1 further inverts, and F8 resumes the application. /b11> Now you can see application_initializeHandler of the values of all variables for the () method.
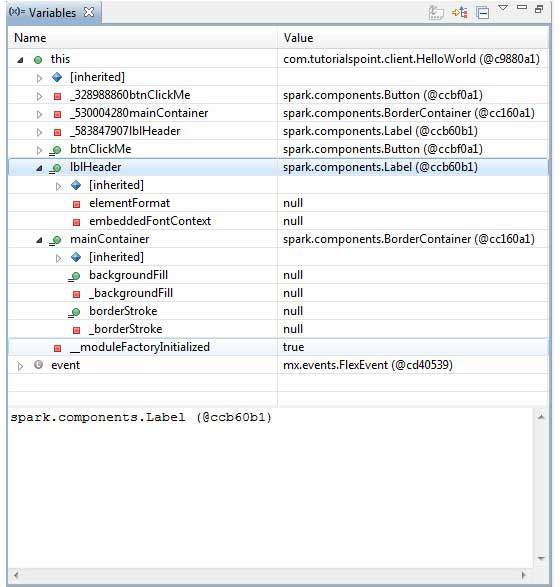
Now you can see that flex code can be debugged in the same way as Java applications can be debugged. /b10> Place the break point on any row and use flex's debugging function.
Flex - Internationalization
Flex provides two ways to internationalize a Flex application, We'll demonstrate use of Compile time Internationalization being most commonly used among projects.| Technology | Describe |
|---|---|
| The compilation time is internationalized | This technique is the most common and requires very little overhead at runtime; /b10> Is a very effective technique for translating constant and paramethy strings; T he simplest implementation. /b11> Compile-time internationalization uses standard property files to store translated strings and paramethy messages that are compiled directly in the application. |
| Run-time internationalization | This technique is very flexible, but slower than static string internationalization. /b10> You need to compile the localized property files separately, keep them outside the application, and load them at runtime. |
The workflow that internationalizes Flex applications
Step 1: Create a folder structure
Create a locale folder under the src folder of the Flex project. T his will be the parent directory of all property files for the locale that the application will support. /b10> In the locale folder, create a sub-folder, and support one for each application's locale. The convention for naming a language environment is
{language}_{country code}
For example, en_US represents English in the United States. /b10> The locale de_DE german. The sample application will support two common languages: English and German
Step 2: Create a property file
Create a property file that contains the messages you want to use in your application. /b10> We created a HelloWorldMessages.en_US file under the src and locale and locale files.
enterName=Enter your name
clickMe=Click Me
applicationTitle=Application Internationalization Demonstration
greeting=Hello {0}
Create a property file that contains translation values that are specific to the locale. /b10> We created a HelloWorldMessages.de_DE file under the src and locale and locale files. /b12> This file contains translations in German. /b13> _de to specify a German locale, we will support German in our application.
If you want to create a property file using Flash Builder, change the encoding of the file to UTC-8. S elect the file, and then right-click to open its property window. S elect the text file to encode as a different UTF-8. /b20> Apply and save the changes.
enterName=Geben Sie Ihren Namen
clickMe=Klick mich
applicationTitle=Anwendung Internationalisierung Demonstration
greeting=Hallo {0}
Step 3: Specify the compiler options
-
Right-click the item and select the property.
-
Select the Flex compiler and add the following to the Other Compiler Parameters settings:
-locale en_US de_DE
-
Right-click the item and select the property.
-
Select the Flex build path, and then add the following to the source path settings:
src\locale\{locale}
An example of internalization
Now let's test the internalization techniques in the Flex application by following these steps:
| Step by step | Describe |
|---|---|
| 1 | As described in the Flex - Create Applications section, create a project called HelloWorld under package com.tutorialspoint.client. |
| 2 | Modify HelloWorld.mxml, as described below. /b10> Keep the rest of the file unchanged. |
| 3 | Compile and run the application to ensure that the business logic works as required. |
The following is the contents of the modified mxml file src / com.tutorialspoint / HelloWorld.mxml.
<?xml version="1.0" encoding="utf-8"?>
   <s:Application xmlns:fx="http://ns.adobe.com/mxml/2009"
   xmlns:s="library://ns.adobe.com/flex/spark"
   xmlns:mx="library://ns.adobe.com/flex/mx"
   minWidth="500" minHeight="500">
   <fx:Metadata>
      [ResourceBundle("HelloWorldMessages")]
   </fx:Metadata>
   <fx:Style source="/com/tutorialspoint/client/Style.css"/>
   <fx:Script>
      <![CDATA[
         import mx.controls.Alert;
         [Bindable]
         private var locales:Array = [{label:"English", locale:"en_US"},
            {label:"German", locale:"de_DE"}];

         private function comboChangeHandler():void
         {
           resourceManager.localeChain = [localeComboBox.selectedItem.locale];
         }

         protected function clickMe_clickHandler(event:MouseEvent):void
         {
            var name:String = txtName.text;
            var inputArray:Array = new Array();
            inputArray.push(name);
            Alert.show(resourceManager.getString('HelloWorldMessages'
            ,'greeting',inputArray));
         }
      ]]>
   </fx:Script>
   <s:BorderContainer width="500" height="500" id="mainContainer"
      styleName="container">
      <s:VGroup width="100%" height="100%" gap="50"
	  horizontalAlign="center" verticalAlign="middle">
         <s:Label id="lblHeader" fontSize="40"
            color="0x777777"
            text ="{resourceManager.getString('HelloWorldMessages'
            ,'applicationTitle')}"
            styleName="heading" width="90%" height="150"/>
         <s:Panel width="300" height="150">
            <s:layout>
               <s:VerticalLayout paddingTop="10" paddingLeft="10" />
            </s:layout>
            <s:HGroup >
               <s:Label
               text="{resourceManager.getString('HelloWorldMessages'
               ,'enterName')}"
               paddingTop="2"/>
               <s:TextInput id="txtName"/>
            </s:HGroup>
            <s:Button
            label="{resourceManager.getString('HelloWorldMessages','clickMe')}"
            click="clickMe_clickHandler(event)" right="10" />
         </s:Panel>
         <mx:ComboBox id="localeComboBox"
         dataProvider="{locales}" change="comboChangeHandler()"/>
      </s:VGroup>
   </s:BorderContainer>
</s:Application>
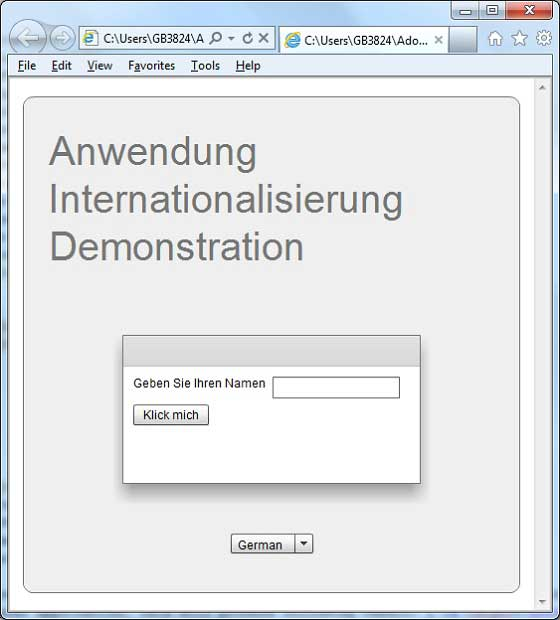
When all the changes are ready, let's compile and run the application in normal mode, as in the Flex - Create Application chapter. If all goes well with your application, this will result in the following results:
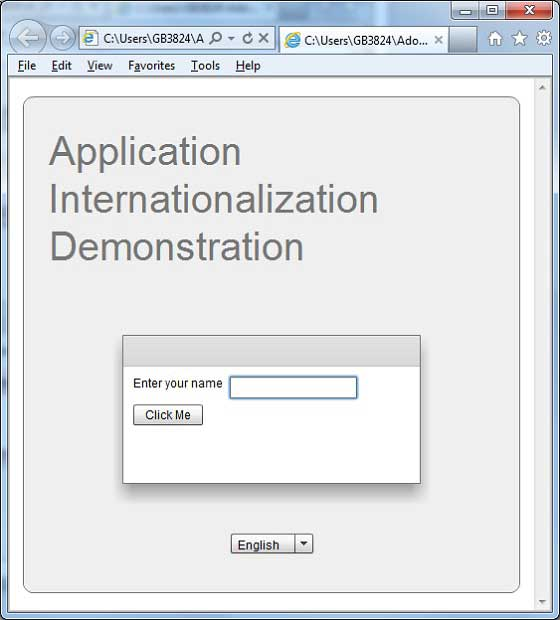
Use the language drop-down menu to change the language and see the results.
Flex - Print support
Flex provides a special class FlexPrintJob to print flex objects.
-
FlexPrintJob can be used to print one or more Flex objects, such as Form or VBox containers.
-
FlexPrintJob prints objects and all the objects they contain.
-
An object can be all or part of the displayed interface.
-
Objects can be components that format the data used for printing.
-
The FlexPrintJob class allows you to scale the output to fit the page.
-
The FlexPrintJob class automatically uses multiple pages to print objects that are not suitable for a single page.
-
The FlexPrintJob class enables the operating system to display a "print" dialog box. /b10> If there are no user actions, you cannot print.
Prepare and send a print job
The FlexPrintJob class enables the operating system to display a "print" dialog box. /b10> If there are no user actions, you cannot print. ...
var printJob:FlexPrintJob = new FlexPrintJob();
Start the print job
printJob.start();
Flex causes the operating system to display a Print dialog box. Add one or more objects to the print job and specify how to scale them
printJob.addObject(myObject, FlexPrintJobScaleType.MATCH_WIDTH);
Each object starts with a new page. Send a print job to the printer
printJob.send();
Print an example
| Describe | Describe |
|---|---|
| 1 | As described in the Flex - Create Applications section, create a project called HelloWorld under package com.tutorialspoint.client. |
| 2 | Modify HelloWorld.mxml, as described below. /b10> Keep the rest of the file unchanged. |
| 3 | Compile and run the application to ensure that the business logic works as required. |
The following is the contents of the modified mxml file src / com.tutorialspoint / HelloWorld.mxml.
<?xml version="1.0" encoding="utf-8"?>
<s:Application xmlns:fx="http://ns.adobe.com/mxml/2009"
   xmlns:s="library://ns.adobe.com/flex/spark"
   xmlns:mx="library://ns.adobe.com/flex/mx"
   width="100%" height="100%"
   minWidth="500" minHeight="500"
   initialize="application_initializeHandler(event)">
   <fx:Style source="/com/tutorialspoint/client/Style.css"/>
   <fx:Script>
     <![CDATA[
        import mx.controls.Alert;
        import mx.events.FlexEvent;
        import mx.printing.FlexPrintJob;
        import mx.printing.FlexPrintJobScaleType;
        protected function btnClickMe_clickHandler(event:MouseEvent):void
        {
            // Create an instance of the FlexPrintJob class.
            var printJob:FlexPrintJob = new FlexPrintJob();

            // Start the print job.
            if (printJob.start() != true) return;

            // Add the object to print. Do not scale it.
            printJob.addObject(myDataGrid, FlexPrintJobScaleType.NONE);

            // Send the job to the printer.
            printJob.send();
        }

        protected function application_initializeHandler(event:FlexEvent):void
        {
            lblHeader.text = "My Hello World Application";
        }
     ]]>
   </fx:Script>
   <s:BorderContainer width="500" height="500" id="mainContainer"
      styleName="container">
      <s:VGroup width="100%" height="100%" gap="50"
         horizontalAlign="center"
         verticalAlign="middle">
         <s:Label id="lblHeader" fontSize="40" color="0x777777"
            styleName="heading"/>
         <mx:DataGrid id="myDataGrid" width="300">
            <mx:dataProvider>
               <fx:Object Product="Flex" Code="1000"/>
               <fx:Object Product="GWT" Code="2000"/>
               <fx:Object Product="JAVA" Code="3000"/>
               <fx:Object Product="JUnit" Code="4000"/>
            </mx:dataProvider>
         </mx:DataGrid>
         <s:Button label="Print Me!" id="btnClickMe"
            click="btnClickMe_clickHandler(event)"
            styleName="button" />
      </s:VGroup>
   </s:BorderContainer>
</s:Application>
When all the changes are ready, let's compile and run the application in normal mode, as in the Flex - Create Application chapter. If all goes well with your application, this will result in the following results:

Click the Print Me button and you can see the printout of the data grid as follows.