Flex Internationalization
May 25, 2021 Flex
Table of contents
1. The workflow that internationalizes Flex applications
2. Step 1: Create a folder structure
3. Step 2: Create a property file
| Technology | Describe |
|---|---|
| The compilation time is internationalized | This technique is the most common and requires very little overhead at runtime; /b10> Is a very effective technique for translating constant and paramethy strings; T he simplest implementation. /b11> Compile-time internationalization uses standard property files to store translated strings and paramethy messages that are compiled directly in the application. |
| Run-time internationalization | This technique is very flexible, but slower than static string internationalization. /b10> You need to compile the localized property files separately, keep them outside the application, and load them at runtime. |
The workflow that internationalizes Flex applications
Step 1: Create a folder structure
Create a locale folder under the src folder of the Flex project. T his will be the parent directory of all property files for the locale that the application will support. /b10> In the locale folder, create a sub-folder, and support one for each application's locale. The convention for naming a language environment is
{language}_{country code}
For example, en_US represents English in the United States. /b10> The locale de_DE german. The sample application will support two common languages: English and German
Step 2: Create a property file
Create a property file that contains the messages you want to use in your application. /b10> We created a HelloWorldMessages.en_US file under the src and locale and locale files.
enterName=Enter your name
clickMe=Click Me
applicationTitle=Application Internationalization Demonstration
greeting=Hello {0}
Create a property file that contains translation values that are specific to the locale. /b10> We created a HelloWorldMessages.de_DE file under the src and locale and locale files. /b12> This file contains translations in German. /b13> _de to specify a German locale, we will support German in our application.
If you want to create a property file using Flash Builder, change the encoding of the file to UTC-8. S elect the file, and then right-click to open its property window. S elect the text file to encode as a different UTF-8. Apply and save the changes.
enterName=Geben Sie Ihren Namen
clickMe=Klick mich
applicationTitle=Anwendung Internationalisierung Demonstration
greeting=Hallo {0}
Step 3: Specify the compiler options
-
Right-click the item and select the property.
-
Select the Flex compiler and add the following to the Other Compiler Parameters settings:
-locale en_US de_DE
-
Right-click the item and select the property.
-
Select the Flex build path, and then add the following to the source path settings:
src\locale\{locale}
An example of internalization
Now let's test the internalization techniques in the Flex application by following these steps:
| Steps | Describe |
|---|---|
| 1 | As described in the Flex - Create Applications section, create a project called HelloWorld under package com.tutorialspoint.client. |
| 2 | Modify HelloWorld.mxml, as described below. /b10> Keep the rest of the file unchanged. |
| 3 | Compile and run the application to ensure that the business logic works as required. |
The following is the contents of the modified mxml file src / com.tutorialspoint / HelloWorld.mxml.
<?xml version="1.0" encoding="utf-8"?>
   <s:Application xmlns:fx="http://ns.adobe.com/mxml/2009"
   xmlns:s="library://ns.adobe.com/flex/spark"
   xmlns:mx="library://ns.adobe.com/flex/mx"
   minWidth="500" minHeight="500">
   <fx:Metadata>
      [ResourceBundle("HelloWorldMessages")]
   </fx:Metadata>
   <fx:Style source="/com/tutorialspoint/client/Style.css"/>
   <fx:Script>
      <![CDATA[
         import mx.controls.Alert;
         [Bindable]
         private var locales:Array = [{label:"English", locale:"en_US"},
            {label:"German", locale:"de_DE"}];

         private function comboChangeHandler():void
         {
           resourceManager.localeChain = [localeComboBox.selectedItem.locale];
         }

         protected function clickMe_clickHandler(event:MouseEvent):void
         {
            var name:String = txtName.text;
            var inputArray:Array = new Array();
            inputArray.push(name);
            Alert.show(resourceManager.getString('HelloWorldMessages'
            ,'greeting',inputArray));
         }
      ]]>
   </fx:Script>
   <s:BorderContainer width="500" height="500" id="mainContainer"
      styleName="container">
      <s:VGroup width="100%" height="100%" gap="50"
	  horizontalAlign="center" verticalAlign="middle">
         <s:Label id="lblHeader" fontSize="40"
            color="0x777777"
            text ="{resourceManager.getString('HelloWorldMessages'
            ,'applicationTitle')}"
            styleName="heading" width="90%" height="150"/>
         <s:Panel width="300" height="150">
            <s:layout>
               <s:VerticalLayout paddingTop="10" paddingLeft="10" />
            </s:layout>
            <s:HGroup >
               <s:Label
               text="{resourceManager.getString('HelloWorldMessages'
               ,'enterName')}"
               paddingTop="2"/>
               <s:TextInput id="txtName"/>
            </s:HGroup>
            <s:Button
            label="{resourceManager.getString('HelloWorldMessages','clickMe')}"
            click="clickMe_clickHandler(event)" right="10" />
         </s:Panel>
         <mx:ComboBox id="localeComboBox"
         dataProvider="{locales}" change="comboChangeHandler()"/>
      </s:VGroup>
   </s:BorderContainer>
</s:Application>
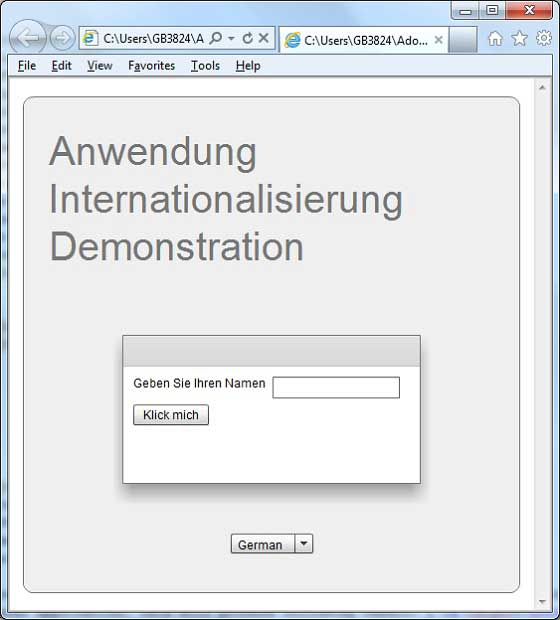
When all the changes are ready, let's compile and run the application in normal mode, as in the Flex - Create Application chapter. If all goes well with your application, this will result in the following results:
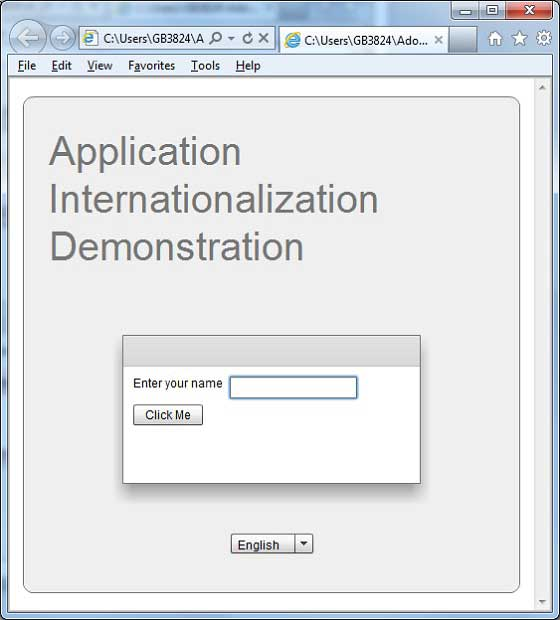
Use the language drop-down menu to change the language and see the results.