CrossApp project structure and entrance
May 21, 2021 CrossApp
Table of contents
If I create a project called HelloCrossApp, a project directory called HelloCrossApp will appear under the project folder at the root of the engine.
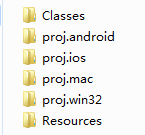
Let's open this directory to see the structure of the following image:
| HelloCrossApp's engineering catalog structure | |
| Classes | Store the C-code we've written |
| proj.android | android platform engineering configuration |
| proj.ios | ios platform engineering configuration (xode required under MacOS) |
| proj.mac | mac platform engineering configuration (requires xode under MacOS) |
| proj.win32 | Win32 platform engineering configuration (for development under win, recommended vs2013) |
| Resources | Resource catalog of the project (storage: pictures, sound effects, fonts, etc.) |
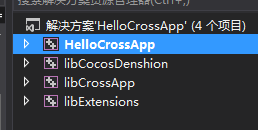
Let's open the engineering configuration used by our respective platforms, and I'll take a screenshot of win vs2013 as an example
| The engineering configuration structure | |
| HelloCrossApp | Our own projects |
| libCocosDenshion | Sound library |
| libCrossApp | CrossApp Engine Library |
| libExtensions | Third-party libraries used (json, sqlit3, network, websockets, etc.) |
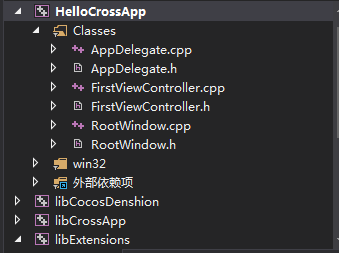
Open the Classics directory under HelloCrossApp and see the following structure:
| Classes directory structure | |
| AppDelegate | The entry point for the item |
| FirstView Controller | The project's CAViewController |
| RootWindow | CAWindow, the project started |
I quote CAWindow and CAViewController from the API here
What is CAWindow?
CAWindow's primary role is to act as a carrier, container, distribution of touch messages, and collaboration with viewController to complete the management of the application. A
pplications typically have only one window, and even if there are multiple windows, only one window can receive screen events. W
e rarely need to reference this window again after the application starts to create it and add one or more views to the window and display it.
CAWindow is the root of all CAViews, managing and coordinating the display of applications.
What is CAViewController?
As the manager of CAView, the most basic function of CAViewController is to control the switching of views.
View controllers play the role of control layer (C) in MVC design mode, and CAViewController's role is to manage the view associated with it while communicating and coordinating with other CAViewControllers.
Let's go into more detail about AppDelegate's code here, open the Application.h file, and I'll note the Chinese on the code to help you understand.
#ifndef  _APP_DELEGATE_H_
#define  _APP_DELEGATE_H_

#include "CrossApp.h"

/**
@brief    The CrossApp Application.
The reason for implement as private inheritance is to hide some interface call by CAApplication.
*/

class  AppDelegate : private CrossApp::CCApplication
{
public:
    AppDelegate();
    virtual ~AppDelegate();

    /**
    @brief    Implement CAApplication and CCScene init code here.
    @return true    Initialize success, app continue.
    @return false   Initialize failed, app terminate.
    */

    /*
    这个函数用于实现CAApplication和CAWindow(CCScene应该为注释的错误,以后版本会修正)的初始化
    如果返回true,初始化成功,程序正常运行
    如果返回false,初始化失败,程序终止运行
    */

    virtual bool applicationDidFinishLaunching();

    /*
    @brief  The function be called when the application enter background
    @param  the pointer of the application
    */

    /*
    当程序进入后台运行时,此函数会被调用(例如,电话)
    */

    virtual void applicationDidEnterBackground();

    /*
    @brief  The function be called when the application enter foreground
    @param  the pointer of the application
    */

    /*
    当程序从后台切回被激活时调用此函数
    */

    virtual void applicationWillEnterForeground();
};
#endif // _APP_DELEGATE_H_
Let's take a look at .cpp in the Application
#include "AppDelegate.h"
#include "RootWindow.h"

USING_NS_CC;

AppDelegate::AppDelegate()
{
}

AppDelegate::~AppDelegate()
{

}

bool AppDelegate::applicationDidFinishLaunching()
{
    // initialize director
    //初始化direction
    CAApplication* pDirector = CAApplication::getApplication();

    //初始化窗口
    CCEGLView* pEGLView = CCEGLView::sharedOpenGLView();
    pDirector->setOpenGLView(pEGLView);

    // run

    //启动 RootWindow入口
    pDirector->runWindow(RootWindow::create());
    return true;
}

// This function will be called when the app is inactive. When comes a phone call,it's be invoked too
void AppDelegate::applicationDidEnterBackground()
{
    //暂停动画
    CAApplication::getApplication()->stopAnimation();

    // if you use SimpleAudioEngine, it must be pause

    //暂停音效,如果你有使用音效,希望程序切到后台音效停止,请解下面代码的注释

    // SimpleAudioEngine::sharedEngine()->pauseBackgroundMusic();
}

// this function will be called when the app is active again
void AppDelegate::applicationWillEnterForeground()
{
    //回复动画
    CAApplication::getApplication()->startAnimation();

    // if you use SimpleAudioEngine, it must resume here

    //回复音效,如果你有使用音效,希望程序切到激活状态音效恢复,请解下面代码的注释

    // SimpleAudioEngine::sharedEngine()->resumeBackgroundMusic();
}
RootWindow is simple, I don't want to go into detail here, I'll take a look at what FirstViewController has done.
Start by opening the FirstViewController.h file
//加载函数 一般做初始化UI和逻辑
void viewDidLoad();
//卸载函数 一般做移除和释放
void viewDidUnload();
Take a look at FirstView .cpp's vievDidLoad ();
Code in:
void FirstViewController::viewDidLoad()
{
    // Do any additional setup after loading the view from its nib.
    DRect winRect = this->getView()->getBounds(); //获得屏幕的Bounds(Bounds不收缩放影响)

    //加载一张图片
    CAImageView* imageView = CAImageView::createWithImage(CAImage::create("HelloWorld.png"));

    //设置图片的Frame显示大小(Frame的值缩放后会被改变)
    imageView->setFrame(winRect);

    //将图片添加的到屏幕上面(如果不添加,那么这个ui将不会被渲染,内存也会在下一个loop时被释放)
    this->getView()->addSubview(imageView);

    //设置一个文本
    CALabel* label = CALabel::createWithCenter(DRect(winRect.size.width*0.5, winRect.size.height*0.5-270, winRect.size.width, 200));

    //文本水平方向中间对其
    label->setTextAlignment(CATextAlignmentCenter);

    //文本竖直方向中间对其
    label->setVerticalTextAlignmet(CAVerticalTextAlignmentCenter);

    //设置字体大小(CROSSAPP_ADPTATION_RATIO是用于适配的系数)
    label->setFontSize(72 * CROSSAPP_ADPTATION_RATIO);

    //设置文本内容
    label->setText("Hello World!");

    //设置文本颜色
    label->setColor(CAColor_white);

    //添加到屏幕并设置z轴
    this->getView()->insertSubview(label, 1);
}


