Cloud development SMS sending
May 22, 2021 Mini Program Cloud Development Advanced
Combined with some third-party SMS APIs, using cloud-developed cloud functions can also send SMS verification codes, systems and activity notifications, and so on, taking Tencent Cloud's SMS service as an example. Tencent Cloud has the tencentcloud-sdk-nodejs module for the Node environment, which integrates Tencent Cloud services, and almost all of Tencent's cloud services are integrated into the Developer Tools Suite (SDK) in addition to SMS.
First, the opening of Tencent cloud SMS service
1, the opening of SMS services
Login SMS console, the account here is not limited to the account of small programs, other accounts can also be; If the account has been certified, directly apply for SMS service can be opened.
2, create an app
Creating an app can be used to personalize the management of SMS sending tasks, such as setting different sending frequencies and sending oversized reminders. O
pen the App Management -
List of Apps in
the menu on the
left,
click
Create
an app, and the app name can be developed for your little program name, Cloud, for easy differentiation of management.
Once created, there will be
SDKAppID
which will be used later.
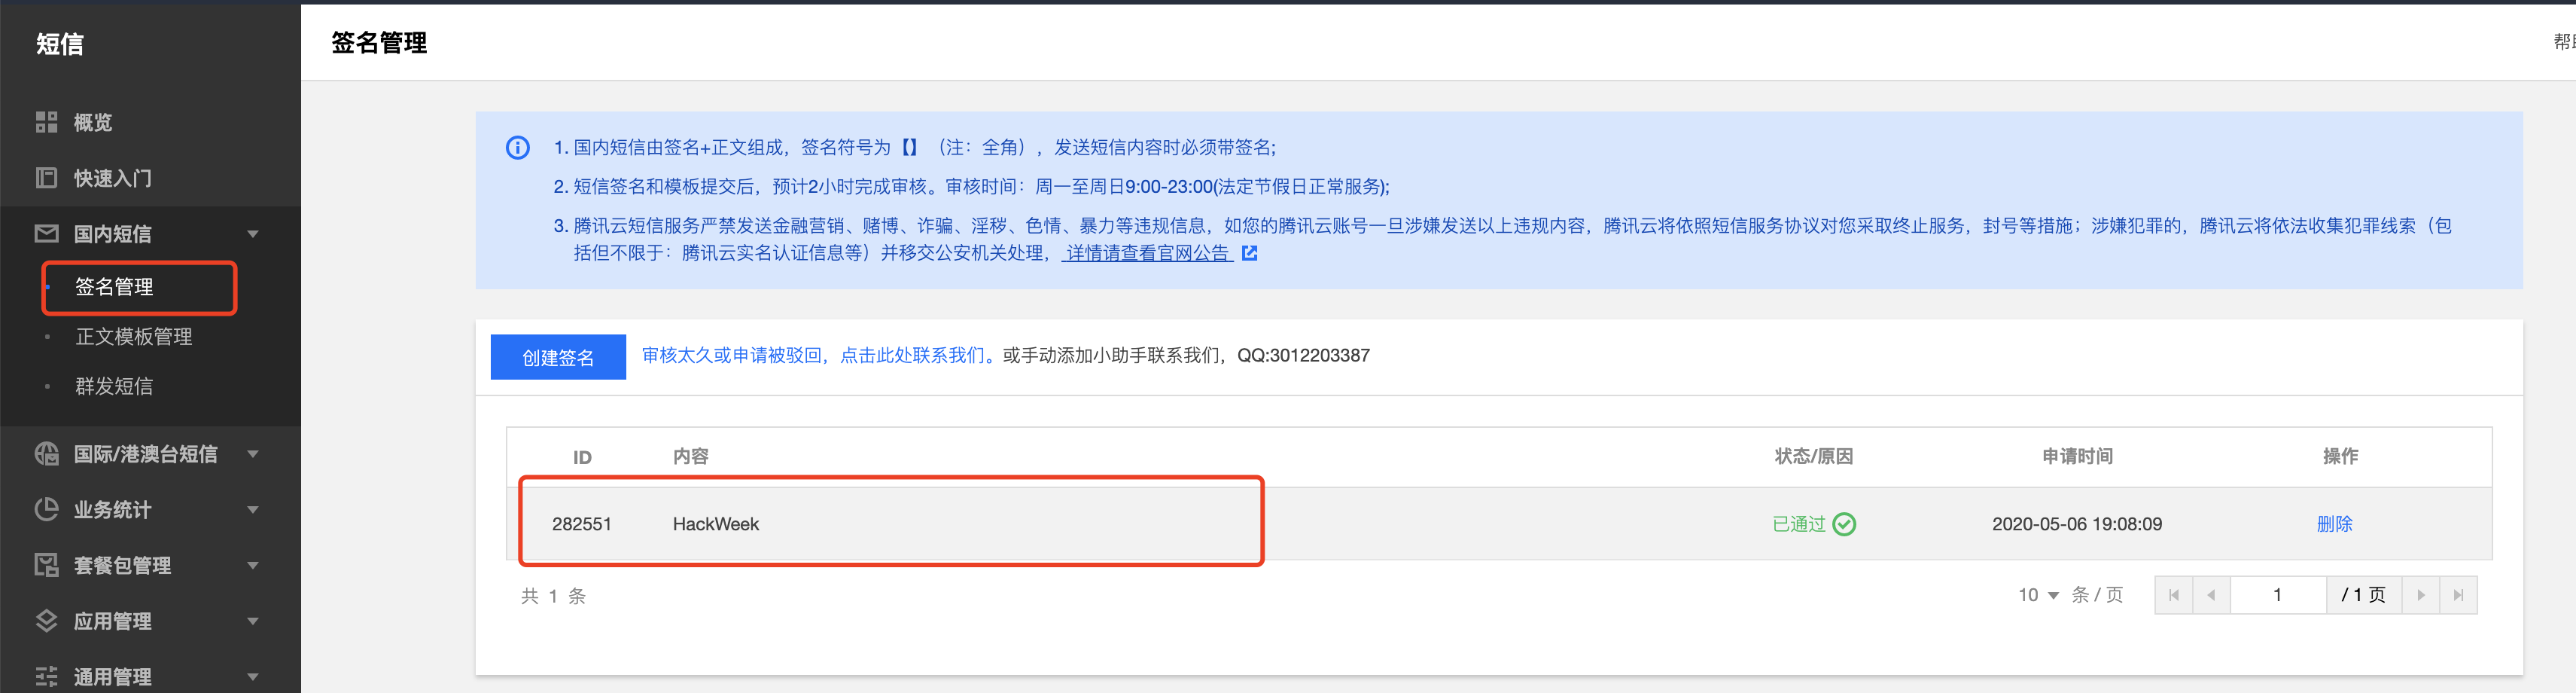
3, build signature and body template
Domestic SMS consists of a signature and body, the signature symbol is , the text message content must be signed. So to send a text message, you need to request a SMS signature and body template, both of which have passed the review, you can start sending SMS.
(1) Create a signature
Open the domestic TEXT message in
the menu
on the left -
Signature
Management, click Create Signature, and after you create the
签名内容
content will be used later.
- Purpose of signature: Select self-use (signature is the real name of this account certified company, website, product name, etc.).
- Signature type: Select Small Program.
- Signature: Enter the company name or small program name or product name
- Proof type: select the small program settings page screenshot, and then upload the small program settings page screenshots, you can refer to the case;
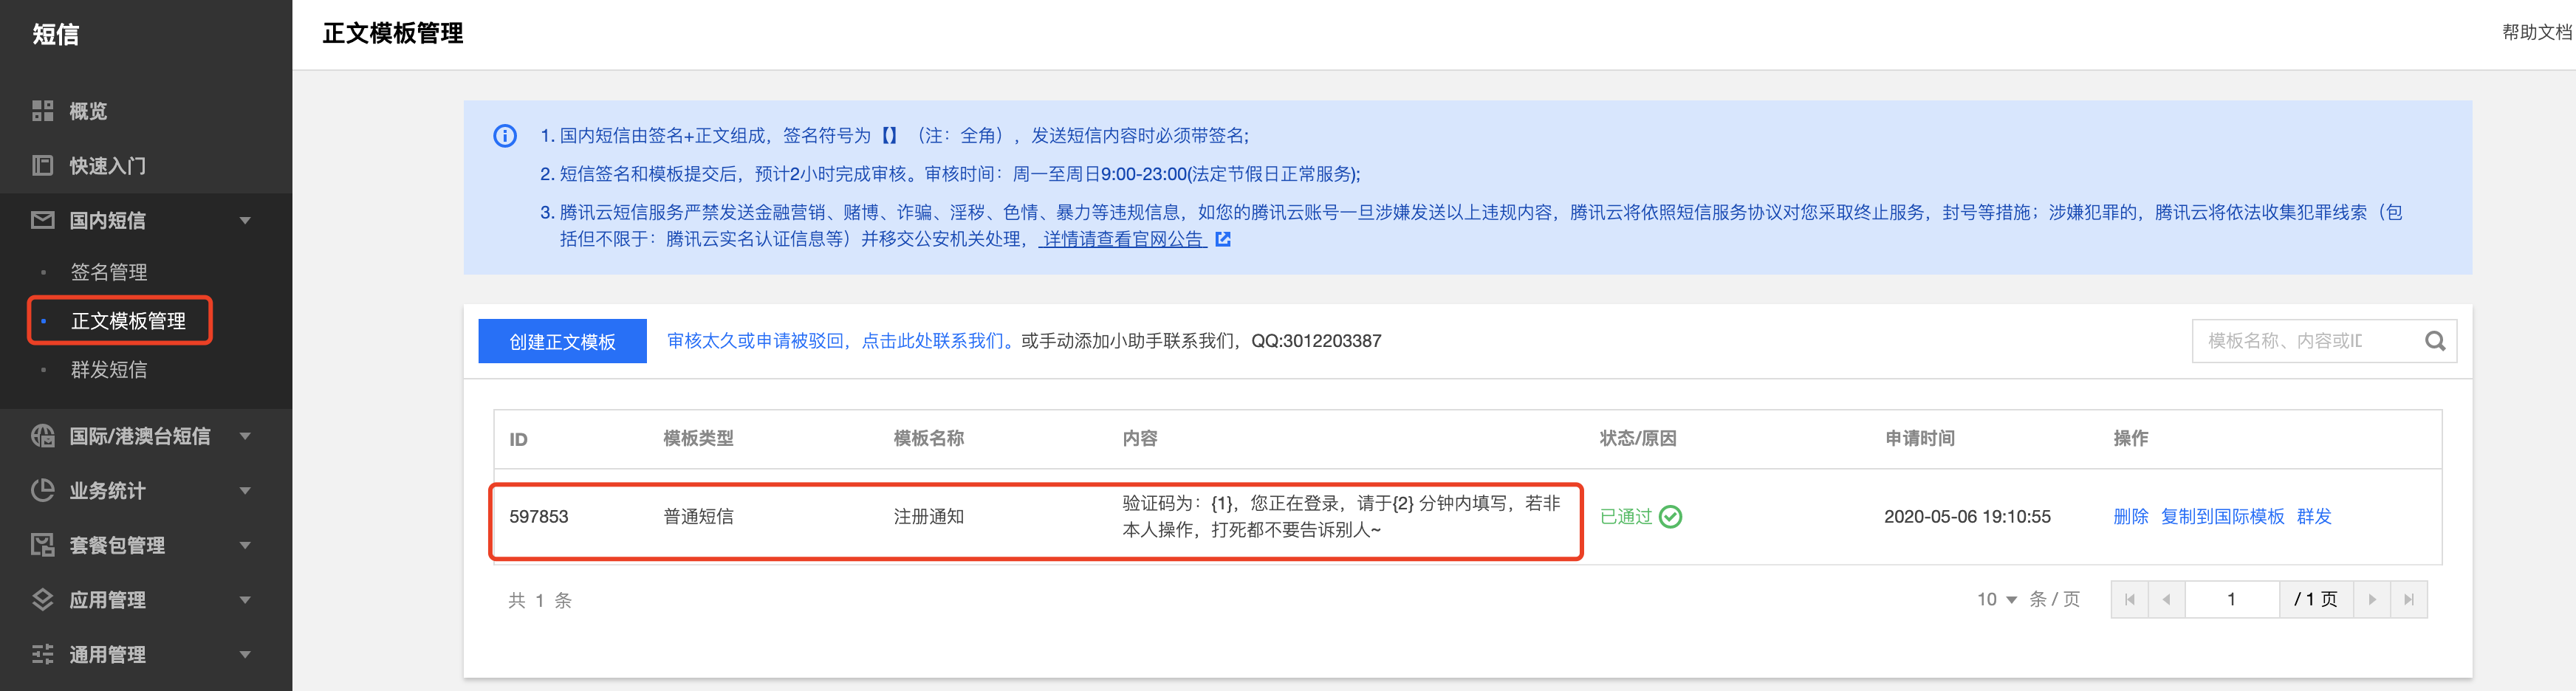
(2) Create a body template
Open the domestic TEXT message
in
the
left menu - body template management, click Create body template, after creating the template, there will be a
ID
which will be used later, but also remember the variable position of your template.
- Template name, suggested with a clear purpose of the name, such as "registration notice", "purchase success feedback" and so on;
- Type of SMS: Select Normal SMS
-
Text message content: for example, "You are applying for mobile phone registration, verification code is: {1}, {2} minutes valid!"
"The
{1}{2}here are the variables that you want to pass in in your code, and the code for the variables must start at {1} and be passed in in order when you pass them in
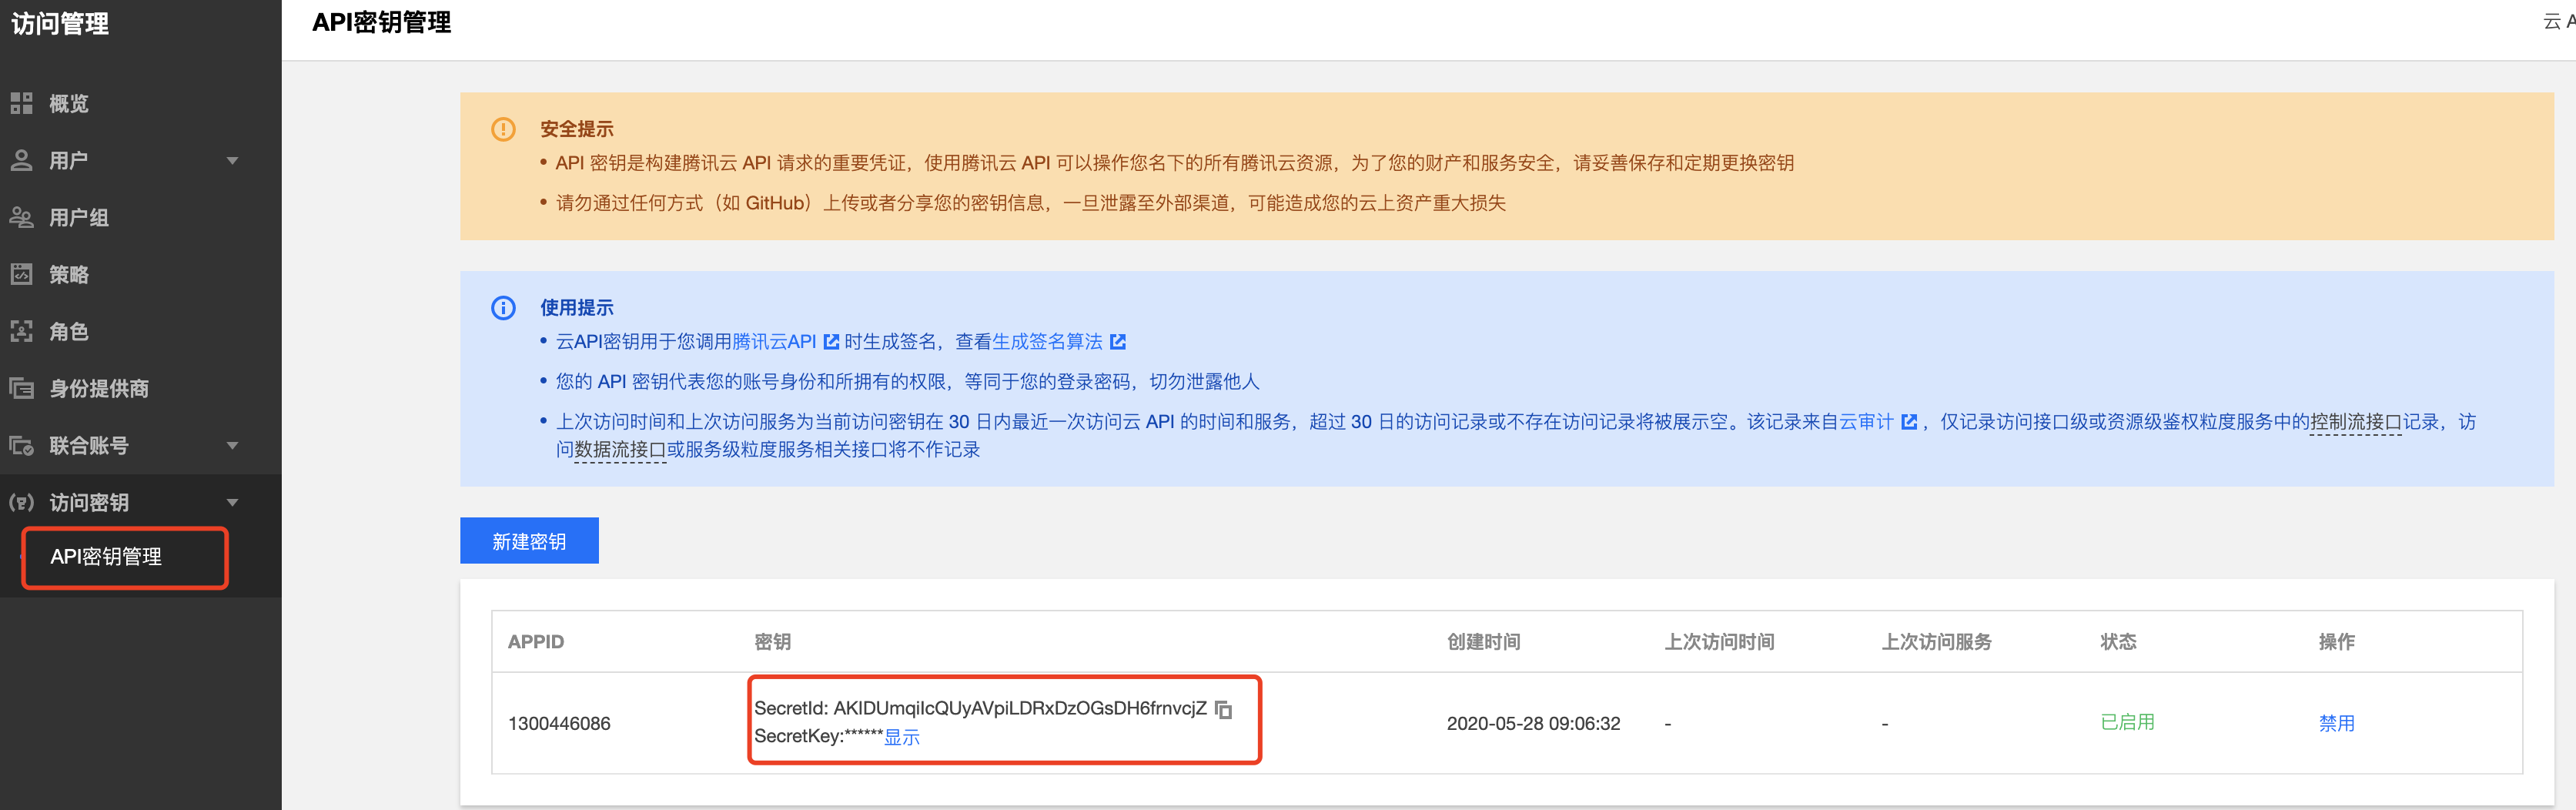
3, obtain security credentials
Before using the cloud API, users first need to apply for security credentials (API keys) on the Tencent cloud console, including SecretID and SecretKey.
Open the API key management of
Tencent Cloud Access
Key, click New Key, you can create the key, and once you create it, you can see
SecretID
and
SecretKey
both of which will be used later.
API key is an important credential for building Tencent Cloud API requests, using Tencent Cloud API can operate all Tencent cloud resources under your account name, be sure to keep and update regularly, do not share with others or upload to the network.
Second, the use of cloud functions to send text messages
Use developer tools to create a new cloud function, such as sms, open package.json in the cloud function directory, add the latest version of the tencentcloud-sdk-nodejs dependency, right-click cloud function directory select to open the input command npm install installation dependency in the terminal:
"dependencies": { "wx-server-sdk":"latest", "tencentcloud-sdk-nodejs":"latest"}
Then create a new config folder under the directory of the cloud function, and create a config folder in the .js, as shown in the following image of the directory structure of the cloud function:
sms // 云函数目录├── config //config文件夹│ └── config.js //config.js文件└── index.js└── config.json └── package.json
Then enter .js code in theconfig code to fill in ThescretID and SecretKey in the security credentials:
module.exports = { secretId: 'wxda99ae45313257046', secretKey: 'josgjwoijgowjgjsogjo', }
Then enter the following code in .js, the content of the code is more, but basically from Tencent cloud SMS technical documents directly Copy over, we just need to change the corresponding parameters inside, for example
-
req.
SmsSdkAppid for
Creating
SDKAppID
-
req.
Sign creates the signature content
签名内容
-
req.
TemplateID is the template ID in the create body
ID
- req. TemplateParamSet is a variable in the contents of a template with an array of values, and how many variables are filled in the array
- req. PhoneNumberSet is the user's mobile phone number and can be filled in for your own test
After modifying the above, you can trigger the cloud function to send a text message to the appropriate mobile phone number:
const cloud = require('wx-server-sdk')const tencentcloud = require("tencentcloud-sdk-nodejs");cloud.init({ env: cloud.DYNAMIC_CURRENT_ENV,})const config= require("./config/config.js")const {secretId,secretKey} = configexports.main = async (event, context) => { const smsClient = tencentcloud.sms.v20190711.Client; const models = tencentcloud.sms.v20190711.Models; const Credential = tencentcloud.common.Credential; const ClientProfile = tencentcloud.common.ClientProfile; const HttpProfile = tencentcloud.common.HttpProfile; let cred = new Credential(secretId,secretKey) let httpProfile = new HttpProfile(); httpProfile.reqMethod = "POST"; httpProfile.reqTimeout = 30; httpProfile.endpoint = "sms.tencentcloudapi.com"; let clientProfile = new ClientProfile(); clientProfile.signMethod = "HmacSHA256"; clientProfile.httpProfile = httpProfile; let client = new smsClient(cred, "ap-guangzhou", clientProfile); let req = new models.SendSmsRequest(); req.SmsSdkAppid = "1400364657"; req.Sign = "HackWeek"; req.ExtendCode = ""; req.SenderId = ""; req.SessionContext = ""; req.PhoneNumberSet = ["+86185****3"]; req.TemplateID = "597853"; req.TemplateParamSet = ["1234","5"]; client.SendSms(req, function (err, response) { if (err) { console.log(err); return; } console.log(response.to_json_string()); });}