Cloud development Image processing and OCR
May 22, 2021 Mini Program Cloud Development Advanced
Cloud calls have some interfaces that fall into the category of AI services, such as intelligent cutting with the help of artificial intelligence, scanning barcodes/two-dimensional codes, HD of pictures and other image processing and recognition of bank cards, business licenses, driver's licenses, identity cards, printed bodies, driver's licenses and other OCR, with these interfaces we can also use artificial intelligence in small programs. Next, let's take the bar code/QR code recognition and recognition of the print as an example of a small program to introduce cloud calls.
First, image processing
Use the developer tool to create a new cloud function, such as scancode, and then add permissions called by the img.scanQRCode cloud in confeg.json, and upload and deploy all files (and update the permissions at this point) after installing the dependency using npm install.
{ "permissions": { "openapi": [ "img.scanQRCode" ] }}
Then enter the following code in .js and note the corresponding writing of
cloud.openapi.img.scanQRCode
method and
img.scanQRCode
permissions, otherwise the error of 604100 will be reported.
const cloud = require('wx-server-sdk')cloud.init({ env: cloud.DYNAMIC_CURRENT_ENV })exports.main = async (event, context) => { try { const result = await cloud.openapi.img.scanQRCode({ imgUrl:"https://tcb-1251009918.cos.ap-guangzhou.myqcloud.com/demo/qrcodetest.png" //注意二维码必须是条码/二维码,不能是小程序码 }) return result } catch (err) { console.log(err) return err }}
After the cloud function is called, the returned result object contains the result object, and the contents of the QR code can be obtained in the data of codeResults.
codeResults: [{ data: "使用云开发来开发微信小程序可以免费。。。", pos: {leftTop: {…}, rightTop: {…}, rightBottom: {…}, leftBottom: {…}},typeName: "QR_CODE"}]errCode: 0errMsg: "openapi.img.scanQRCode:ok"imgSize: {w: 260, h: 260}
Second, OCR artificial intelligence recognition
Use the developer tool to create a new cloud function, such as ocrprint, and then add the permissions called by the ocr.printedText cloud to the config.json, and upload and deploy all files (at which point the permissions are updated) after installing the dependency using npm install.
{ "permissions": { "openapi": [ "ocr.printedText" ] }}
After the cloud function is called, the returned result object contains the result object, and the contents of the QR code can be obtained in the data of codeResults.
const cloud = require('wx-server-sdk')cloud.init({ env: cloud.DYNAMIC_CURRENT_ENV })exports.main = async (event, context) => { try { const result = await cloud.openapi.ocr.printedText({ imgUrl: 'https://tcb-1251009918.cos.ap-guangzhou.myqcloud.com/demo/ocrprint.png' }) console.log(result) return result } catch (err) { console.log(err) return err }}
After the cloud function is called, the returned result object contains the result object, and the text contained in the picture can be returned in the items.
items: Array(4)0: {text: "JavaScript入门", pos: {…}}1: {text: "JavaScript是目前世界上最流行的编程语言之一,它也是小程序开发最重要的基础语言。要做出一个功能复杂的小程序,除了需要掌握JavaScript的基本语", pos: {…}}2: {text: "法,还要了解如何使用JavaScript来操作小程序(通过API接口)", pos: {…}}3: {text: "过API接口)。", pos: {…}}
Third, image processing expansion capacity
Pictures are very important elements of small programs, especially travel photos, social pictures, e-commerce products pictures, photo album category programs, media images, etc. , picture loading speed, clarity, picture interaction, picture effect processing and picture loading CDN consumption is a need to pay attention to. And cloud development image processing expansion capabilities combined with cloud storage can be very effective in solving many problems.
It is highly recommended that all users with image processing needs should install image processing expansion capabilities, which greatly compensate for and enhance cloud storage image processing capabilities, especially if the picture is scaled according to the required specifications can greatly reduce the consumption of CDNs and the loading speed of the picture and we can use fast thumbnail templates according to different business scenarios, all of which are very practical and easy to use combined with cloud storage.
1, image processing capacity introduction
Cloud development image processing capabilities combined with Tencent cloud data image solutions, image processing provides a variety of image processing functions, including intelligent cutting, lossless compression, watermarking, format conversion, etc., image processing expansion capabilities include a very rich range of functions, the cost of using the following image processing is billed by volume, billing cycle is free of charge, within 10TB, more than 10TB, according to 0.025 yuan / GB to save money:
- Zoom: iso-scale, set target wide and high zoom and other ways;
- Crop: ordinary cropping, zooming and cropped, inner cut round, face intelligent cutting;
- Rotation: normal rotation, adaptive rotation;
- Format conversion: jpg, bmp, gif, png, webp, yjpeg format conversion, gif format optimization, progressive display function;
- Quality transformation: quality transformation for JPG and WEBP images;
- Gauss Blur: Blurring pictures;
- Sharpening: sharpening of pictures;
- Photo watermarking: providing picture watermarking function;
- Text watermarking: providing real-time text watermark processing function;
- Get the basic information of the picture: query the basic information of the picture, including format, length, width, etc.
- Get picture EXIF: query picture EXIF information, such as photo shooting parameters, thumbnails, etc.
- Get the main tone of the picture: get the main tone information of the picture;
- Remove meta-information: remove picture meta-information, reduce image volume;
- Quick thumbnail template: quickly realize the functions of image format conversion, thumbnail, trim and so on, and generate thumbnails;
- Pipe operator: The pictures are processed in a variety of order
After we have added the expansion capabilities of image processing in Tencent Cloud Development Web Console (note to log in using WeChat Public Number), we can see cloud storage developed by The Cloud in Tencent Cloud's Data Wanying Bucket, and the in-depth use of image processing capabilities can also refer to Tencent Cloud Data Wanying's technical documentation.
There are three ways to use image processing power in small program cloud development:
- Image address stitching, only need to be in the picture download address url stitching some simple parameters (API pipeline operator), you can use the image processing capacity, very convenient to use, this will not store the results of image processing to cloud storage, will not occupy the space of cloud storage;
- In the front end (small terminal) to do persistent image processing, support the resulting graph output processing operations, that is, we can zoom, crop, format conversion, quality transformation and other processing after the picture storage to the cloud storage for easy use later;
- Persistent image processing at the cloud function side supports processing with result graph output
2, image address stitching
Before we understand the image processing power, we need to understand the fileID of the cloud storage file, the download address, and the permission parameters that the download address carries (the parameter stitching of the image processing power is based on the download address), as shown in the following image:
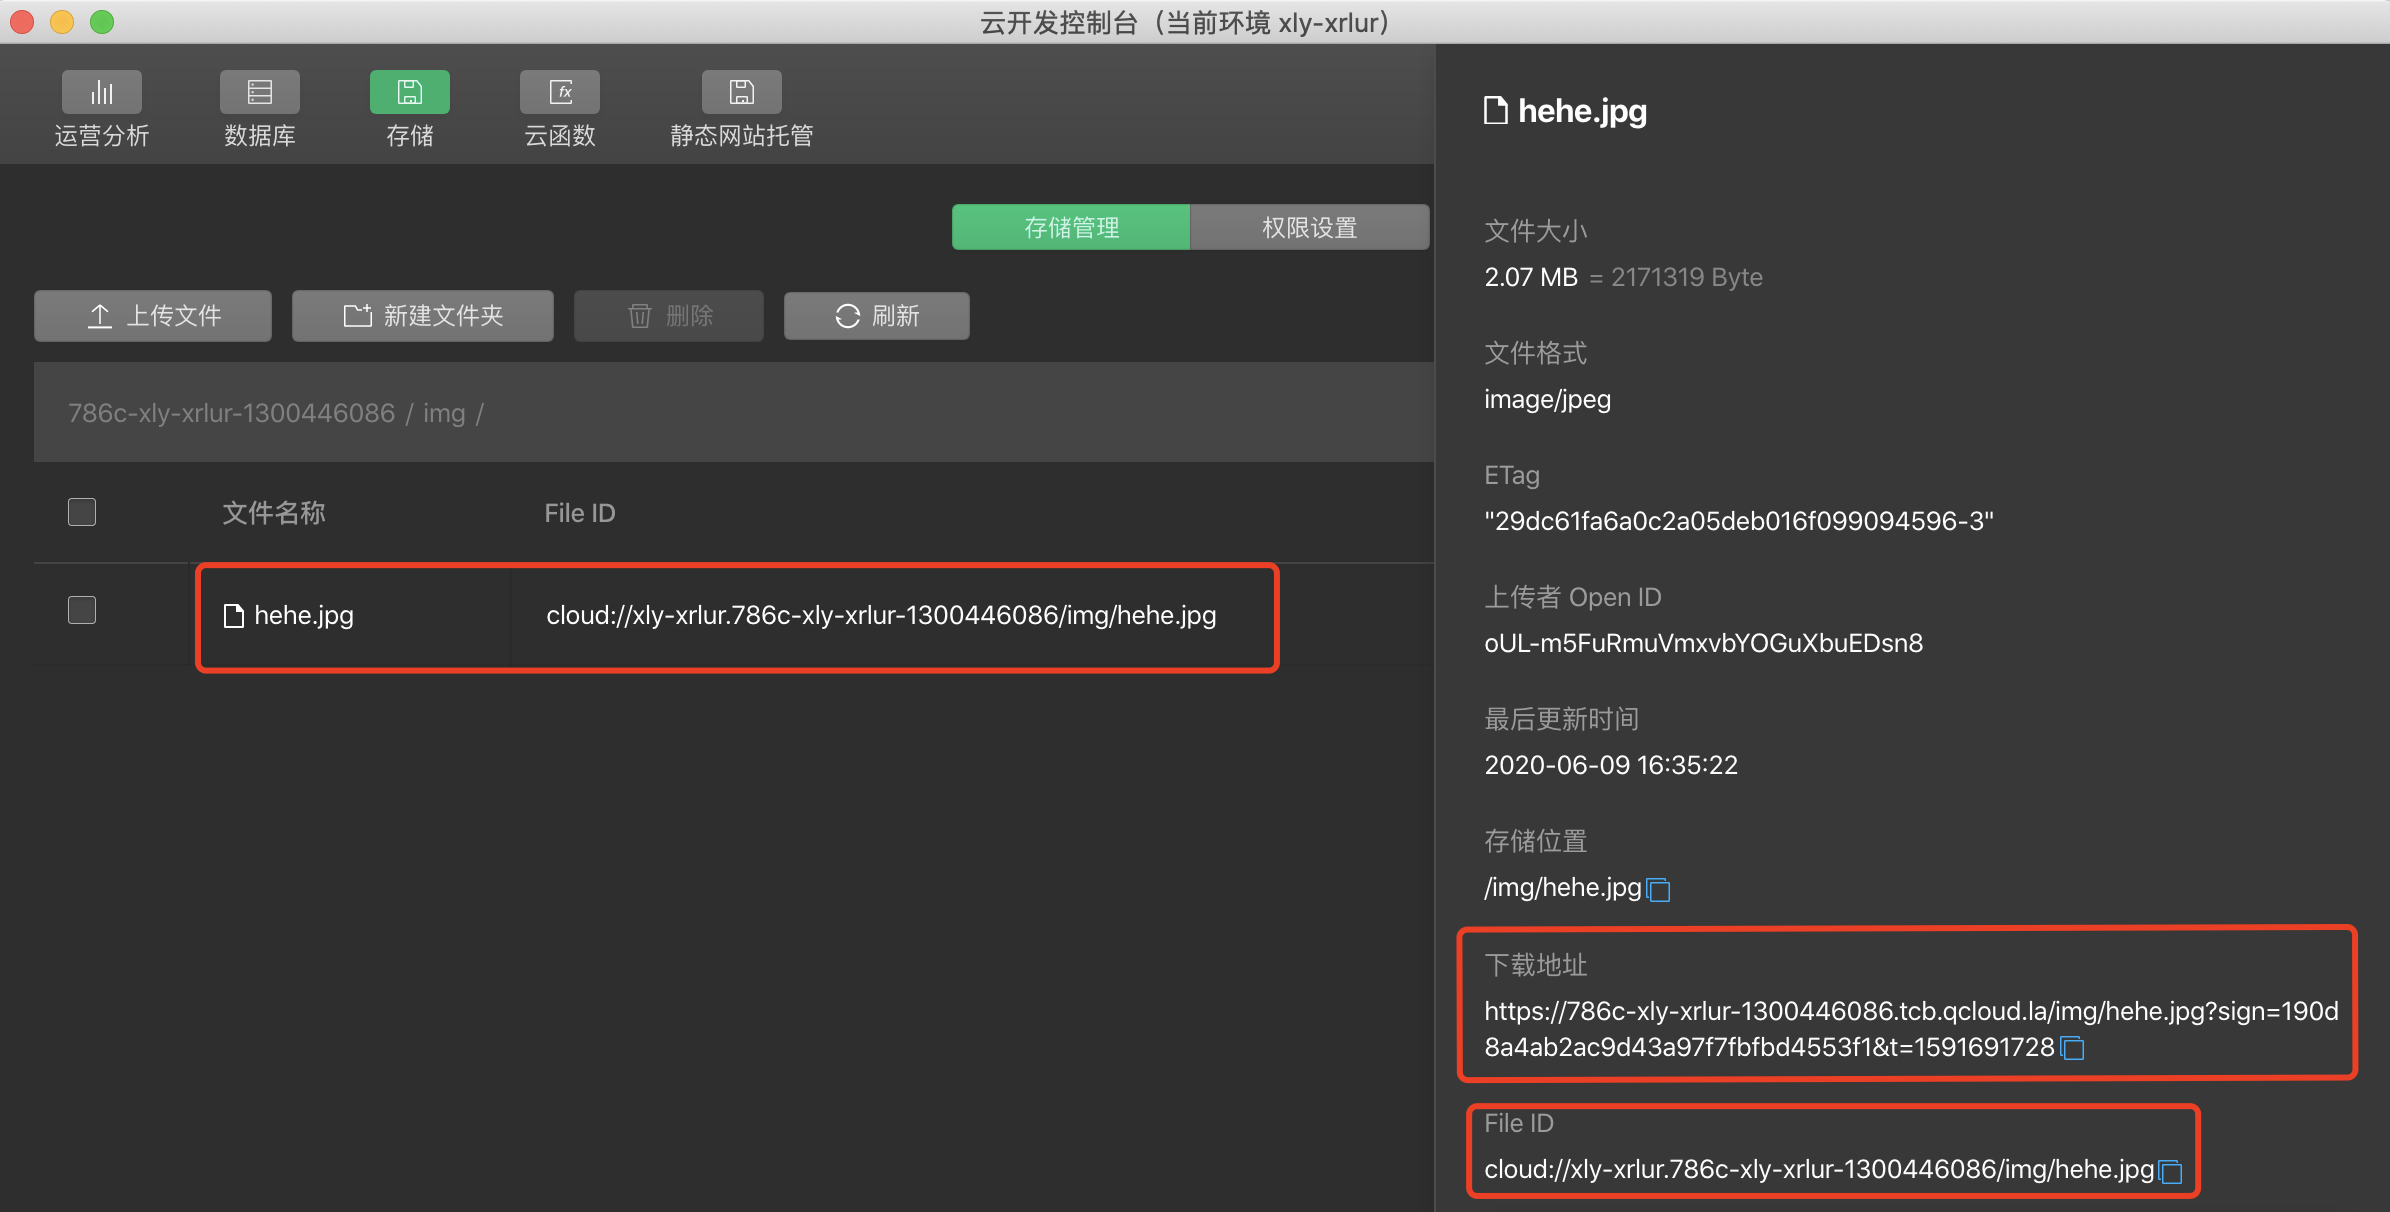
In the case of installed image processing expansion capabilities, we can directly take the download address of cloud storage for stitching, after stitching the link we can use in a small program, can also be used in the drawing bed, such as the original picture download address is:
https://786c-xly-xrlur-1300446086.tcb.qcloud.la/hehe.jpg?sign=b8ac757538940ead8eed4786449b4cd7&t=1591752049
And the relevant image processing capacity stitching case is as follows, the specific operation can look at the technical documentation, the actual effect, you can copy and paste links to the browser or small program experience (change to their own address), note that the stitching method is to add a download address after the
&imageMogr2/thumbnail/!20p
(note that there is already a sign parameter, so stitching
$
?
//将图片等比例缩小到原来的20%https://786c-xly-xrlur-1300446086.tcb.qcloud.la/hehe.jpg?sign=b8ac757538940ead8eed4786449b4cd7&t=1591752049&imageMogr2/thumbnail/!20p
Later, for convenience,
https://786c-xly-xrlur-1300446086.tcb.qcloud.la/hehe.jpg?sign=b8ac757538940ead8eed4786449b4cd7&t=1591752049
short as a download_url:
//缩放宽度,高度不变,下面案例为宽度为原图50%,高度不变download_url&imageMogr2/thumbnail/!50px//缩放高度,宽度不变,下面案例为高度为原图50%,宽度不变download_url&imageMogr2/thumbnail/!x50p//指定目标图片的宽度(单位为px),高度等比压缩,注意下面的是x,不是px,p与x在拼接里代表着不同的意思download_url&imageMogr2/thumbnail/640x//指定目标图片的高度(单位为px),宽度等比压缩:download_url&imageMogr2/thumbnail/x355//限定缩略图的宽度和高度的最大值分别为 Width 和 Height,进行等比缩放download_url&imageMogr2/thumbnail/640x355//限定缩略图的宽度和高度的最小值分别为 Width 和 Height,进行等比缩放download_url&imageMogr2/thumbnail/640x355r//忽略原图宽高比例,指定图片宽度为 Width,高度为 Height ,强行缩放图片,可能导致目标图片变形download_url&imageMogr2/thumbnail/640x355!//等比缩放图片,缩放后的图像,总像素数量不超过 Areadownload_url&imageMogr2/thumbnail/150000@//取半径为300,进行内切圆裁剪download_url&imageMogr2/iradius/300//取半径为100px,进行圆角裁剪download_url&imageMogr2/rradius/100//顺时针旋转90度download_url&imageMogr2/rotate/90//将jpg格式的原图片转换为 png 格式download_url&imageMogr2/format/png//模糊半径取8,sigma 值取5,进行高斯模糊处理download_url&imageMogr2/blur/8x5//获取图片的基础信息,返回的是json格式,我们可以使用https请求来查看图片的format格式,width宽度、height高度,size大小,photo_rgb主色调download_url&imageInfo
3, small terminal persistent image processing
When we want to store the results of image processing (i.e., processed pictures) such as zooming, cropping, rotating, format transformation, etc. into cloud storage, this is called persistent image processing, and after the image processing power is installed, we can also do image processing on the small terminal.
When the user uploads the original image to the small terminal, we need to do some processing of the picture, such as the picture is too large to crop and narrow the picture, such as the picture needs to do a certain Gauss blur, rotation and other processing, although these are before the image processing, but the effect of the small terminal image processing is not so good or too complex, the use of image processing expansion capabilities are very practical.
Build image expansion dependencies on the small terminal
First in the developer tool gadget root (usually miniprogram), right-click "open in the terminal", and then enter the following code in the terminal, that is, install the image expansion dependency in the small terminal, after installation, we can see node_modules under the miniprogram folder:
npm install --save @cloudbase/extension-ci-wxmp@latest
Then click on the tool in the developer toolbar - build npm, and once the build is successful, you can see the minprogram_npm in @cloubase folder under the miniprogram folder, which contains extension-ci-wxmp, indicating that the image expansion dependency is built.
Image processing on a small terminal
Using the developer tool to create a new imgprocess page, and then entering the following code in imgprocess.wmxl, let's create a new button button:
<button bindtap="imgprocess">处理图片</button>
Then the image processing .js (outside) above the Page() function of the image process, which is called:
const extCi = require("./../../miniprogram_npm/@cloudbase/extension-ci-wxmp");
Then write an imgprocess event handler in the Page() function of the imgprocess .js, click button and then execute the readFile() function, that is, get the result of the picture uploaded to the small program temporary file (is an object), and then Call the imageProcess() function, which processes the picture, saves it
tcbdemo.jpg
and the processed picture is saved as the tcbdemo.png under the image_process folder, which is equivalent to saving two pictures:
async imgprocess(){ const readFile = async function() { let res = await new Promise(resolve=>{ wx.chooseImage({ success: function(res) { let filePath = res.tempFilePaths[0] let fm = wx.getFileSystemManager() fm.readFile({ filePath, success(res){ resolve(res) } }) } }) }) return res } let fileResult = await readFile(); //获取图像的临时文件上传结果 const fileContent = fileResult.data //获取上传到临时文件的图像,为Uint8Array或Buffer格式 async function imageProcess() { extCi.invoke({ action: "ImageProcess", cloudPath: "tcbdemo.jpg", // 图像在云存储中的路径,有点类似于wx.cloud.uploadFile接口里的cloudPath,上传的文件会保存为云存储根目录下的hehe.jpg operations: { rules: [ { fileid: "/image_process/tcbdemo.png", //将图片存储到云存储目录下的image_process文件夹里,也就是我们用image_process存储处理之后的图片 rule: "imageMogr2/format/png", // 处理样式参数,我们可以在这里写图片处理的参数拼接 } ] }, fileContent }).then(res => { console.log(res); }).catch(err => { console.log(err); }) } await imageProcess()}
-
Perhaps your developer tool will report the following error: https://786c-xly-xrlur-1300446086.pic.ap-shanghai.myqcloud.com is not in the following request legitimate domain name
https://786c-xly-xrlur-1300446086.pic.ap-shanghai.myqcloud.com 不在以下 request 合法域名列表中,请参考文档:https://developers.weixin.qq.com/miniprogram/dev/framework/ability/network.htmlthis to follow the reference document to add the link to the legitimate domain name, otherwise no pictures will be generated;
-
actionis an action type, and its values can be: ImageProcess image processing, DetectType image security audit (described later), WaterMark image busy watermark, DetectLabel image label, and so on.
-
operationsare image processing parameters, especially rule and our previous url stitching isimageMogr2/blur/8x5imageMogr2/rradius/100are still valid.
FileContent in the above function is not necessary, that is, we can not upload pictures on the small terminal, but directly modify the cloud storage inside the existing pictures, and the picture processing photos saved, this case code can be written as follows:
async imgprocess(){ extCi.invoke({ action: "ImageProcess", cloudPath: "tcbdemo.jpg", // 会直接处理这张图片 operations: { rules: [ { fileid: "/image_process/tcbdemo.png", rule: "imageMogr2/format/png", // 处理样式参数,与下载时处理图像在url拼接的参数一致 } ] }, }).then(res => { console.log(res); }).catch(err => { console.log(err); })}
4, cloud function persistent image processing
In the processing of the cloud function side and the processing of the small terminal, the method used is generally consistent, but the cloud function processing picture scene and the small terminal processing picture scene will be different, the small terminal is mainly used to upload pictures when the picture is processed, the cloud function is mainly used to download pictures from a third party after processing or the picture inside the cloud storage processing (such as the use of a timed trigger to the picture processing of the specified folder in the cloud storage). It is not recommended to transfer the picture to the cloud function and then process the picture.
Use the developer tool to create a new imgprocess cloud function, then add the latest version
@cloudbase/extension-ci
the cloud function directory to select the input command npm install installation dependency to open in the terminal:
"dependencies": { "wx-server-sdk": "latest", "@cloudbase/extension-ci": "latest"}
Then enter the following code .js in the index code, the specific meaning of the code can be explained by reference to the contents of the small terminal:
const cloud = require('wx-server-sdk')cloud.init({ env: cloud.DYNAMIC_CURRENT_ENV })const extCi = require('@cloudbase/extension-ci')cloud.registerExtension(extCi)async function process() { try { const opts = { rules: [ { fileid: '/image_process/tcbdemo.jpeg', rule: 'imageMogr2/format/png' } ] } const res = await app.invokeExtension('CloudInfinite', { action: 'ImageProcess', cloudPath: "tcbdemo.jpg", fileContent, operations: opts }) console.log(res) return res } catch (err) { console.log(err) }}