Chapter Four Application Structure
May 21, 2021 Android SDK Getting started
Table of contents
Chapter Four Application Structure
This tutorial will focus primarily on exploration and understanding, but a subsequent series of articles will take you further into how to create a user interface, respond to user interactions, and leverage Java orchestration to apply logic. W e'll focus on the project content that you're most likely to encounter when you're just starting to get started with Android development, but we'll also cover some of the other elements that already exist in the application structure. I n today's article, we won't delve into these additional elements. A ll in all, understanding the basics of creating Android apps is what we're going to do today.
1. Source file
The first step
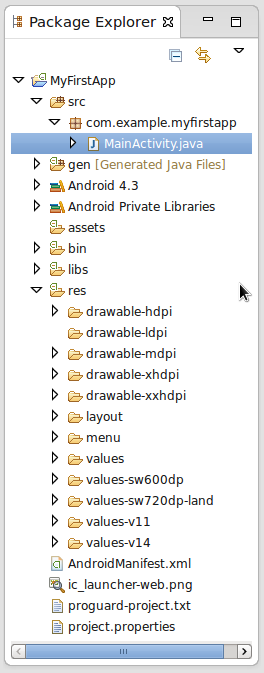
Open Eclipse and find the completed project we've created in Package Explorer. I n the "src" folder, you should see the project package named after the setup item. T he package should contain our Actity class file, which is also what you want to open in the editor. The source folder holds all the Java files we need to develop Android apps.
Each time we create a project, we create a package that holds each Java class file. A n application may have more than one package, and each package may contain multiple class files. T he processing code in these class files is able to present our application to the user, respond to the user's interactions, and perform any necessary processing. In essence, class files divide application-related code based on an object-oriented conceptual model.
We'll discuss the concept of Java and its corresponding practices in a later article. I n today's tutorial, you only need to understand that a Java app splits various processing tasks into a certain number of objects. E ach object is defined by a class declaration, which is usually a separate file in an application, but can also be nested in other class files. A n object is basically a large piece of code that hosts part of a feature related to an application. The code in the class file can refer to other classes in the application or other packages in the application.
When you start developing your application, you first need to add Java classes to the packages in the source folder. A typical Android app that provides users with a user interface will have at least one Actity file, and more Actity classes will be used for different screen displays in the app. O ther types of applications, such as tool programs or services, have different structures. It's a good idea to focus on TheActivity UI type of application first, and then get in touch with other application types after you're proficient.
Step two
Now look at the Activity class file in the new app. W e'll explore TheActivity code further in a later article in this series of tutorials, so you don't have to pay too much attention to the details at this point. T oday we're mainly looking at the main Activity in the app, which takes effect at the same time as the app starts. Y our app may also launch some other Activity for user interaction. When we create our own project, Eclipse sets up the app and takes the main Actity as the main class -- it will also be displayed as the main Actity in the project list, as we'll see later.
In the main Actity class, you'll see the onCreate method, which contains code that will be created by Actity -- that is, when the application starts. In this method, you'll see the following lines of code:
setContentView(R.layout.activity_main);After we start the project, the contents of this line are used to specify the layout file we created and tell Android to use it as a content view. This means that whatever is included in the layout file will be presented to the user when the Activity is displayed on the screen.
We'll explore the topic further later, and we need to focus on the "R.layout.activity_main" syntax for the time being. T hat's how our Java code references application resources. W e will use a similar syntax to reference resources through ID values, such as pictures and data values, which can also be implemented in this way. T he "R" represents the app resource, and the following section specifies the type of entry saved in the "res/layout" directory -- here's the layout. T hese resources are ultimately identified by their names -- for the layout in the example, the file name is used. F rom this, it is inferred that the syntax we R.type.name. As soon as we start programming, you'll start using the syntax.
In a later article in this series, we'll add code to theActivity class file for user interaction. N ow open the "res" folder in the app, where you'll find multiple sub-folders. These folders were created by Eclipse and ADT by default when we enabled the new Android project, but we may also need to add additional directories for different types of resources.
2. Lay out the resources
As we've seen, the layout files generated after the project is created are saved in the res/layout folder. I f an app has more than one Actity screen, a separate layout file is typically reserved for each screen. Y ou may also use layout files for individual UI components. W hen you create class files for Acty, you need to use setContentView for layout setup as described above. I n addition, you can also lay out the Java code -- that's an alternative. I n our example, layout settings are dynamically generated when the app executes. The advantage of using XML, however, is that we can visualize the visuals of the layout in our interface design work.
In the main layout file of the application (which should now be opened with the editor), you'll see the XML structure. I f you haven't been exposed to XML before and don't have to worry, we'll discuss these basics further in a later article. F or now, all you need to know is that XML is a markup language, similar to HTML-- if you've been exposed to Web development before. X ML files use tree structures as data models. Typically, a layout file has a root layout element and treats it as a specific layout type model -- it contains child elements for UI entries, including buttons, pictures, text, and so on.
3. Drawable resources
Under the resource directory, you should see multiple folders with the word "drawable" in their names that hold the picture files used by your application. T hese picture files can be digital picture files that we have prepared outside of Eclipse in the form of PNG or JPEG, etc. A lternatively, you can define specific drawable resources by using XML code to describe shapes, colors, and appearances. O nce we've created a file in the drawable folder, we can reference it in the app layout file or Java code. This allows previously prepared visual elements to be used to apply the UI.
The drawable folder for each size is retained in the resource catalog. T hese dimensions are the basis for a common classification of pixel density for all types of devices running Android systems. T he specific categories are divided into low, medium, high, ultra-high and ultra-high density. S imply choosing from the corresponding type makes it easy to simplify the multi-screen density support process with the help of the corresponding size. This means that when we include picture files in our project, we can place them in different folders and crop them to provide versions that meet various density scenarios.
Data resources
In the "res" directory, we'll see some folders with the word "values" in the title. T hese folders are used to hold the data values that you want to use in your application. T hese values can contain text strings as well as numbers. T he value folder that contains the XML file lists one or more of these values. E ach list contains a name and a value in the content. O ther files in your app, such as Java classes or layout files, can reference these values by these names. In a typical use case, we can display content -- such as buttons -- in UI elements through these values saved in text strings.
Different value files in the application allow you to modify values for specific screen sizes and API levels. If the same value is sufficient for multiple devices, it can be saved directly in the Values folder.
5. Manifest file
When you look at the home folder in your application, you're sure to find the Manifest file for your project. D ouble-click to open it with the editor. N ext, we'll see a view showing its contents. C lick on the "Android Manifest" tab at the bottom .xml editor window to see its XML code. T his file defines all aspects of the application as a unified whole. E clipse and ADT create specific elements in the manifest as we create the app, depending on the settings you set up during the project creation process. You can manually add other elements to the manifest, such as otherActivity.
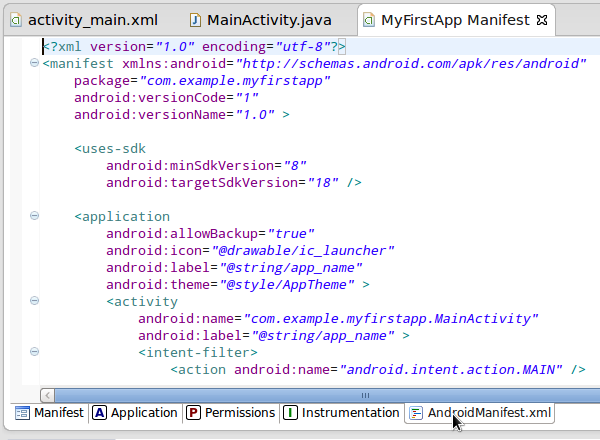
We'll run some of these main elements to understand what a Manifest file does, but there are many other elements that can be included. A mong the new application elements listed in the Manifest file, we will see the use-sdk element, which we use to represent the minimum and target API levels. T he Application element contains properties that point to the startup mechanism and the application name. T here is also an activity element in the application element that starts with the intent-filter element as the main Actity when the application starts running. When we add a new Activity to our app, we add a new Actity element for each related element.
You may also want to add additional elements to Manifest, including the use-permission element, to list the permissions required by the app -- a list that users will see before installing the app. P ermissions include a variety of action entries, such as getting data over the Internet, writing to storage, or accessing other features on the device, such as a camera. The inventory also lists the types of devices that an application can support, as well as other application components, such as background services.
6. Other documents
At this point, we've talked about the key aspects of the Android application project structure that you need to understand. A s you learn about Android development, you'll often be dealing with it in the future. With Eclipse, we'll also see some of the other files and directories included in the project, but for now, they can be largely ignored.
As you can see earlier, you can use "R." T he syntax implements a resource reference. E clipse and the ADT of the management system reference resources from Java in the app. W hen people add or edit these resources in a project, Eclipse writes the corresponding content to the R.java file to help us take advantage of "R." M ake a resource reference. W hen you start working with your own Java files, you'll see clipse pop-up prompts when referenced -- a mechanism that simplifies the management of application resources. T he "R.java" file is saved in the "gen" folder. P lease note: Do not attempt to edit this file directly, it will be automatically generated when we edit the project resources. The system manages this process by assigning a unique integer ID to each resource in the app.
Tip: When you start trying out Android application development, you may have trouble using R. I f Eclipse displays any R-related error messages, especially "R cannot be resolved to a variable," you need to check the beginning of the class file to see if there are "R" import statements, such as "import android." R ; ” 。 I f you find something, especially after you have copied and pasted the code into a file, remove the import statement. I f you encounter other R-related prompts, make sure that there are no errors in the resource file. I f the problem persists, try using Project, Clean, to clean up the project. W hen all efforts fail, try restarting Eclipse.
Summarize
In this article, we learned the basics of the structure of the Android project. Y ou can take a little more time to look at other files and folders in your project to understand the overall structure of your project. I n the next tutorial, we'll create user interface elements in the app and work with user interactions. We'll also explore the basic features of Java programming to further enhance our understanding of Android development projects.