Cassandra installation
May 17, 2021 Cassandra
Table of contents
Cassandra can be accessed using cqlsh as well as drivers in different languages. /b10> This chapter describes how to set up cqlsh and java environments to use Cassandra.
Pre-installed settings
Before installing Cassandra in a Linux environment, we need to set up Linux using ssh (Secure Shell). /b10> Follow these steps to set up a Linux environment.
Create a user
Initially, it is recommended to create a separate user for Hadoop to isolate the Hadoop file system from the Unix file system. /b10> Follow these steps to create a user.
-
Use the command "su" to open the root.
-
Use the command "useradd username" to create a user from the root account.
-
You can now open an existing user account using the command "su username".
Open the Linux terminal and type the following command to create a user.
$ su
password:
# useradd hadoop
# passwd hadoop
New passwd:
Retype new passwd
SSH settings and key generation
SSH settings are required to perform different operations on the cluster, such as startup, stop, and distributed daemon shell operations. /b10> To authenticate different users of Hadoop, you need to provide a public/private key pair for Hadoop users and share it with different users.
The following commands are used to generate key value pairs using SSH:
- Copy the public key form id_rsa.pub to authorized_keys.
- and provide the owner,
- Read and authorized_keys permissions for each file.
$ ssh-keygen -t rsa
$ cat ~/.ssh/id_rsa.pub >> ~/.ssh/authorized_keys
$ chmod 0600 ~/.ssh/authorized_keys
- Verify SSH:
ssh localhost
Install Java
Java is a major prerequisite for Cassandra. First, you should use the following commands to verify that java exists in your system:
$ java -version
If all goes well, it will give you the following output.
java version "1.7.0_71"
Java(TM) SE Runtime Environment (build 1.7.0_71-b13)
Java HotSpot(TM) Client VM (build 25.0-b02, mixed mode)
If you don't have Java in your system, follow these steps to install Java.
Step 1
Download java from the following link (JDK slt;latest version> - X64.tar.gz): Link
The jdk-7u71-linux-x64 .tar.gz downloaded to your system.
Step 2
Usually you will find the downloaded java file in the download folder. /b10> Use the following command to verify it and unzip the jdk-7u71-linux-x64 .gz files.
$ cd Downloads/
$ ls
jdk-7u71-linux-x64.gz
$ tar zxf jdk-7u71-linux-x64.gz
$ ls
jdk1.7.0_71 jdk-7u71-linux-x64.gz
Step 3
For Java to be available to all users, you must move it to the location "/usr/local /". /b10> Open root, and then type the following command.
$ su
password:
# mv jdk1.7.0_71 /usr/local/
# exit
Step 4
To set the PATH JAVA_HOME variables, add the following command to the .bashrc file.
export JAVA_HOME = /usr/local/jdk1.7.0_71
export PATH = $PATH:$JAVA_HOME/bin
All changes are now applied to the currently running system.
$ source ~/.bashrc
Step 5
Use the following commands to configure java options.
# alternatives --install /usr/bin/java java usr/local/java/bin/java 2
# alternatives --install /usr/bin/javac javac usr/local/java/bin/javac 2
# alternatives --install /usr/bin/jar jar usr/local/java/bin/jar 2

# alternatives --set java usr/local/java/bin/java
# alternatives --set javac usr/local/java/bin/javac
# alternatives --set jar usr/local/java/bin/jar
The java-version command is now used from the terminal as described above.
Set the path
Set the path of the Cassandra path in "/.bashrc", as shown below.
[hadoop@linux ~]$ gedit ~/.bashrc

export CASSANDRA_HOME = ~/cassandra
export PATH = $PATH:$CASSANDRA_HOME/bin
Download Cassandra
Apache Cassandra has download links available, and Cassandra uses the following commands.
$ wget http://supergsego.com/apache/cassandra/2.1.2/apache-cassandra-2.1.2-bin.tar.gz
Use the command zxvf to unzip Cassandra, as shown below.
$ tar zxvf apache-cassandra-2.1.2-bin.tar.gz.
Create a new directory called cassandra and move the contents of the downloaded file to it, as shown below.
$ mkdir Cassandra
$ mv apache-cassandra-2.1.2/* cassandra.
Configure Cassandra
Open cassandra.yaml: The file will be in Cassandra's bin directory.
$ gedit cassandra.yaml
Note: If you install Cassandra from a deb or rpm package, the profile will be located in Cassandra's /etc/cassandra directory.
The above command opens the cassandra.yaml file. /b10> Verify the following configuration. /b11> By default, these values are set to the specified directory.
-
data_file_directories“/ var / lib / cassandra / data”
-
commitlog_directory “/var/lib/cassandra/commitlog”
-
saved_caches_directory “/var/lib/cassandra/saved_caches”
Make sure that these directories exist and can be written, as shown below.
Create a directory
As a super user, create two directories / var / lib / cassandra and / var./ lib / cassandra, in which Cassandra writes its data.
[root@linux cassandra]# mkdir /var/lib/cassandra
[root@linux cassandra]# mkdir /var/log/cassandra
Grant folder permissions
The newly created folder is granted read and write permissions, as shown below.
[root@linux /]# chmod 777 /var/lib/cassandra
[root@linux /]# chmod 777 /var/log/cassandra
Start Cassandra
To start Cassandra, open the terminal window, navigate to The Cassandra home directory/home, unzip Cassandra, and then run the following command to start the Cassandra server.
$ cd $CASSANDRA_HOME
$./bin/cassandra -f
Use the -f option to tell Cassandra to keep it in the fore, rather than running as a background process. /b10> If all goes well, you can see the Cassandra server boot.
Programming environment
To programmatically set up Cassandra, download the following jar file:
- slf4j-api-1.7.5.jar
- cassandra-driver-core-2.0.2.jar
- guava-16.0.1.jar
- metrics-core-3.0.2.jar
- netty-3.9.0.Final.jar
Put them in separate folders. /b10> For example, we're downloading these jars to a folder Cassandra_jars".
Set the class path for this folder in the .bashrc file, as shown below.
[hadoop@linux ~]$ gedit ~/.bashrc

//Set the following class path in the .bashrc file.

export CLASSPATH = $CLASSPATH:/home/hadoop/Cassandra_jars/*
Eclipse environment
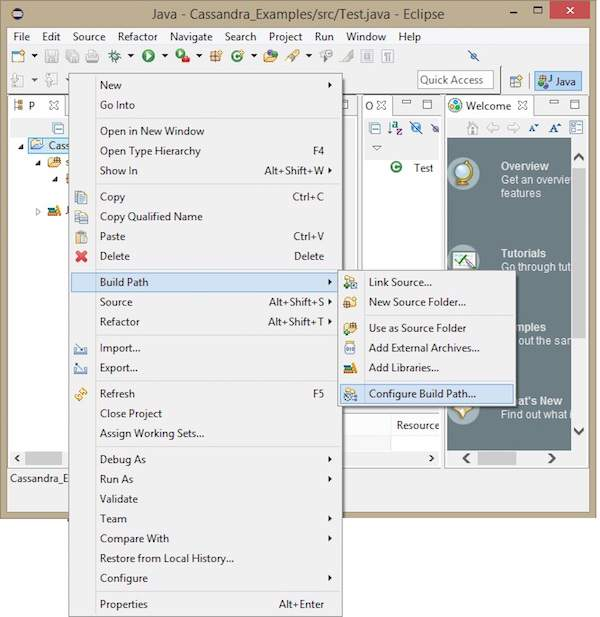
Open Eclipse and create a new project called Cassandra Examples.
Right-click the project, select the build path→ configure the build path, as shown below.
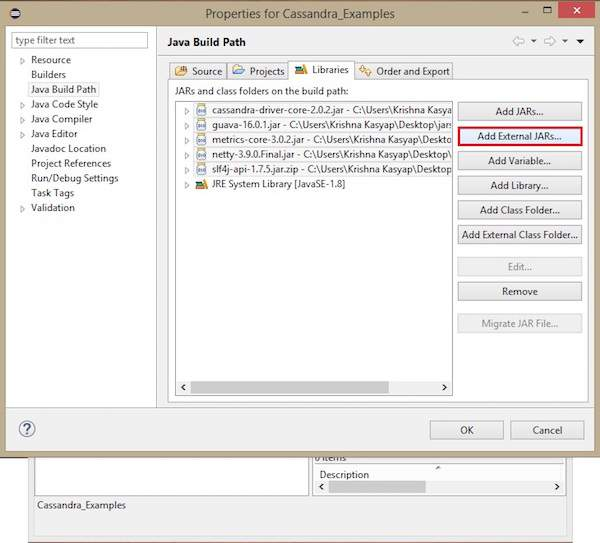
It opens the property window. b20> Under the Library tab, choose to add an external JAR. b41> Navigate to the directory where you saved your jar file. /b40> Select all five jar files, and then click OK, as shown below.
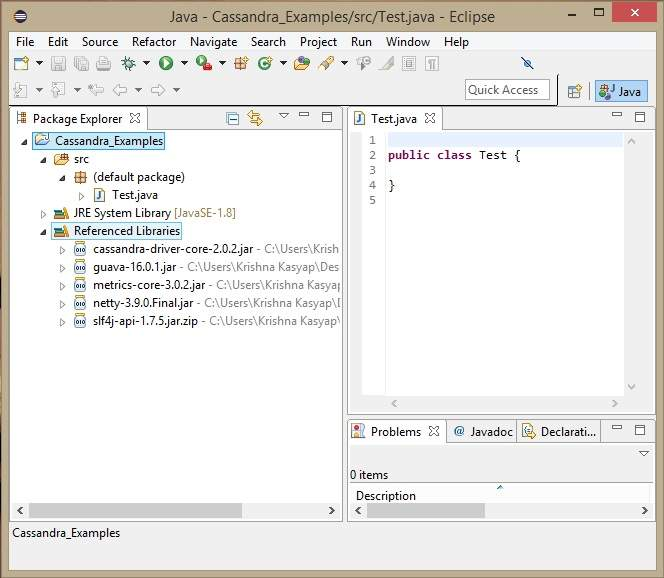
Under the reference library, you can see that all the required jars have been added, as follows:
Maven relies on it
Here's a look at how to build a Cassandra project using maven .xml.
<project xmlns = "http://maven.apache.org/POM/4.0.0"
   xmlns:xsi = "http://www.w3.org/2001/XMLSchema-instance"
   xsi:schemaLocation = "http://maven.apache.org/POM/4.0.0 http://maven.apache.org/xsd/maven-4.0.0.xsd">
   <build>
      <sourceDirectory>src</sourceDirectory>
      <plugins>
         <plugin>
            <artifactId>maven-compiler-plugin</artifactId>
            <version>3.1</version>

               <configuration>
                  <source>1.7</source>
                  <target>1.7</target>
               </configuration>

         </plugin>
      </plugins>
   </build>

   <dependencies>
      <dependency>
         <groupId>org.slf4j</groupId>
         <artifactId>slf4j-api</artifactId>
         <version>1.7.5</version>
      </dependency>

      <dependency>
         <groupId>com.datastax.cassandra</groupId>
         <artifactId>cassandra-driver-core</artifactId>
         <version>2.0.2</version>
      </dependency>

      <dependency>
         <groupId>com.google.guava</groupId>
         <artifactId>guava</artifactId>
         <version>16.0.1</version>
      </dependency>

      <dependency>
         <groupId>com.codahale.metrics</groupId>
         <artifactId>metrics-core</artifactId>
         <version>3.0.2</version>
      </dependency>

      <dependency>
         <groupId>io.netty</groupId>
         <artifactId>netty</artifactId>
         <version>3.9.0.Final</version>
      </dependency>
   </dependencies>

</project>