ASP.NET security
May 13, 2021 ASP.NET
Table of contents
Security
Implementing the security of your website is related to the following:
-
Authentication: The
process of confirming a user's identity and authenticity. A
SP.NET types of certifications are available in this document:
- Windows certification
- Form certification
- Authentication
- Custom authentication
- Authorization: The process of defining and assigning specific roles to a specific user.
- Confidentiality: Includes encryption of client browsers and web servers.
- Integrity: Maintain data integrity. For example, implement a digital signature.
Form-based authentication
In general, form-based authentication includes editing network profiles and registration pages with verification codes.
Network profiles can be written in code such as:
<configuration>

<system.web>
    <authentication mode="Forms">
        <forms loginUrl ="login.aspx"/>
    </authentication>

    <authorization>
        <deny users="?"/>
    </authorization>
</system.web>
...
...
</configuration>
The login.aspx page mentioned in the code snippt above may contain code that contains the username and password used for authentication, which is difficult to encode after the file.
protected bool authenticate(String uname, String pass)
{
    if(uname == "Tom")
    {
        if(pass == "tom123")
            return true;
    }

    if(uname == "Dick")
    {
        if(pass == "dick123")
            return true;
    }

    if(uname == "Harry")
    {
        if(pass == "har123")
            return true;
    }

    return false;
}

public void OnLogin(Object src, EventArgs e)
{
    if (authenticate(txtuser.Text, txtpwd.Text))
    {
        FormsAuthentication.RedirectFromLoginPage(txtuser.Text, chkrem.Checked);
    }
    else
    {
        Response.Write("Invalid user name or password");
    }
}
Notice that the FormsAuthentication class is used in the authentication process.
However, Visual Studio can easily and seamlessly implement user creation, authentication, and authorization through web site management tools without writing any code. T his tool enables the creation of users and roles.
In addition, ASP.NET have an out-of-the-way login control family that gives you control over all the work.
The implementation of form-based security
In order to establish form-based authentication, you need to do the following:
- A user database that supports the authentication process
- A Web site that uses a database
- The user account
- Role
- Restrictions on user activity and group activity
- A user page that displays user status and other information
- A login interface that allows users to log in, retrieve, and modify their passwords.
In order to create a user, you need to take the following steps:
Step 1: Select a website - configure the ASP.NET to open the web app management tool.
Step 2: Click on the security option.
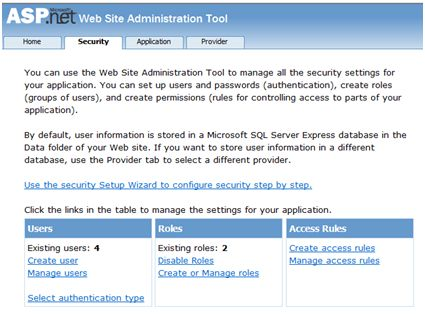
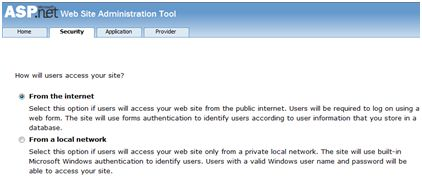
Step 3: Select the 'Forms authentication' option to set the authentication type to 'From the Internet'.
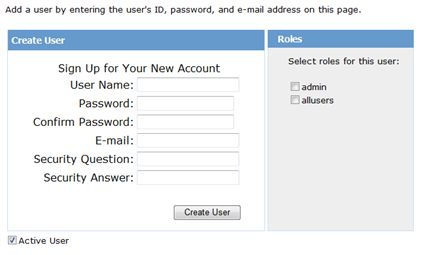
Step 4: Click 'Create Users'. I f you have already created a role, you can assign the role to that user at this step.
Step 5: Create a website and add the following pages:
- Welcome page
- Sign in to the page
- The registration page
- Find the password page
- Modify the password page
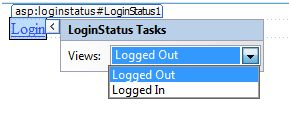
Step 6: Set up a login status control in the sign-in section of the welcome page. C ontains two standard boxes: LoggedIn and LoggedOut.
LoggedIn has the option to view users who are already logged in, and LogedOut has the option to view users who have already exited. Y ou can change the text properties of logins and exits in the property window.
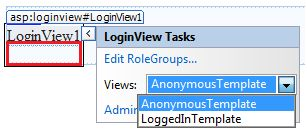
Step 7: Set up a LoginView control below the LoginStatus control. H ere you can set up other text or other controls (such as hyperlinks, buttons, and so on) that reflect whether the user is signed in.
This control has two standard boxes: the Anonymous box and the LoggedIn box. S elect each view and write some text for the user as the content to display when selecting the standard box. T he text should be placed in the area marked red in the following image.
Step 8: Create an app user by the developer. Y ou may want to allow visitors to also create a user account. T o do this, you can add a link under the LoginView control that you can go to the registration page.
Step 9: Set up a CreateUserWizard control on the registration page. S et the ContinueDestination PageUrl property for this control to ensure that you can go to the welcome page.
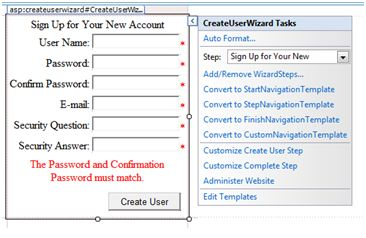
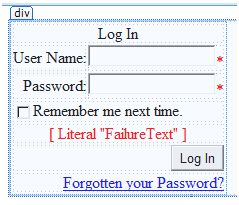
Step 10: Create a login page. S et up a Login control on this page. T he LoginStatus control automatically connects to the login page. M aking the following changes in the network profile can change this default setting.
For example, if you name your signup page .aspx, you can add the following lines of code in the section of your network profile.
<configuration>
<system.web>
<authentication mode="Forms">
<forms loginUrl ="signup.aspx" defaultUrl = “Welcome.aspx†/>
</authentication>
</system.web>
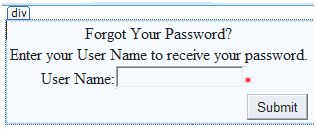
</configuration>Step 11: Users often forget their passwords. T he PasswordRecovery control helps users regain access to this account. S elect the login control. O pen its small label and select 'Convert to Template'.
By customizing the user interface of this control, place a hyperlink control under the login button, which should be able to link to the retrieved password page.
Step 12: Set up a PasswordRecovery control on the Find Password page. T his control requires the mail server to send the password to the user.
Step 13: Set a link to the password modification page in the LogedIn box of the LoginView control on the welcome page.
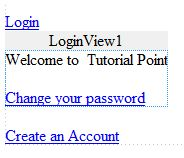
Step 14: Set up a ChangePassword control on the change password page, which has two views:

Now run the app and observe the different security operations.
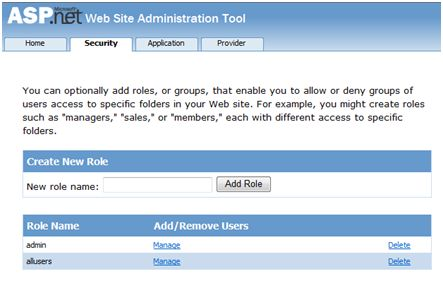
You can go back to the Web App Management tool and click on the security options to create a role.
Click 'Create Roles' to create some characters for this app.
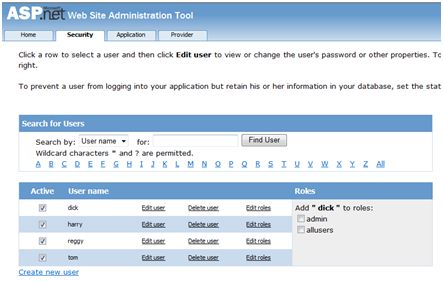
Click 'Manage Users' to assign roles to users.
IIS Certification: SSL
The secure socket layer (SSL) is the protocol used to ensure a secure connection. B y using SSL, the browser encrypts all data sent to the server and decrypts all data from the server. A t the same time, the server decrypts all the data from the two-word browser.
The URL of the secure connection uses the HTTPS protocol instead of the HTTP protocol. A small lock will also be displayed by browsers that use a secure connection. W hen the browser actively communicates with the server using SSL, the server sends a security certificate to authenticate the server itself.
To use SSL, you need to purchase a digital security certificate from a trusted certification authority (CA) and install it on a network server. H ere are some trusted, well-known certification bodies:
- www.verisign.com
- www.geotrust.com
- www.thawte.com
SSL is built on all major browsers and servers. T o enable SSL, you need to install a digital certificate. T he strength of different digital certificates is different depending on the length of the key generated during the encryption process. T he longer the key, the more secure the certificate and the more secure the connection.
| Strength | Describe |
|---|---|
| 40 bits | Supports most browsers but is easy to crack. |
| 56 bits | More robust than 40 bits. |
| 128 bits | It's hard to crack, but not all browsers support it. |