Arduino stepper motor
May 15, 2021 Arduino
Table of contents
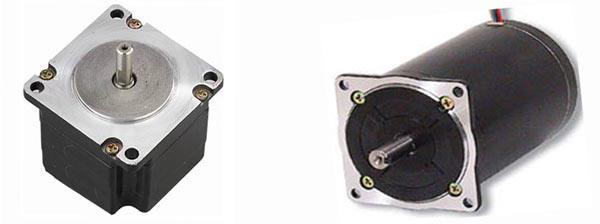
The stepper motor is a brushless synchronous motor that divides the complete rotation into multiple steps. /b10>Unlike brushless DC motors, when a fixed DC voltage is applied to it, it rotates continuously and the stepper motor rotates at a non-continuous step angle.
As a result, stepper motors are manufactured to have steps of 12, 24, 72, 144, 180 and 200 degrees per turn, resulting in step angles of 30 degrees, 15 degrees, 5 degrees, 2.5 degrees, 2 degrees and 1.8 degrees per step. /b10> Stepper motors can have or have no feedback control.
Imagine a motor on an RC plane. /b10> The motor speeds very fast in one direction or in the other. Y ou can change the speed by giving the motor the amount of power, but you can't park the propeller in a specific position.
Now imagine a printer. /b10> There are many moving parts in the printer, including motors. /b11> A motor is used as a feed, rotating the rollers to move the paper when the ink begins to print on the paper. /b12> This motor needs to be able to move the paper at an exact distance so that the next line of text or the next line of image can be printed.
There is another motor connected to a screw that moves the print head back and forth. S imilarly, the screw needs to move an exact amount so that one letter after another is printed. /b11> This is where stepper motors come in handy.
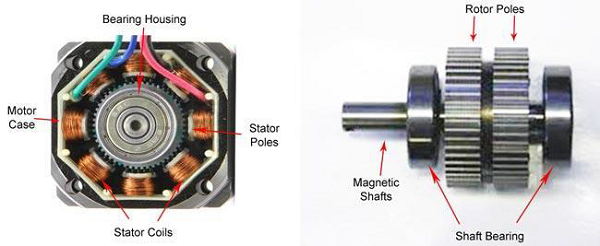
How does the stepper motor work?
Conventional DC motors rotate only in the direction, while step motors rotate in precise increments.
The stepper motor can rotate an exact number of degrees (or steps) as needed. /b10> This gives you complete control of the motor, allowing you to move it to the exact position and keep it in that position. /b11> It is achieved by powering the coils inside the motor for a very short period of time. /b12> The disadvantage is that you have to power the motor all the time to keep it where you want it to be.
What you need to know now is that to move the stepper motor, you have to tell it to move a certain number of steps in one direction or the other, and tell it the speed at which to step in that direction. /b10> There is a wide range of stepper motors. /b11> The methods described here can be used to infer how to use other motors and drivers that are not mentioned in this tutorial. /b12> However, it is always recommended that you consult the data sheets and guidelines for specific models of motors and drives.
The required component
You will need the following components:
- 1 × Arduino UNO board
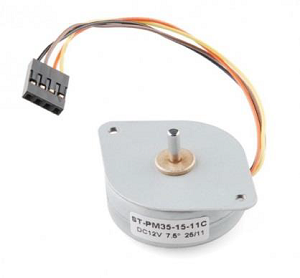
- 1 × small bipolar stepper motor, as shown in the following image
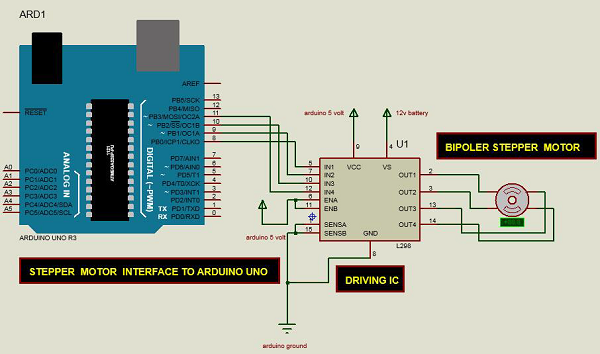
- 1 × LM298 drive IC
Program
Connect according to the circuit diagram, as shown in the following image.
Sketch
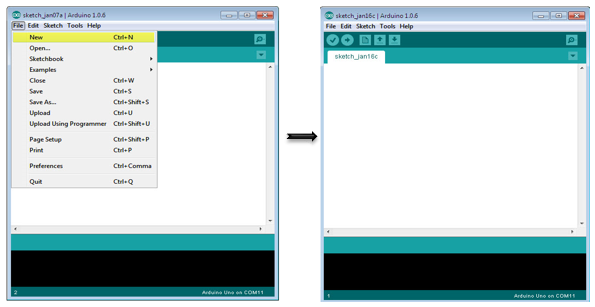
Turn on the Arduino IDE software on your computer. U se arduino to encode and control your circuitry. /b11> Open a new sketch file by clicking New.
Arduino code
/* Stepper Motor Control */

#include <Stepper.h>
const int stepsPerRevolution = 90;
// change this to fit the number of steps per revolution
// for your motor
// initialize the stepper library on pins 8 through 11:
Stepper myStepper(stepsPerRevolution, 8, 9, 10, 11);

void setup() {
   // set the speed at 60 rpm:
   myStepper.setSpeed(5);
   // initialize the serial port:
   Serial.begin(9600);
}

void loop() {
   // step one revolution in one direction:
   Serial.println("clockwise");
   myStepper.step(stepsPerRevolution);
   delay(500);
   // step one revolution in the other direction:
   Serial.println("counterclockwise");
   myStepper.step(-stepsPerRevolution);
   delay(500);
}
Code description
The program drives unpolar or bipolar stepper motors. /b10> The motor is connected to Arduino's digital pins 8-11.
Results
The motor rotates one turn in one direction and then one turn in the other direction.