Arduino PIR sensor
May 15, 2021 Arduino
Table of contents
PIR sensors allow you to sense motion. T hey are used to detect whether a person enters or leaves the range of the sensor. I t usually appears in appliances and gadgets used by families or businesses. They are often referred to as PIR, "passive infrared", "thermoelectric" or "IR motion" sensors.
Here are the benefits of PIR sensors:
- Small size
- The lens range is wide
- Easy to interface
- Cheap
- Low battery
- Easy to use
- Does not wear out
The PIR is made of thermoelectric sensors and has a rectangular crystal in the center of the round metal tank that detects the level of infrared radiation. E verything emits low levels of radiation, and the hotter things emit, the more radiation they emit. T he sensor in the motion detector is divided in half. T his is to detect motion (change) rather than average IR levels. T he two halves are connected to each other so that they cancel each other out. If half see more or less infrared radiation than the other half, the output swings high or low.
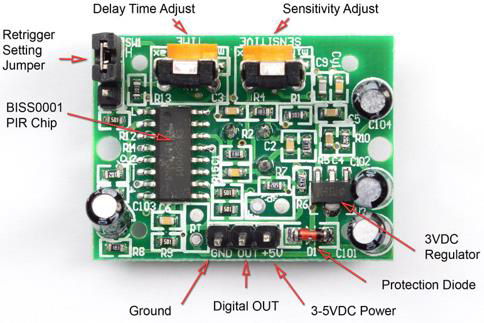
The PIR has adjustable settings and a connector is installed on the 3-pin ground/out/power board.
PIR sensors are useful for many basic projects or products that require detection when people leave or enter the area. P lease note that the PIR does not tell you the number of people around or the distance from the sensor. L enses are usually fixed within a certain distance of scanning, and sometimes they are taken away by pets in the house.
The required component
You will need the following components:
- 1 × breadboard breadboard
- 1 × Arduino Uno R3
- 1 × PIR sensor (MQ3)
Program
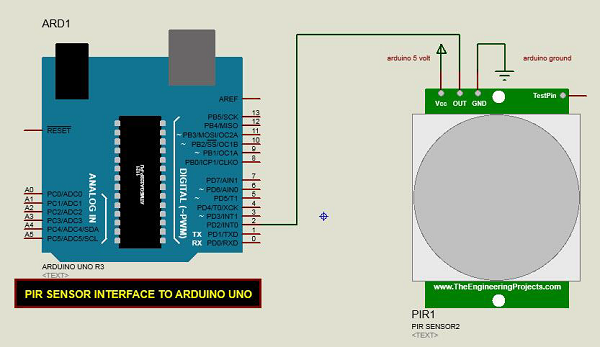
Connect according to the circuit diagram, as shown in the following image.
Sketch
Turn on the Arduino IDE software on your computer. U se arduino to encode and control your circuitry. Open a new sketch file by clicking New.

Arduino code
#define pirPin 2
int calibrationTime = 30;
long unsigned int lowIn;
long unsigned int pause = 5000;
boolean lockLow = true;
boolean takeLowTime;
int PIRValue = 0;

void setup() {
   Serial.begin(9600);
   pinMode(pirPin, INPUT);
}

void loop() {
   PIRSensor();
}

void PIRSensor() {
   if(digitalRead(pirPin) == HIGH) {
      if(lockLow) {
         PIRValue = 1;
         lockLow = false;
         Serial.println("Motion detected.");
         delay(50);
      }
      takeLowTime = true;
   }
   if(digitalRead(pirPin) == LOW) {
      if(takeLowTime){
         lowIn = millis();takeLowTime = false;
      }
      if(!lockLow && millis() - lowIn > pause) {
         PIRValue = 0;
         lockLow = true;
         Serial.println("Motion ended.");
         delay(50);
      }
   }
}
Code description
The PIR sensor has three terminals: Vcc, OUT and GGND. C onnect the sensor as follows:
- Connect the .Vcc to the .5v on the Arduino board.
- Connect OUT to the digital pin 2 on the Arduino board.
- Connect the GD to the GD on Arduino.
You can adjust the sensor sensitivity and delay time by using two variable resistors located at the bottom of the sensor board.

Once the sensor detects any movement, Arduino sends a message through the serial port indicating that motion has been detected. T he PIR sensing motion is delayed for a certain amount of time to check for new movements. If no motion is detected, Arduino sends a new message that the motion is over.
Results
If motion is detected, you will see one message on the serial port and another message when the motion stops.