Arduino mouse button control
May 15, 2021 Arduino
Table of contents
With the mouse library, you can use Arduino Leonardo, Micro, or Due to control your computer's screen cursor.
This particular example uses five buttons to move the cursor on the screen. /b10> The four buttons are directional (top, bottom, left, right) and one is used for left mouse clicks. C ursor movement from Arduino is always relative. /b12> Each time the input is read, the position of the cursor is updated relative to the current position.
As soon as one direction button is pressed, Arduino moves the mouse to map the HIGH input to the range of 5 in the appropriate direction.
The fifth button controls left-clicks from the mouse. /b10> When the button is released, the computer recognizes the event.
The required component
You will need the following components:
- 1 × breadboard breadboard
- 1 × Arduino Leonardo, Micro or Due board
- 5 × 10k ohm resistor
- 5 × momentary button
Program
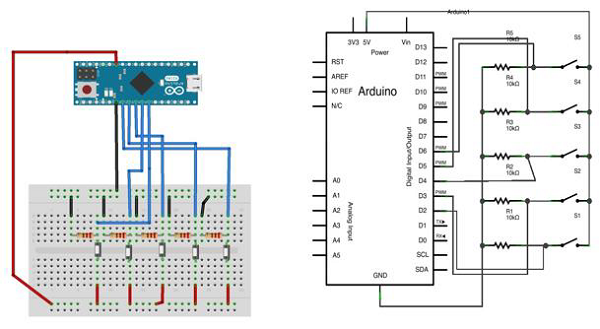
Connect the components on the breadboard according to the circuit diagram, as shown in the following image.
Sketch
Turn on the Arduino IDE software on your computer. U se arduino to encode and control your circuitry. /b11> Open a new sketch file by clicking New.
For this example, you need to use Arduino IDE 1.6.7

Arduino code
/*
   Button Mouse Control
   For Leonardo and Due boards only .Controls the mouse from
   five pushbuttons on an Arduino Leonardo, Micro or Due.
   Hardware:
   * 5 pushbuttons attached to D2, D3, D4, D5, D6
   The mouse movement is always relative. This sketch reads
   four pushbuttons, and uses them to set the movement of the mouse.
   WARNING: When you use the Mouse.move() command, the Arduino takes
   over your mouse! Make sure you have control before you use the mouse commands.
*/

#include "Mouse.h"
// set pin numbers for the five buttons:
const int upButton = 2;
const int downButton = 3;
const int leftButton = 4;
const int rightButton = 5;
const int mouseButton = 6;
int range = 5; // output range of X or Y movement; affects movement speed
int responseDelay = 10; // response delay of the mouse, in ms

void setup() {
   // initialize the buttons' inputs:
   pinMode(upButton, INPUT);
   pinMode(downButton, INPUT);
   pinMode(leftButton, INPUT);
   pinMode(rightButton, INPUT);
   pinMode(mouseButton, INPUT);
   // initialize mouse control:
   Mouse.begin();
}

void loop() {
   // read the buttons:
   int upState = digitalRead(upButton);
   int downState = digitalRead(downButton);
   int rightState = digitalRead(rightButton);
   int leftState = digitalRead(leftButton);
   int clickState = digitalRead(mouseButton);
   // calculate the movement distance based on the button states:
   int xDistance = (leftState - rightState) * range;
   int yDistance = (upState - downState) * range;
   // if X or Y is non-zero, move:
   if ((xDistance != 0) || (yDistance != 0)) {
      Mouse.move(xDistance, yDistance, 0);
   }

   // if the mouse button is pressed:
   if (clickState == HIGH) {
      // if the mouse is not pressed, press it:
      if (!Mouse.isPressed(MOUSE_LEFT)) {
         Mouse.press(MOUSE_LEFT);
      }
   } else {                           // else the mouse button is not pressed:
      // if the mouse is pressed, release it:
      if (Mouse.isPressed(MOUSE_LEFT)) {
         Mouse.release(MOUSE_LEFT);
      }
   }
   // a delay so the mouse does not move too fast:
   delay(responseDelay);
}
Code description
Use a micro-USB cable to connect the board to your computer. /b10> Buttons are connected to the digital inputs of pins 2 to 6. M ake sure to use a 10k drop-down resistor.