Arduino keyboard message
May 15, 2021 Arduino
Table of contents
In this example, when a button is pressed, a text string is sent to the computer as keyboard input. /b10> The number of times the string reports how many times the button was pressed. /b11> Once you've finished the Leonardo version of the program and wiring, open your favorite text editor to see the results.
Warning - When you use the Keyboard.print() command, Arduino takes over your computer keyboard. /b10> To ensure that you do not lose control of your computer when you run sketches with this feature, set up a reliable control system before calling Keyboard.print(). /b11> This sketch includes a button to switch the keyboard so that it only runs when the button is pressed.
The required component
You will need the following components:
- 1 × breadboard breadboard
- 1 × Arduino Leonardo, Micro, or Due board
- 1 × the momentary button
- 1 × 10k ohm resistor
Program
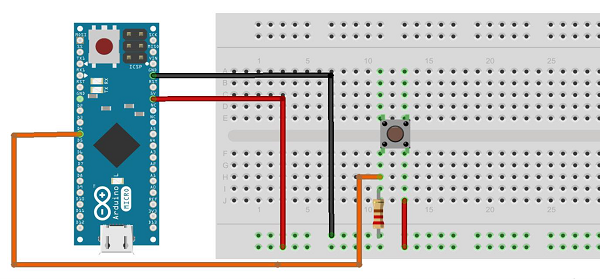
Connect the components on the breadboard according to the circuit diagram, as shown in the following image.
Sketch
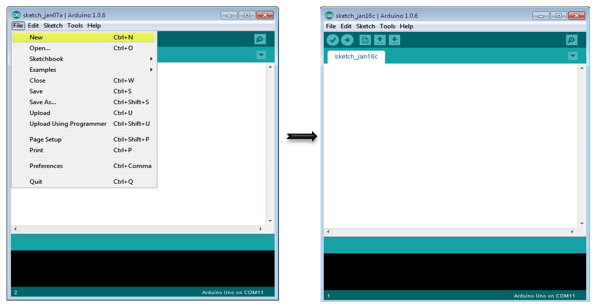
Turn on the Arduino IDE software on your computer. U se arduino to encode and control your circuitry. /b11> Open a new sketch file by clicking New.
Arduino code
/*
   Keyboard Message test For the Arduino Leonardo and Micro,
      Sends a text string when a button is pressed.
   The circuit:
   * pushbutton attached from pin 4 to +5V
   * 10-kilohm resistor attached from pin 4 to ground
*/

#include "Keyboard.h"
const int buttonPin = 4; // input pin for pushbutton
int previousButtonState = HIGH; // for checking the state of a pushButton
int counter = 0; // button push counter

void setup() {
   pinMode(buttonPin, INPUT); // make the pushButton pin an input:
   Keyboard.begin(); // initialize control over the keyboard:
}

void loop() {
   int buttonState = digitalRead(buttonPin); // read the pushbutton:
   if ((buttonState != previousButtonState)&& (buttonState == HIGH)) // and it's currently pressed: {
      // increment the button counter
      counter++;
      // type out a message
      Keyboard.print("You pressed the button ");
      Keyboard.print(counter);
      Keyboard.println(" times.");
   }
   // save the current button state for comparison next time:
   previousButtonState = buttonState;
}
Code description
Connect one terminal of the button to pin 4 on Arduino. /b10> Connect another pin to 5V. /b11> Use the resistor as a drop-down resistor to provide a ground reference by grounding it from pin 4.
Once you program the board, unplug the USB cable, open a text editor, and place the text cursor in the typing area. C onnect the board to your computer again via USB, and then press the button to write in the document.
Results
By using any text editor, text sent through Arduino is displayed.