Arduino humidity sensor
May 15, 2021 Arduino
Table of contents
In this section, we'll learn how to connect our Arduino boards using different sensors. We will discuss the following sensors:
- Humidity Sensor (DHT22)
- Temperature Sensor (LM35)
- Water level detection sensor (simple water trigger)
- PIR sensor
- Ultrasonic sensor
- Gps
Humidity Sensor (DHT22)
The DHT-22 (also known as AM2302) is a digital output, relative humidity and temperature sensor. /b10> It uses capacitive humidity sensors and thermistors to measure ambient air and send digital signals on the data pins.
In this example, you'll learn how to use this sensor with Arduino UNO. /b10> Room temperature and humidity will be printed on the serial monitor.
DHT-22 sensor
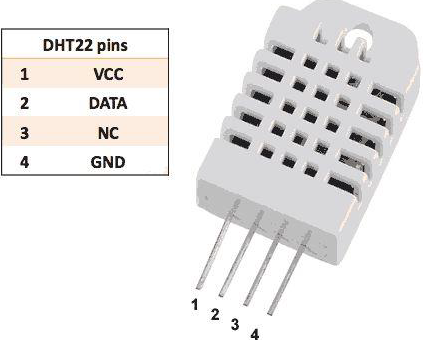
The connection is simple. /b10> The first pin on the left is a 3-5V power supply, the second pin is connected to the data input pin, and the right pin is grounded.
Technical details
-
Power supply - 3-5V
-
Maximum current - 2.5mA
-
Humidity - 0-100% with 2-5% accuracy
-
Temperature - 40 to 80 degrees C with an accuracy of ±0.5 degrees C
The required component
You will need the following components:
- 1 × breadboard breadboard
- 1 × Arduino Uno R3
- 1 × DHT22
- 1 × 10K ohm resistor
Program
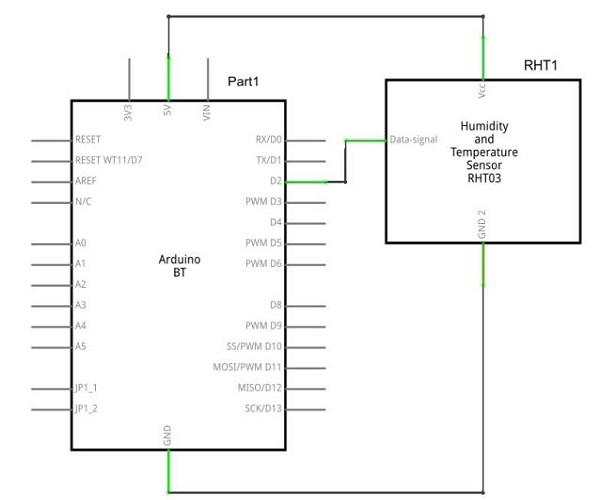
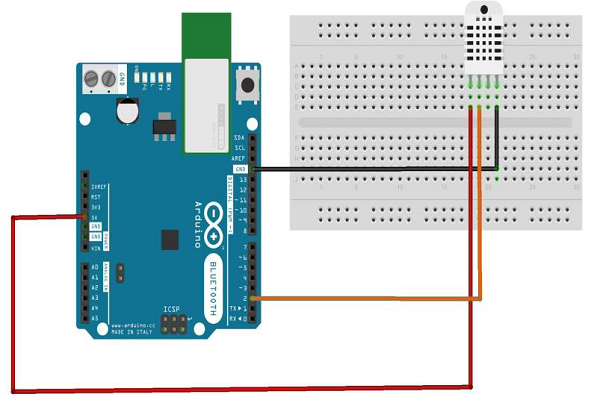
Connect the components on the breadboard according to the circuit diagram, as shown in the following image.
Sketch
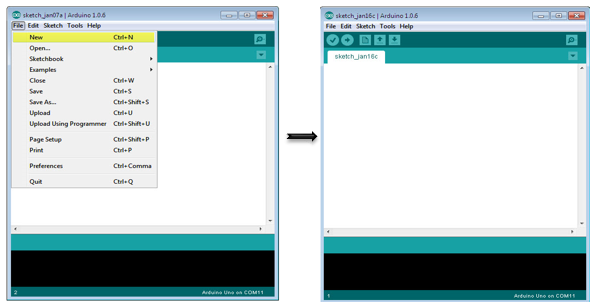
Turn on the Arduino IDE software on your computer. U se arduino to encode and control your circuitry. /b11> Open a new sketch file by clicking New.
Arduino code
// Example testing sketch for various DHT humidity/temperature sensors

#include "DHT.h"
#define DHTPIN 2 // what digital pin we're connected to
// Uncomment whatever type you're using!
//#define DHTTYPE DHT11 // DHT 11
#define DHTTYPE DHT22 // DHT 22 (AM2302), AM2321
//#define DHTTYPE DHT21 // DHT 21 (AM2301)
// Connect pin 1 (on the left) of the sensor to +5V
// NOTE: If using a board with 3.3V logic like an Arduino Due connect pin 1
// to 3.3V instead of 5V!
// Connect pin 2 of the sensor to whatever your DHTPIN is
// Connect pin 4 (on the right) of the sensor to GROUND
// Connect a 10K resistor from pin 2 (data) to pin 1 (power) of the sensor
// Initialize DHT sensor.
// Note that older versions of this library took an optional third parameter to
// tweak the timings for faster processors. This parameter is no longer needed
// as the current DHT reading algorithm adjusts itself to work on faster procs.
DHT dht(DHTPIN, DHTTYPE);

void setup() {
   Serial.begin(9600);
   Serial.println("DHTxx test!");
   dht.begin();
}

void loop() {
   delay(2000); // Wait a few seconds between measurements
   float h = dht.readHumidity();
   // Reading temperature or humidity takes about 250 milliseconds!
   float t = dht.readTemperature();
   // Read temperature as Celsius (the default)
   float f = dht.readTemperature(true);
   // Read temperature as Fahrenheit (isFahrenheit = true)
   // Check if any reads failed and exit early (to try again).
   if (isnan(h) || isnan(t) || isnan(f)) {
      Serial.println("Failed to read from DHT sensor!");
      return;
   }

   // Compute heat index in Fahrenheit (the default)
   float hif = dht.computeHeatIndex(f, h);
   // Compute heat index in Celsius (isFahreheit = false)
   float hic = dht.computeHeatIndex(t, h, false);
   Serial.print ("Humidity: ");
   Serial.print (h);
   Serial.print (" %\t");
   Serial.print ("Temperature: ");
   Serial.print (t);
   Serial.print (" *C ");
   Serial.print (f);
   Serial.print (" *F\t");
   Serial.print ("Heat index: ");
   Serial.print (hic);
   Serial.print (" *C ");
   Serial.print (hif);
   Serial.println (" *F");
}
Code description
The DHT22 sensor has four terminals connected to the circuit board (Vcc, DATA, NC, GND), as follows:
- The DATA pin is connected to Arduino's Pin No. 2
- The Vcc pin is connected to the 5-volt voltage of the Arduino board
- The GND pin is connected to the ground of the Arduino plate
- We need to connect 10k ohm resistors (pull-up resistors) between the DATA and Vcc pins
Once the hardware connection is complete, you need to add the DHT22 library to your Arduino library file, as described earlier.
Results
You'll see the temperature and humidity display on the serial monitor, updated every 2 seconds.