Struts2 Hello World example
May 15, 2021 Struts2
Table of contents
By learning about the Struts2 framework, you can learn that when you click on a hyperlink or submit an HTML form in Struts2's web application, the controller collects input and sends a Java class called Actions. A fter Action is executed, Result selects a resource to respond. This resource is usually a JSP, or it can be a PDF file, an Excel table, or a Java widget window.
Assuming you've built your development environment, let's move on to the first Struts2 project:
Hello World.
T
he goal of this project is to build a web application that collects user names and follows them with hello World.
We need to build the following four components for each Struts2 project:
| Serial number | Name and description |
| 1 | Action (Action) |
| Create an action class that contains complete business logic and controls interaction between users, models, and views. | |
| 2 | Interceptors (Interceptor) |
| This is part of the controller that can create interceptors on demand or use existing interceptors. | |
| 3 | View (View) |
| Create a JSP to interact with the user, get input, and present the final information. | |
| 4 | Configuration Files (Profile) |
| Create profiles to connect actions, views, and controllers, which are struts.xml web .xml, and struts.properties. |
If we plan to use eclipse IDE, all the necessary components will be created under Dynamic Web Project. S o let's start by creating a dynamic Web project.
Create a dynamic Web project:
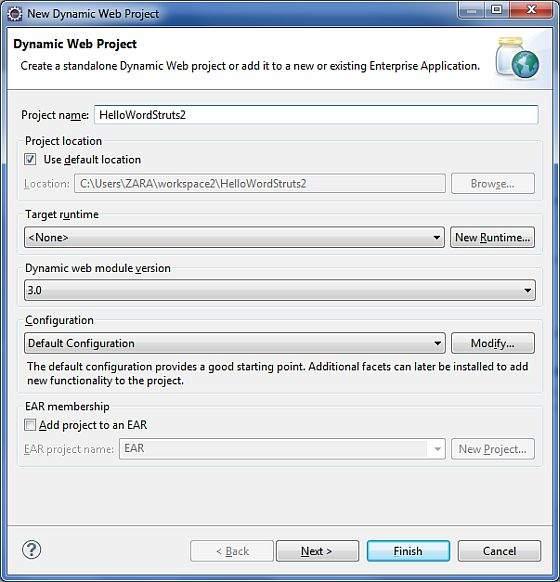
Follow the figure below to select all the default options, and
finally check the .xml the deployment descriptor
option. T
his will create a dynamic web project for you in Eclipse.
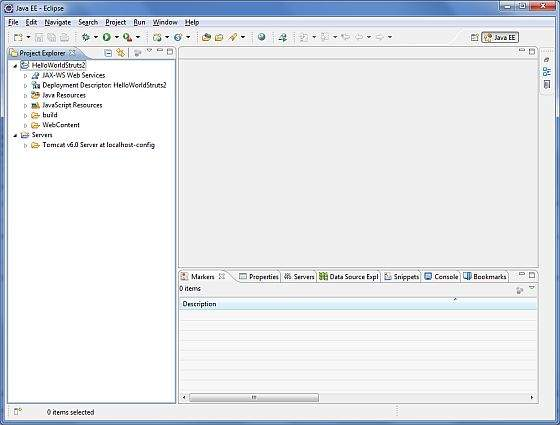
Now click
on "Windows", "Show", "View" and "Project Explorer"
and you'll see your project
window, as shown below:
- commons-fileupload-x.y.z.jar
- commons-io-x.y.z.jar
- commons-lang-x.y.jar
- commons-logging-x.y.z.jar
- commons-logging-api-x.y.jar
- freemarker-x.y.z.jar
- javassist-x.y.z.GA
- ognl-x.y.z.jar
- struts2-core-x.y.z.jar
- xwork-core.x.y.z.jar
Create an Aciton class
package cn.w3cschool.struts2;

public class HelloWorldAction{
   private String name;

   public String execute() throws Exception {
      return "success";
   }

   public String getName() {
      return name;
   }

   public void setName(String name) {
      this.name = name;
   }
}
Create a view
<%@ page contentType="text/html; charset=UTF-8" %>
<%@ taglib prefix="s" uri="/struts-tags" %>
<html>
<head>
<title>Hello World</title>
</head>
<body>
   Hello World, <s:property value="name"/>
</body>
</html>
Create a home page
<%@ page language="java" contentType="text/html; charset=ISO-8859-1"
   pageEncoding="ISO-8859-1"%>
<%@ taglib prefix="s" uri="/struts-tags"%>
   <!DOCTYPE html PUBLIC "-//W3C//DTD HTML 4.01 Transitional//EN"
"http://www.w3.org/TR/html4/loose.dtd">
<html>
<head>
<title>Hello World</title>
</head>
<body>
   <h1>Hello World From Struts2</h1>
   <form action="hello">
      <label for="name">Please enter your name</label><br/>
      <input type="text" name="name"/>
      <input type="submit" value="Say Hello"/>
   </form>
</body>
</html>
Profile
<?xml version="1.0" encoding="UTF-8"?>
<!DOCTYPE struts PUBLIC
   "-//Apache Software Foundation//DTD Struts Configuration 2.0//EN"
   "http://struts.apache.org/dtds/struts-2.0.dtd">
<struts>
<constant name="struts.devMode" value="true" />
   <package name="helloworld" extends="struts-default">

      <action name="hello"
            class="cn.w3cschool.struts2.HelloWorldAction"
            method="execute">
            <result name="success">/HelloWorld.jsp</result>
      </action>
   </package>
</struts>
<?xml version="1.0" encoding="UTF-8"?>
<web-app xmlns:xsi="http://www.w3.org/2001/XMLSchema-instance"
   xmlns="http://java.sun.com/xml/ns/javaee"
   xmlns:web="http://java.sun.com/xml/ns/javaee/web-app_2_5.xsd"
   xsi:schemaLocation="http://java.sun.com/xml/ns/javaee
   http://java.sun.com/xml/ns/javaee/web-app_3_0.xsd"
   id="WebApp_ID" version="3.0">

   <display-name>Struts 2</display-name>
   <welcome-file-list>
      <welcome-file>index.jsp</welcome-file>
   </welcome-file-list>
   <filter>
      <filter-name>struts2</filter-name>
      <filter-class>
         org.apache.struts2.dispatcher.FilterDispatcher
      </filter-class>
   </filter>

   <filter-mapping>
      <filter-name>struts2</filter-name>
      <url-pattern>/*</url-pattern>
   </filter-mapping>
</web-app>
Attention:
If it is a struts2-core-2.5 .jar, change the .xml class tag value in the web server to
<filter-class>
     org.apache.struts2.dispatcher.filter.StrutsPrepareAndExecuteFilter
</filter-class>
If it is a struts2-core-2.1.3 .jar, change the .xml class tag value in the web server to
<filter-class>
     org.apache.struts2.dispatcher.FilterDispatcher
</filter-class>
FilterDispatcher has not been recommended since Struts 2.1.3. If you are using an older version, the user is higher than the solution.
If it is a struts2-core-2.3.X .jar, change the .xml class tag value in the web server
<filter-class>
org.apache.struts2.dispatcher.ng.filter.StrutsPrepareAndExecuteFilter
</filter-class>
Enable detailed logs
org.apache.catalina.core.ContainerBase.[Catalina].level = INFO
org.apache.catalina.core.ContainerBase.[Catalina].handlers = \
                              java.util.logging.ConsoleHandler
By default, log.properties specifies that a Console Handler sends logging to stdout and FileHandler along the specified route. The level threshold for program run logs can be used by SEVERE, WARNING, INFO, CONFIG, FINE, FINER, FINEST or ALL.
That way, we're ready to run our Hello World program using Struts 2.
Execute the application
Right-click on the project
name, then click "Export" and "WAR File"
to create a WAR file, and then deploy the WAR to Tomcat's webapps directory.
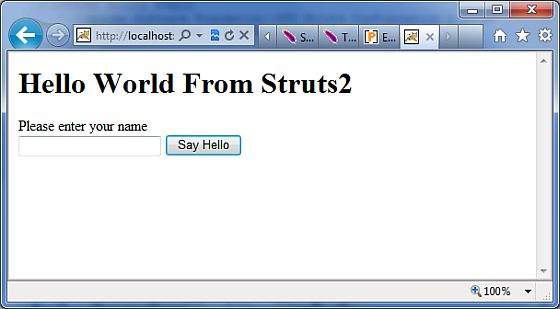
Finally, starting the Tomcat server and attempting to access the URL http://localhost:8080/HelloWorldStruts2/index.jsp results as shown in the following image:
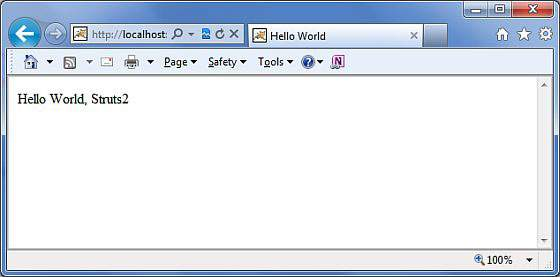
Enter a "Struts2" value and submit the page, which you can see below
Note that you can define an .xml as an action in the struts
file so that you can call the index
page http://localhost:8080/HelloWorldStruts2/index.action.
See how indexes are defined as actions below:
<?xml version="1.0" encoding="UTF-8"?>
<!DOCTYPE struts PUBLIC
   "-//Apache Software Foundation//DTD Struts Configuration 2.0//EN"
   "http://struts.apache.org/dtds/struts-2.0.dtd">
<struts>
<constant name="struts.devMode" value="true" />
   <package name="helloworld" extends="struts-default">

      <action name="index">
            <result >/index.jsp</result>
      </action>

      <action name="hello"
            class="cn.w3cschool.struts2.HelloWorldAction"
            method="execute">
            <result name="success">/HelloWorld.jsp</result>
      </action>

   </package>
</struts>