Shell file system operations
May 23, 2021 Shell - An example of programming
Table of contents
2. The location of the file system in the Linux operating system
3. Hardware management and device drivers
4. Understand and view disk partitions
5. The relationship between partitioning and file systems
Objective
Prepared for a long time, looking for many days of information, do not know how to write: because of fear of not being able to hold, so on the one hand continue to find information, on the other hand, think about how to write. As part of the Shell Programming Paradigm, it is hoped that it will be a good way for Shell programmers to understand how to use shell commands to perform various operations on file systems that are very signed to the Linux system, and that the "chaos" of the file system among Shell programmers will disappear, in the hope that the file system will be presented in a clearer light.
The location of the file system in the Linux operating system
How do I get to know the file system? F rom the shell programmer's point of view, a file system is a way to organize various files. H owever, file systems cannot exist independently of hardware storage devices and operating systems, so it is necessary to understand the links between various concepts such as hardware storage devices, partitions, operating systems, logical volumes, file systems, etc., in order to understand some of the "details" of the normal operation of the file system. This connection may (and may have some problems) be presented in one way or another:
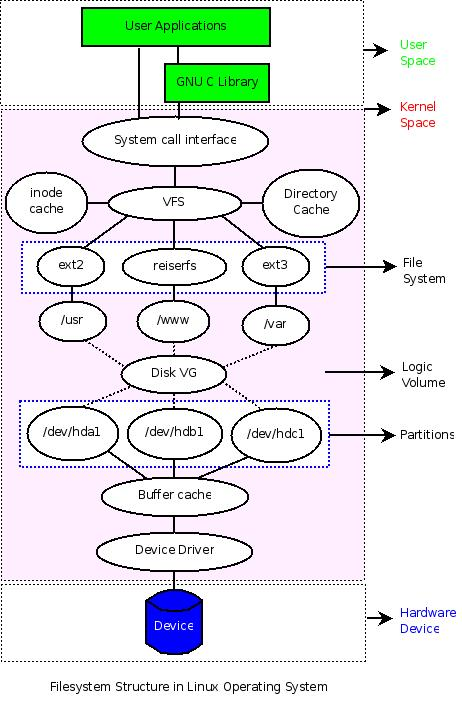
From the diagram, we can clearly see the relationship between the various "concepts", they are distributed at different levels, covering hardware devices, system kernel space, system user space. I n the user space, users can operate specific hardware devices regardless of the kernel, using only a variety of interfaces designed by the programmer, and the average programmer only needs to use the various interfaces provided by the kernel (System Call) or some C library to interact with the kernel, without having to care about the specific implementation details. For operating system developers, however, they need to design specific data structures in kernel space to manage and organize the underlying hardware devices.
Here's a bottom-up approach (starting with the underlying hardware) that uses tools to analyze and understand several important concepts in the diagram. (If you are interested, you can first look at the following information)
Resources:
- Look at Linux's virtual file system from file I/O
- Linux file system profiling
- Chapter 9 File System
- Linux logical reel management LVM details
Hardware management and device drivers
Linux systems manage hardware devices through device drivers. I
f you add a new hardware device, you need to write the appropriate hardware driver to manage it. F
or some common hardware devices, the system already has its own drivers, and when you compile the kernel, select them, then compile them as part of the kernel or as modules.
If compiled as a module, the corresponding module file can be found in the
/lib/modules/$(uname -r)
directory.
Example: Find the drive files that your device needs
For example, the corresponding scsi driver and usb driver module files can be found in this way:
Update the system Chinese index database (a little slow)
$ updatedbFind scsi-related drivers
$ locate scsi*.koLook for usb-related drivers
$ locate usb*.ko
These drivers are
.ko
with .ko and are compiled as modules by default when the system is installed. Y
ou can actually compile them as part of the kernel, just by selecting it when
[*]
H
owever, in many cases they are compiled as modules, which reduces the size of the kernels and gives you the flexibility to load and unload them as needed.
Here's a quick demonstration of how to uninstall the module, load the module, and see the status of the loaded module.
The status of the individual modules loaded
modules
be checked through the modules file of the
/proc
file
lsmod
command.
$ cat /proc/modulesOr
$ lsmodExample: View the device drivers that have been loaded
View scsi and usb-related drivers, and the results are listed as module names, module sizes, references to other modules (number of references, modules that reference them)
$ lsmod | egrep "scsi|usb"
usbhid                 29536  0
hid                    28928  1 usbhid
usbcore               138632  4 usbhid,ehci_hcd,ohci_hcd
scsi_mod              147084  4 sg,sr_mod,sd_mod,libata
Example: Uninstall the device driver
Let's
usbhid
module to see (don't uninstall the scsi driver!)
Because your system may be running on it, if you really want to play, remember to save the
rmmod
command and switch to root user first:
$ sudo -s
# rmmod usbhid
Look at the module's information again, you can't see it enough
$ lsmod | grep ^usbhidExample: Mount device drive
If there is a usb mouse, then move it, do you find that you can't move it? B
ecause the equipment drive is gone, the equipment will naturally not be able to use Luo.
But don't be nervous, now that you know why, reload the driver and reload
usbhid
below.
insmod
$ sudo -s
# insmod `locate usbhid.ko`
locate usbhid.ko
the
usbhid.ko
if there is no
updatedb
that it can not be
/lib/modules
find
usbhid.ko
file to find.
# insmod $(find /lib/modules -name "*usbhid.ko*" | grep `uname -r`)Now the mouse can be used again, do not believe to move the mouse again : -)
Here, the relationship between hardware devices and device drivers should be clearer. If not, continue with the following.
Example: View the device file for the device driver
Linux device drivers are associated with the appropriate device files, which correspond to hardware devices one by one.
These device files are stored uniformly in the
/dev/
For example, the scsi device
/dev/sda
/dev/sda1
/dev/sda2
...
Check out these device information below.
$ ls -l /dev/sda*
brw-rw---- 1 root disk 8, 0 2007-12-28 22:49 /dev/sda
brw-rw---- 1 root disk 8, 1 2007-12-28 22:50 /dev/sda1
brw-rw---- 1 root disk 8, 3 2007-12-28 22:49 /dev/sda3
brw-rw---- 1 root disk 8, 4 2007-12-28 22:49 /dev/sda4
brw-rw---- 1 root disk 8, 5 2007-12-28 22:50 /dev/sda5
brw-rw---- 1 root disk 8, 6 2007-12-28 22:50 /dev/sda6
brw-rw---- 1 root disk 8, 7 2007-12-28 22:50 /dev/sda7
brw-rw---- 1 root disk 8, 8 2007-12-28 22:50 /dev/sda8
You can see that the first character in the first column
b
and the fifth column is the number 8.
b
that the file is a block device file, correspondingly,
c
a character device (e.g. '/dev/ttyS0), you can see here the difference between the block device and the character device:
Character devices: Character devices are devices that can be accessed like byte streams, and character terminals and serials belong to character devices.
- Block device: A file system can be accommodated on a block device. U nlike character devices, block devices can only transfer one or more complete blocks at a time when reading and writing. I n the Linux operating system, applications can read and write block devices (read or write arbitrary bytes of data at once) just like accessing character devices. Therefore, the difference between block devices and character devices is simply the difference in the management of data in the kernel.
The number 8 is the device number corresponding to the hardware device in the kernel, and the device number assignment can be found in the
Documentation/devices.txt
/proc/devices
of the kernel. B
ut why does the same device correspond to different device files (why are there different numbers after
/dev/sda
and column 6 in
ls
result corresponds to them). T
his is actually to distinguish between different parts of different devices. F
or hard drives, this can handle different partitions inside the hard drive. I
n the case of the kernel, it only needs to be able to find the corresponding hardware device through the device number in column 5, but for the driver module it also needs to know how to handle different partitions, so there is an additional auxiliary device number, which is the corresponding content in column 6.
Such a device has a master device number (column 5) and an auxiliary device number (column 6), making it easy to manage a variety of hardware devices.
Because the device files and hardware correspond, the hard drive information can be read directly from
/dev/sda
(in the case
IDE
hard drive, the corresponding device is the
/dev/hda
device, for example:
Example: Access device files
Copy the first 512 bytes of the hard disk with the
dd
command to root the user
$ sudo dd if=/dev/sda of=mbr.bin bs=512 count=1
Use
file
command to view the appropriate information
$ file mbr.bin
mbr.bin: x86 boot sector, LInux i386 boot LOader; partition 3: ID=0x82, starthead 254, startsector 19535040, 1959930 sectors; partition 4: ID=0x5, starthead 254, startsector 21494970, 56661255 sectors, code offset 0x48
You can also read and analyze in a 16-step form with the
od
command
$ od -x mbr.bin
bs
the size of the block (in
bytes
and
count
number of blocks
Because this information is not intuitive (and further in-depth analysis is provided below), a look at another device file will provide a very intuitive demonstration of the relationship between the device file and the hardware. Or take the mouse as an example, the following to read the mouse corresponding to the device file information.
$ sudo -s
# cat /dev/input/mouse1 | od -x
Your mouse driver may not be the same, so the device files may be other, but they'll
/dev/input
Move the mouse to see if you find different information outputs.
Based on this principle, we often check that the serial line is corrupted by reading the contents of the device file
/dev/ttyS0
at one end and writing to the device file
/dev/ttyS0
at the other end.
Here, you should be more impressed by the correlation between device drivers, device files, and hardware devices. If you want to learn more about how device-driven works and how device-driven writing works, take a look at the information listed below to begin the process of device-driven writing.
Resources:
- Compile linux kernel 2.6
- How hardware drivers are written for Linux systems
- How USB devices work under Linux, configuration, frequently asked questions
- The Linux Kernel Module Programming Guide
- Linux device-driven development
Understand and view disk partitions
Memory, usb sticks, and so on can actually be used as "storage" devices at the bottom of the file system, but only hard drives are used as instances to describe the relationship between disks and partitions.
Currently, Linux's partitioning still uses the partitioning principle used by the first PC hard drive, which is analyzed and demonstrated step by step below.
The basic principles of disk partitioning
Let's take a look at a few concepts:
-
Device management and partitioning
Under Linux, each storage device corresponds to a system's device file, and
IDE
and
SCSI
the corresponding device files containing the character hd and
sd
can be
hd
/dev
directory. D
epending on the board device interface and data cable interface of the
sd
a to
z
can be added after the
hd
or
a
characters, such as
hda
hdb
hdc
and
sda
sdb
sdc
a number can be
hda1
hda2
hda3
and
sda1
sda2
sda3, in order to distinguish between different partitions of
sda3
, so in
/dev
you can see many similar device files.
-
The role of each partition
The problem of primary and logical partitioning is often encountered in partitioning, which is actually to facilitate the extension of partitioning, just as the subsequent introduction of logical volumes is to better manage multiple hard drives, the introduction of primary partitioning and logical partitioning can easily be the management of partitioning.
Each hard disk device in a Linux system consists of up to 4 primary partitions, including extended partitions.
The role of the primary partition is that the computer is used to start the operating system, so the startup program of each operating system, or boot program, should be stored on the main partition. L
inux states that the primary partition (or extended partition) occupies the first four partition numbers.
So you'll see that the device file for the primary partition
/dev/hda1-4
or
/dev/sda1-4
not
hda5
sda5
Extended partitions are intended to extend more logical partitions, which under Linux consume 12 numbers such
sda5-16
hda5-16
- The type of partition
It specifies the type of file system on this partition. Linux supports many file system types such as msdoc, vfat, ext2, ext3, and more information is covered further in the next section.
Understand the partitioning principle by analyzing the MBR
The partition is analyzed and understood by analyzing the first 512 bytes of the hard disk, or
MBR
Let's take a look at this picture:
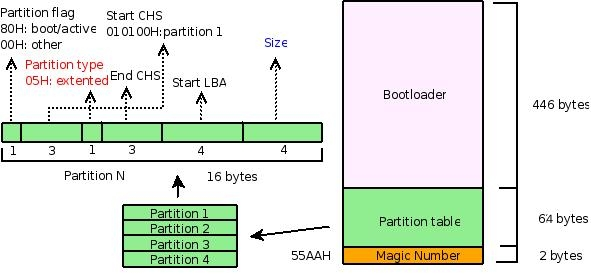
It is used to describe the structure of the
MBR
MBR
includes the boot section, partition table, and end tag'(55AAH), which consumes 446 bytes, 64 bytes, and 2 bytes of 512 bytes, respectively.
Focus here only on the partition table portion, the 64-byte in the middle and the left part of the figure.
Since I'm
SCSI
hard drive, copy the first 512 bytes of the hard drive from my
/dev/sda
device
mbr.bin
file.
$ sudo -s
# dd if=/dev/sda of=mbr.bin bs=512 count=1
The MBR data is analyzed with commands such as
file
od
fdisk
and compared to the figure above to deepen understanding.
MBR
$ file mbr.bin
mbr.bin: x86 boot sector, LInux i386 boot LOader; partition 3: ID=0x82, starthead 254, startsector 19535040, 1959930 sectors; partition 4: ID=0x5, starthead 254, startsector 21494970, 56661255 sectors, code offset 0x48
$ od -x mbr.bin | tail -6   #仅关注中间的64字节,所以截取了结果中后6行
0000660 0000 0000 0000 0000 a666 a666 0000 0180
0000700 0001 fe83 ffff 003f 0000 1481 012a 0000
0000720 0000 0000 0000 0000 0000 0000 0000 fe00
0000740 ffff fe82 ffff 14c0 012a e7fa 001d fe00
0000760 ffff fe05 ffff fcba 0147 9507 0360 aa55
$ sudo -s
# fdisk -l | grep ^/  #仅分析MBR相关的部分,不分析逻辑分区部分
/dev/sda1   *           1        1216     9767488+  83  Linux
/dev/sda3            1217        1338      979965   82  Linux swap / Solaris
/dev/sda4            1339        4865    28330627+   5  Extended
file
of the file command show that the newly copied 512 bytes are boot sectors, with the parts separated by
bootloader
partition 3, and partition 4. T
he type of partition 3 is 82,
swap
partition (which can be
l
l command of the
fdisk
command), which corresponds to column 5
/dev/sda3
in
fdisk
result, and the number of sectors in partition 3 is 195993 0, the number of bytes converted to
1959930\*512
(currently, the default sector size of the hard disk is 512 bytes),
swap
partition is 1024 bytes, so the number of blocks is
:
$ echo 1959930*512/1024 | bc
979965
It is exactly the number of blocks corresponding to the fourth column of the row in the
fdisk
result
/dev/sda3
and similarly, partition 4
fdisk
results of fdisk and
file
Let's take a look at the results of the
od
command displayed in hete sixteenths, and consider partition 3, and calculate that the result of
od
partition 3 is:
fe00 ffff fe82 ffff 14c0 012a e7fa 001d
The first is the partition
00H
from the figure above, it is not the boot
80H
is the boot partition), and the partition type?
For
82H
which is consistent
file
display, let's look at the partition size, which is the number of sectors in the
file
result.
$ echo "ibase=10;obase=16;1959930" | bc
1DE7FA
Just corresponds
e7fa 001d
also considers the results of the boot partition:
0180 0001 fe83 ffff 003f 0000 1481 012a
Partition tag:
80H
reflects that the partition is the boot partition, followed by the disk sector in which the boot partition is located, 010100, i.e. 1 side 0 channel 1 sector.
Other content can be analyzed against it.
For time, please refer to the information below for more details or check out the relevant manual for the system.
Supplement: When installing a system, you can
fdisk
such as
cfdisk
and so on.
If you want to start from a partition, you need to mark
80H
for example, by setting a partition to
bootable
cfdisk
Resources:
- Inside the linux boot process
- Develop your own OS: booting
- Introduction to Redhat9 disk partitioning
- Linux partition HOWTO
The relationship between partitioning and file systems
Before the introduction of logical volumes, partition types and file system types could be treated almost equally, and the process of setting partition types was the process of formatting partitions and establishing the appropriate file system types.
The following mainly describes how to establish a link between partition and file system type, that is, how to format partitioning to the specified file system type.
Common partition types
Let's take a look at the common types of file systems under Linux (if you want to see all the file types supported by Linux, you can view them
l
command of the
fdisk
command, or you can view them via
man fs
or you can view
/proc/filesystems
-
ext2ext3ext4These three are the types typically used by Linux root file systems -
swapThis is a file system used to implement Linux virtual memory, which typically requires a dedicated partition to be established andswapfile system (if you want to addswappartitions, you can refer to the resources in this sectionddmkswapswaponswapoffetc.) -
procThis is a relatively special file system that exists as an interface between the kernel and the user, built incat/procsystem can be viewed by cat commands, and even/proc/systhe current premise is that theprocfile system needs to be mounted on:mount -t proc proc /proc
In addition to the file system types mentioned above, Linux supports a variety of common file system types, including
vfat
iso
xfs
nfs
and under Linux, you are free to view and operate file systems used by other operating systems such as Windows.
So how do you establish an association between disks and these file system types? Format.
The process of formatting is actually the process of reorthorizing partitions, possible
mkfs
and, of course, by commands such as
fdisk
O
nly
mkfs
which can be used to format an existing partition and not to implement partitioning
mkfs
(if you want to partition and format a disk,
fdisk
When formatted, the data on the partition is organized by a particular file system type.
Example: Formatting the file system
For example,
/dev/sda9
partition as
ext3
$ sudo -s
# mkfs -t ext3 /dev/sda9
If you want to list the file system types for each partition, you
fdisk -l
command.
For more information, please refer to the following information.
Resources:
- The step to load the swap partition under Linux
- Production and burning of ISO mirror files under Linux
- The RAM disk partition is interpreted as:
- Advanced File System Implementer's Guide
Relationships between partitions, logical volumes, and file systems
The last section formatted partitions directly into some file system type, but given the need to extend new storage devices, developers introduced logical volumes between file systems and partitions. For time, it's no longer detailed here, please refer to: Linux Logical Volume Management Details
The visual structure of the file system
The file system ends up with a visual structure that can be presented using commands such as ls, find, tree, etc. It's like an upside-down "tree" that can also be mounted on the nodes of a tree.
Here's a brief introduction to the mounting of the file system.
A file system can mount
mount
through a device to a directory called a mount point. I
nterestingly, under Linux, one directory itself can also be mounted to another directory, and a formatted file can
/dev/loop
(such
iso
file).
In addition, in the case of file systems, Linux supports not only local file systems, but also remote file systems such
nfs
Example: Mounting a file system
Here are a few examples of file system mounts.
- The mount of the root file system
Mounting requires Root permissions, for example, mounting system
/dev/sda1
/mnt
$ sudo -s
# mount -t ext3 /dev/sda1 /mnt/
Looking
/dev/sda1
mount, you can see that a device can mount more than once
$ mount | grep sda1
/dev/sda1 on / type ext3 (rw,errors=remount-ro)
/dev/sda1 on /mnt type ext3 (rw)
For a file system that is already mounted, you can re-mount to support different properties
$ mount -n -o remount, rw /- Mount a new device
If the kernel already supports the USB connector, when you plug in the usb stick, you can view the corresponding device number with the
dmesg
command and mount it.
Look at the last few lines in the
dmesg
results, find information like
/dev/sdN
and find the device number for the u disk
$ dmesg
Let's assume that the
vfat
format so that it can also be used on Windows in some print shops
# mount -t vfat /dev/sdN /path/to/mountpoint_directory- Mount an iso file or disc
For some iso files or iso-formatted discs, you can also mount them with the
mount
command.
For iso files:
# mount -t iso9660 /path/to/isofile /path/to/mountpoint_directoryFor discs:
# mount -t iso9660 /dev/cdrom /path/to/mountpoint_directory- Mount a remote file system
# mount -t nfs remote_ip:/path/to/share_directory /path/to/local_directory- Mount a proc file system
# mount -t proc proc /proc
proc
file system is organized in memory, but it can be mounted to a directory. I
t is usually
/proc
directory so that some system management and configuration tools can use it. F
or
top
command uses it to analyze memory usage (reads files
lsmod
such as
/proc/meminfo
and
/proc/modules
/proc/stat
netstat
/proc/net/dev
O
f course, you can also write tools. I
n addition, by
/proc/sys
be dynamically adjusted, such as writing the number 1 to the
/proc/sys/net/ipv4/ip_forward
file to enable the kernel to support packet forwarding.
(For more information,
proc
man``proc
- Mount a directory
$ mount --bind /path/to/needtomount_directory /path/to/mountpoint_directoryThis is interesting, for example, to mount a directory to the root of the ftp service without having to copy the content to share the resources in the directory.
Example: Uninstall a partition
All of the above only mentions mounting, so how to uninstall it? U
se
umount
command to keep up with the mounted source address or mount point (device, file, remote directory, etc.).
For example:
$ umount /path/to/mountpoint_directoryOr
$ umount /path/to/mount_source
If you want to manage a large number of or recurring mount services, then each manual mount is a bad thing. T
he
mount
/etc/fstab
can then be used to write the
mount
corresponding to the mount to the column corresponding to
/etc/fstab
file for
mount -a
and unloading
umount -a
/etc/fstab
are file system, mount point, type, and related options.
More information can be
fstab
the help of
man fstab
Resources:
- Linux hard disk partition and its mounting principle
- Look at Linux's virtual file system from file I/O
- Source analysis: Static analysis of C program function call diagrams
How to make a file system
Linux file system has some of the most basic directories, different directories hold different types of files. T
he most basic directories are
/etc
/lib
/dev
/bin
and so on, which hold system profiles, library files, device files, and executables. T
hese directories are generally required to create such a basic file
busybox
tools such as busybox when doing embedded development.
Here is only a very simple file system, and the file system to carry out a variety of routine operations, in order to deepen the understanding of the file system.
Example: Create a fixed-size file with dd
Remember
dd
command?
Use it to produce a fixed-size file, this one for
1M(1024\*1024 bytes)
$ dd if=/dev/zero of=minifs bs=1024 count=1024
Looking at the file
minifs
is a file full of .
\\0
any specific data structure
$ file minifs
minifs: data
Description:
/dev/zero
a very special device, and if you read it, you can
\\0
The file is then formatted as a file system of a specified file type. (
Isn't it amazing that files can also be formatted?)
Yes, not only devices can, but files can also be organized in some file system type, but it is important to note that
ext3
require a minimum
64M
targets.
Example: Format the file with mkfs
$ mkfs.ext2 minifs
Look at the file type at this point, and
minifs
are organized in the format of the
ext2
file system
$ file minifs
minifs: Linux rev 1.0 ext2 filesystem data
Example: Mount the file system you just created
Because the file is organized in the type of file system,
mount
it with the mount command and use it.
Switch to
root
hook it up and associate it with a special device
/dev/loop
-o loop
$ sudo -s
# mount minifs /mnt/ -o loop
Looking at the file system information, you can see only one directory
lost+found
$ ls /mnt/
lost+found
Example: Read, write, delete, etc. on the file system
Under the file system to carry out a variety of general operations, including reading, writing, deletion and so on.
(Save a copy of
minifs
the relevant information can be in-depth analysis of the various operations of the file system changes, so as to gain an in-depth understanding of the file system as a way of organizing data implementation principles, etc.)
$ cp minifs minifs.bak
$ cd /mnt
$ touch hello
$ cd -
$ cp minifs minifs-touch.bak
$ od -x minifs.bak > orig.od
$ od -x minifs-touch.bak > touch.od
After you create a file, compare the similarity and differences between the file system at this time and the previous file system
$ diff orig.od touch.od
diff orig.od touch.od
61,63c61,64
< 0060020 000c 0202 2e2e 0000 000b 0000 03e8 020a
< 0060040 6f6c 7473 662b 756f 646e 0000 0000 0000
< 0060060 0000 0000 0000 0000 0000 0000 0000 0000
---
> 0060020 000c 0202 2e2e 0000 000b 0000 0014 020a
> 0060040 6f6c 7473 662b 756f 646e 0000 000c 0000
> 0060060 03d4 0105 6568 6c6c 006f 0000 0000 0000
> 0060100 0000 0000 0000 0000 0000 0000 0000 0000
Through comparison, it is found that the corresponding location of the file system has changed significantly by adding files
$ echo "hello, world" > /mnt/hello
Execute
sync
command to make sure that the data in the cache has been written to disk
buffer cache
in Figure 1 of this section, where the data in the
cache
is written to disk)
$ sync
$ cp minifs minifs-echo.bak
$ od -x minifs-echo.bak > echo.od
After the contents of the file are written, compare the file system with the previous similarity
$ diff touch.od echo.odView strings in the file system
$ strings minifs
lost+found
hello
hello, world
Delete
hello
file to see changes to the file system
$ rm /mnt/hello
$ cp minifs minifs-rm.bak
$ od -x minifs-rm.bak > rm.od
$ diff echo.od rm.od
By looking at the strings of the file system, it is found that the contents of the file are not overwritten when they are deleted, so in theory the contents are recoverable at this time
$ strings minifs
lost+found
hello
hello, world
The above only demonstrates some of the common tools for analyzing file systems, and analyzes a few general operations, if you want to understand the implementation principles of the file system in great depth, please familiarize yourself with the use of the above tools and read the relevant materials.
Resources:
- Build a mini filesystem in linux from scratch
- Build a mini filesystem in linux with BusyBox
- ext2 file system
How to develop your own file system
With
fuse
it is possible to develop a file system in user space, and if you want to develop your own file system, it is recommended to read:
Use fuse to develop your own file system.
Postscript
- On December 22, 2007, a lot of information was gathered and the overall framework was written
- On the afternoon of December 28, 2007, the first draft was completed, and many details were not further analyzed, given the time relationship, and some parts may have problems with understanding, and criticism is welcome
- On the evening of December 28, 2007, part of the material was modified and the document was officially made public
- 29, adding a small section of device drivers and hardware devices