Example Tutorial - Student Management System
May 27, 2021 Web Cloud Development and Web Hosting Learning Guide
Table of contents
2. Step 1: Turn on anonymous sign-in
3. Step 2: Create a cloud function
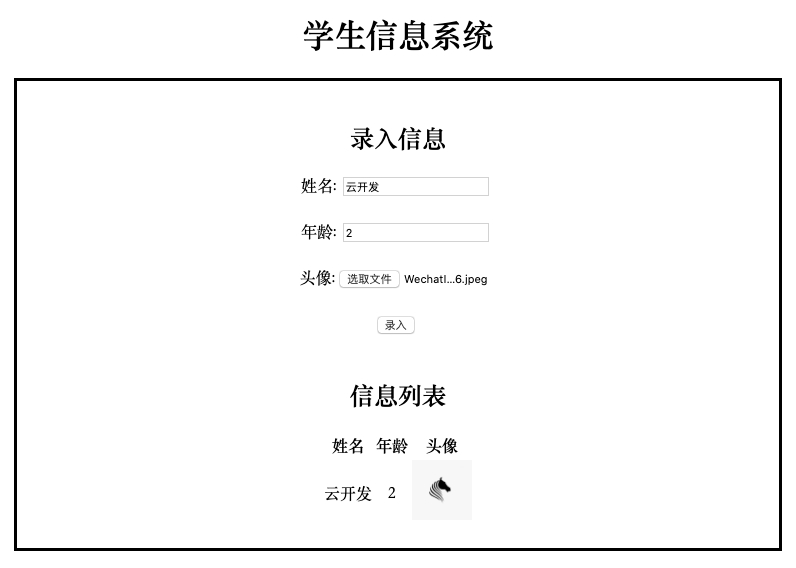
This document describes how to use cloud development capabilities to quickly build a student information management system without a domain name or server, and the final application is shown as follows:
Features provided include:
- Entry of student information (name, age, avatar).
- Student information is read and displayed
- File upload
Preparation
- Please register for Tencent Cloud Account, register successfully to use Tencent Cloud Services, registered to ignore this step.
-
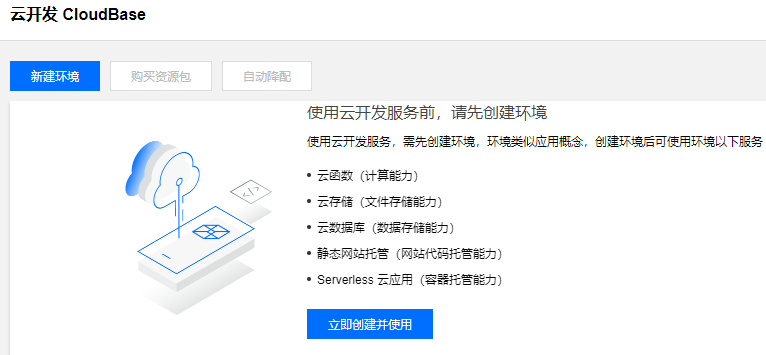
Sign in to
Tencent Cloud Development
Console and click Create and use now to create a new environment for deployment.
 If you've created an environment before, you can continue to use the
metered environment you've
created, or create a new environment again.
If you've created an environment before, you can continue to use the
metered environment you've
created, or create a new environment again.

-
In the new environment window, fill in the environment name according to the actual needs, select Bill by Volume, click Open Now to open the environment.

-
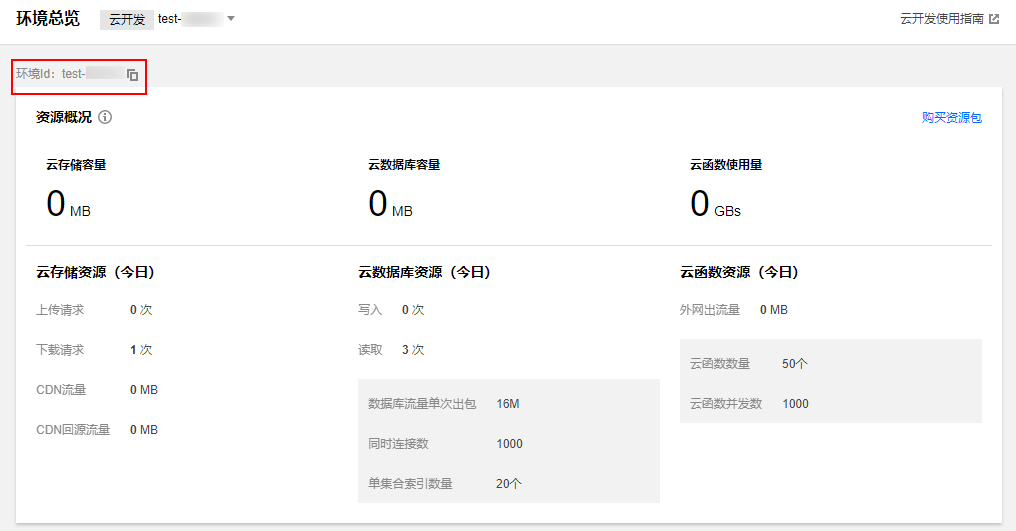
lt; O nce the span id is "step1.3" and the opening is successful, click on the environment name and go to the environment overview page. R emember your environment ID, which will be used in the next steps, as follows:
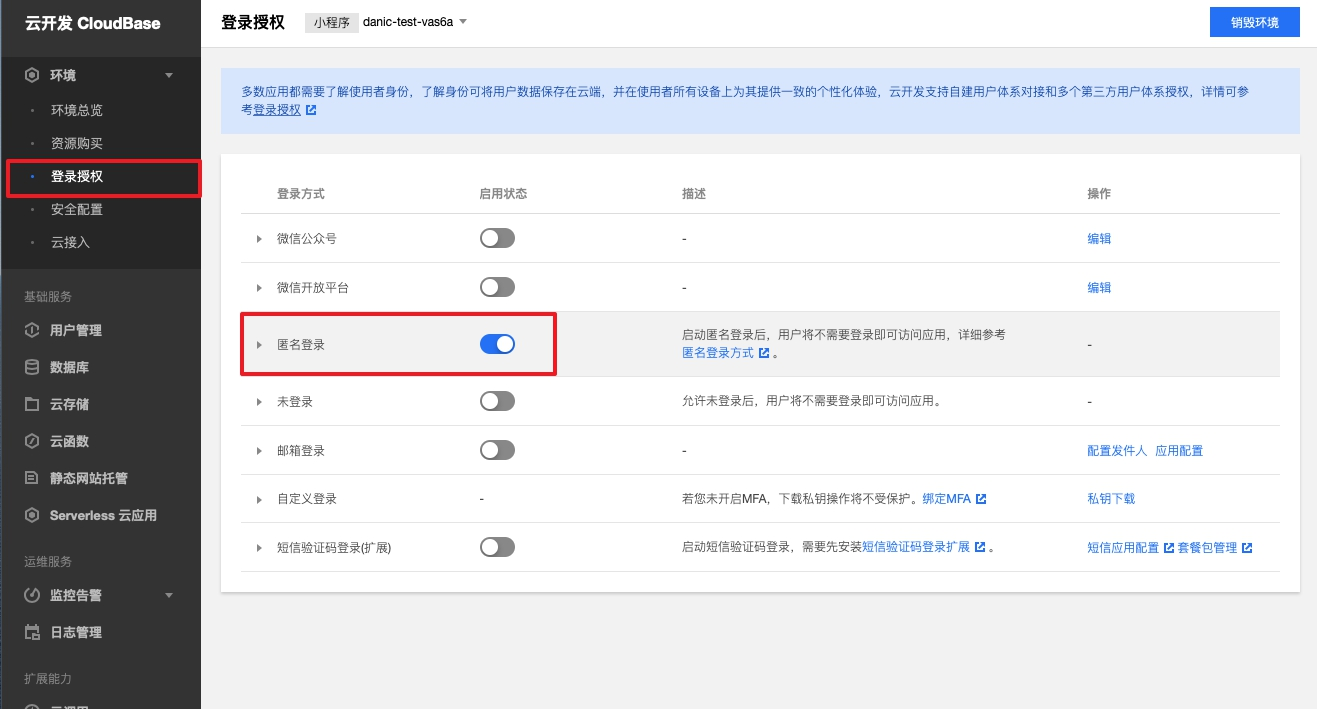
Step 1: Turn on anonymous sign-in
To build a student information management system, you need to turn on anonymous login, go to the login authorization console, click the anonymous login switch, as follows:
Step 2: Create a cloud function
-
Click on
the cloud function on
the left, click New Cloud Function, and start creating a cloud function.
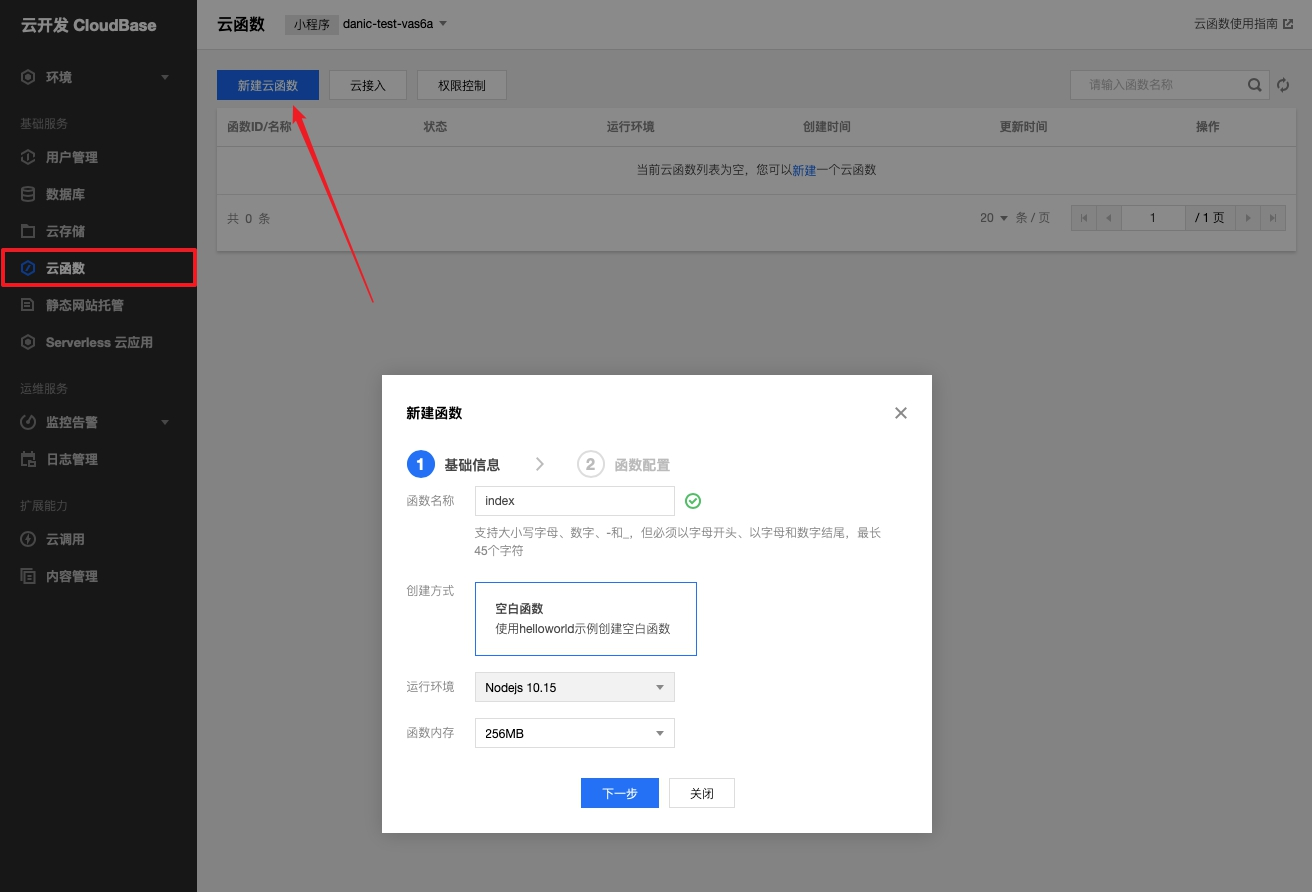
-
Create a function
named index,
run in Nodejs 10.15, copy the
sample
code below
into the index
function and save it.
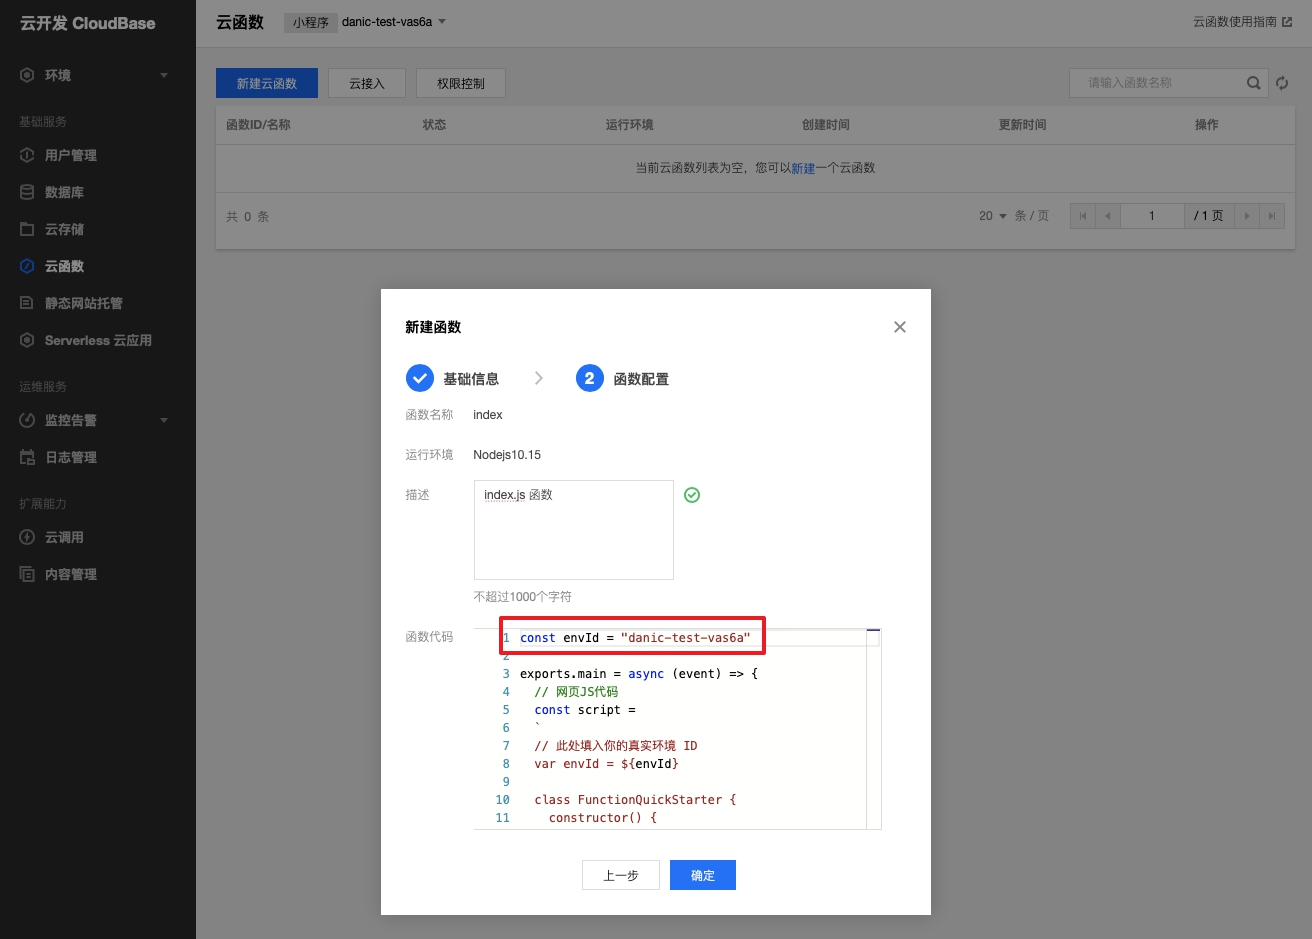
! You need to change the
envIdof the code to your real-world ID.
lt; The full code for the spsn id-"code" and the function is as follows:
// 此处填入您的真实环境 IDconst envId = "your-env-id"exports.main = async (event) => { // 网页JS代码 const script = ` var envId = "${envId}" class FunctionQuickStarter { constructor() { // 绑定 dom this.addNameInput = document.getElementById("add-name") this.deleteNameInput = document.getElementById("delete-name") this.addAgeInput = document.getElementById("add-age") this.addAvatarInput = document.getElementById("add-avatar") this.addDataButton = document.getElementById("add-button") this.infoBox = document.getElementById("info-box") // 绑定 dom listener this.addAvatarInput.addEventListener("change", this.addAvatar.bind(this), false) this.addDataButton.addEventListener("click", this.addData.bind(this), false) // 初始化 CloudBase this.app = tcb.init({ env: envId }) this.setButtonStatus(true) this.signIn() } setButtonStatus(status) { this.addDataButton.disabled = status if (!status) { this.queryData() } } // 匿名登录 signIn() { var auth = this.app.auth({ persistence: "local" }) if(!auth.hasLoginState()) { auth.signInAnonymously().then(() => { this.setButtonStatus(false) }) } else { this.setButtonStatus(false) } } // 录入信息 addData(e) { e.stopPropagation() e.preventDefault() var name = this.addNameInput.value var age = parseFloat(this.addAgeInput.value) var coll = this.app.database().collection("test_db") if (!name) { window.alert( "姓名不能为空!" ) return } if (!(age > 0 && age < 200)) { window.alert( "年龄需要在 0 ~ 200 之间" ) return } if (!this.avatarUrl) { window.alert( "头像不能为空!" ) return } this.setButtonStatus(true) coll.add({ name: name, age: age, avatar: this.avatarUrl }).then((res) => { if (res.code) { console.log("数据库新增失败", res) // 打印数据库新增失败的信息 window.alert( "成绩录入失败: [code=" + res.code + "] [message=" + res.message + "]" ) } else { console.log("数据库新增成功", res) this.avatarUrl = "" window.alert( "成绩录入成功!" ) } this.setButtonStatus(false) }) } // 上传头像 addAvatar(e) { e.stopPropagation() e.preventDefault() var file = e.target.files[0] var name = file.name this.app.uploadFile({ cloudPath: (new Date()).valueOf() + "-" + name, filePath: file }).then(res => { // 云文件ID var fileID = res.fileID // 通过云文件ID 获取 云文件链接 this.app.getTempFileURL({ fileList: [fileID] }).then(res2 => { var fileObj = res2.fileList[0] var url = fileObj.tempFileURL this.avatarUrl = url }) }) } // 查询信息 queryData() { var coll = this.app.database().collection("test_db") coll.where({}).get().then((res) => { if (res.code) { console.log("数据库查询失败", res) // 打印数据库查询失败的信息 window.alert( "成绩查询失败: [code=" + res.code + "] [message=" + res.message + "]" ) } else { console.log("数据库查询成功", res) // 打印数据库查询结果 var html = "<tr>" + "<th>姓名</th>" + "<th>年龄</th>" + "<th>头像</th>" + "</tr>" if (res.data.length > 0) { res.data.forEach((data) => { html += "<tr>" + "<td>" + data.name + "</td>" + "<td>" + data.age + "</td>" + "<td><img src='" + data.avatar + "' style='width:60px;height:60px'></td>" + "</tr>" }) this.infoBox.innerHTML = "<table style='margin: 0 auto'>" + html + "</table>" } else { window.alert( "查无此人!" ) } } }) } } window.addEventListener("load", function() { window.app = new FunctionQuickStarter() }) ` // 网页HTML代码 const body = ` <!doctype html> <html lang="zh"> <head> <meta charset="utf-8"> <script src="https://imgcache.qq.com/qcloud/tcbjs/1.9.0/tcb.js" rel="external nofollow" ></script> <script type="text/javascript">${script}</script> </head> <body style="text-align:center;"> <header> <h1>学生信息系统</h1> </header> <div style="margin: 0 30%; padding: 20px 0; border: solid;"> <h2>录入信息</h2> <form> 姓名: <input id="add-name"> <br><br> 年龄: <input id="add-age"> <br><br> 头像: <input type="file" id="add-avatar" accept=".jpg, .jpeg, .png" style="width: 153px"/> <br><br> <button id="add-button">录入</button> <br><br> </form> <h2>信息列表</h2> <div id="info-box"></div> </div> </body> </html> ` return { statusCode: 200, headers: { 'content-type': 'text/html' }, body: body }}
Step 3: Enable cloud access
-
Go
to the Cloud Development
Console Cloud Access page and turn on the cloud access switch, as follows:

-
Click New to start a new trigger path with the following description of the configuration item:
-
Trigger path: Fill
/quickstart -
Associated resources: Select the index function created in
step 2.
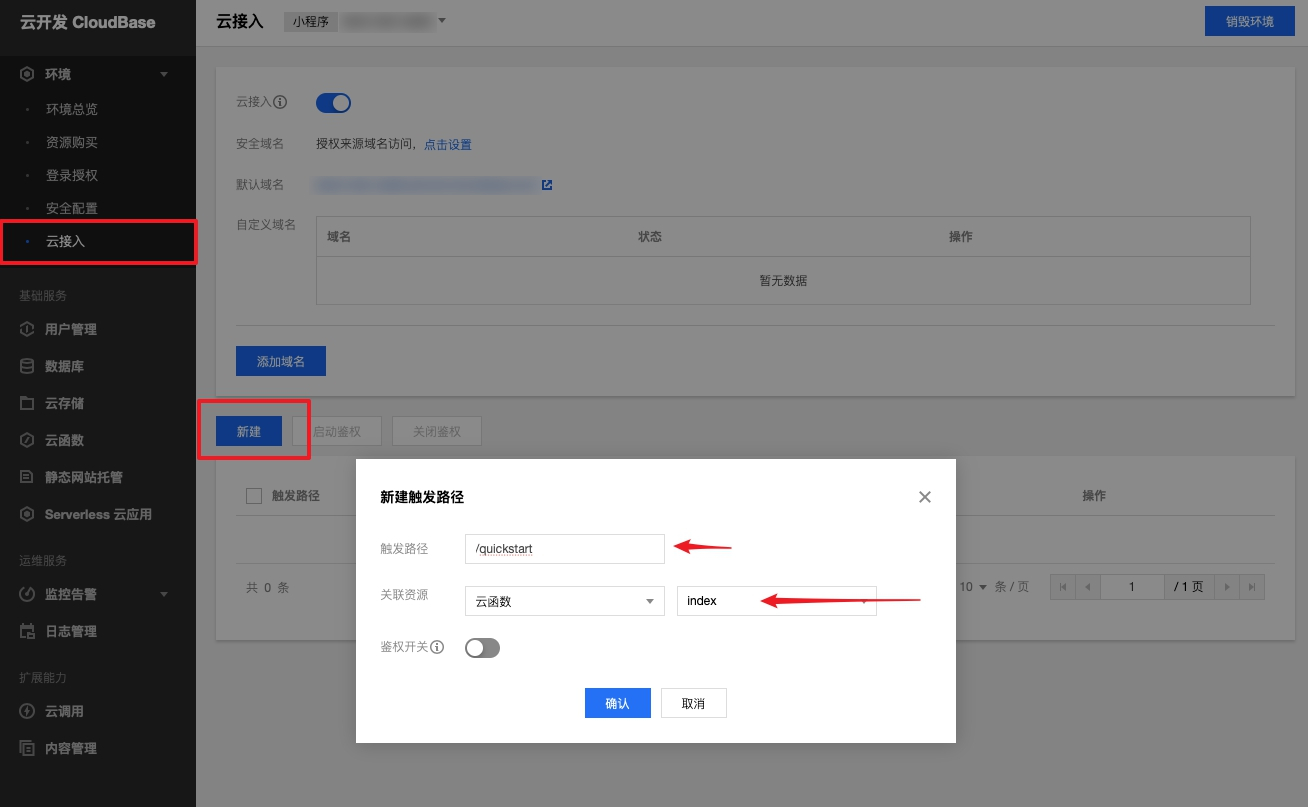
-
Trigger path: Fill
- Click Confirm to add success.
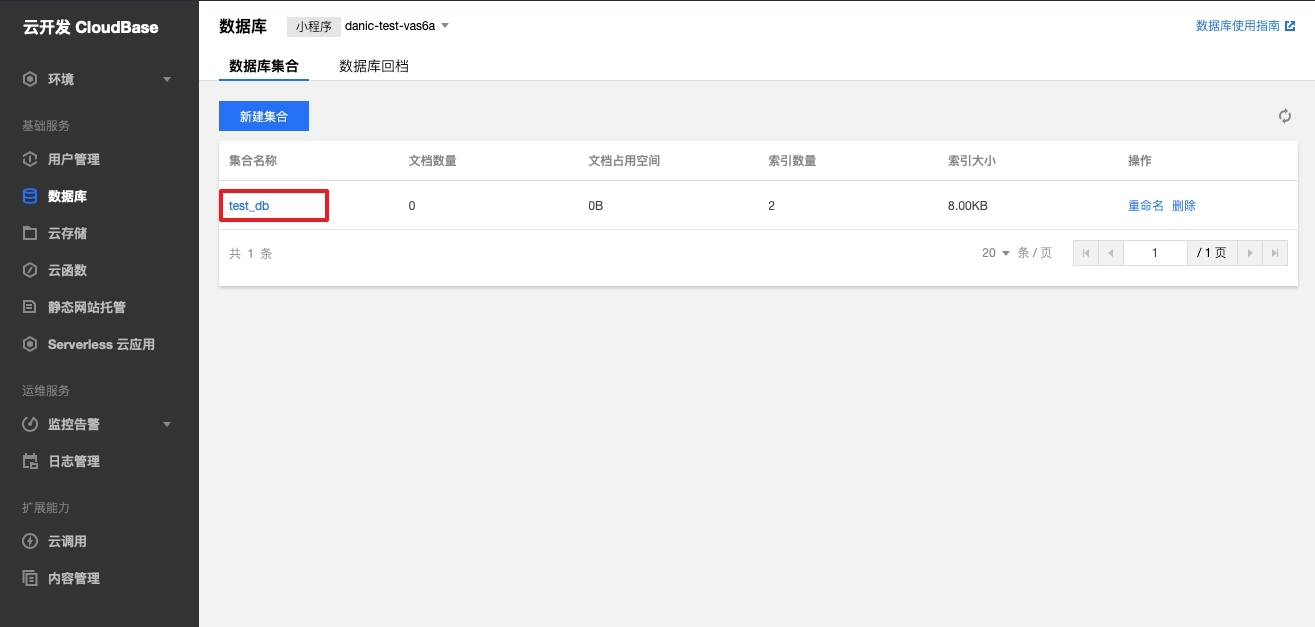
Step 4: Create a database
- Go to the Database console to create a new collection page.
-
Click New Collection to create a collection of
test_dbthe collection.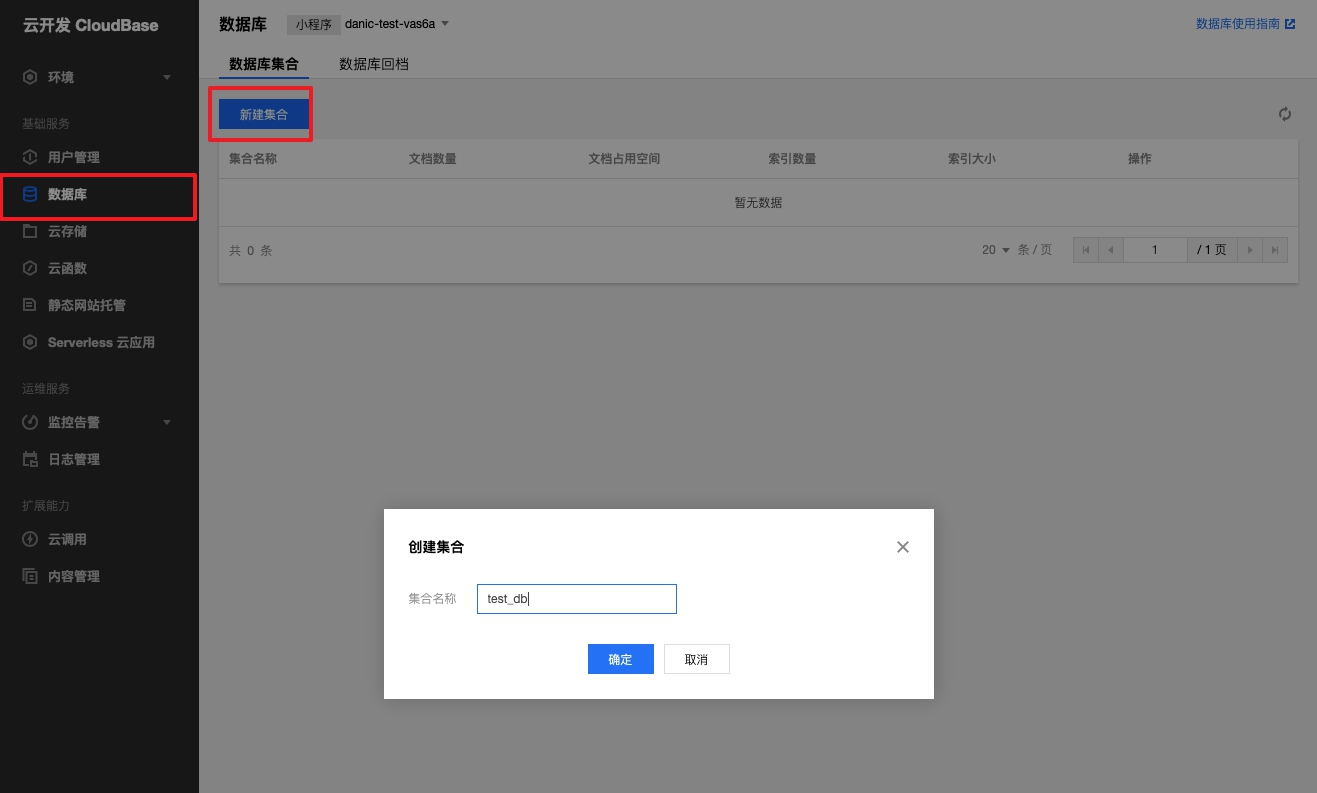
-
Click the collection name to go to the collection management page.
-
In the Permission Settings tab, set permissions for the collection to be
readable by all users.
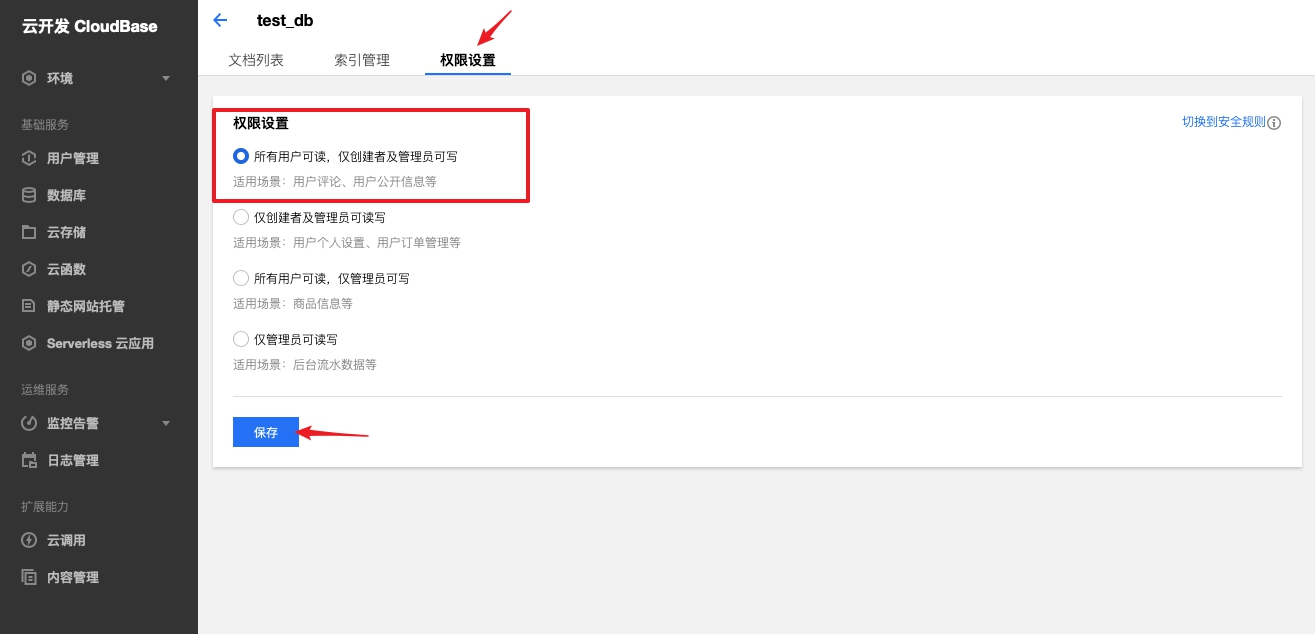
- Click Save to complete the configuration.
Step 5: Visit the website
-
Once configured above, you can
copy the domain
name of the cloud access on the Cloud Access page, as follows:
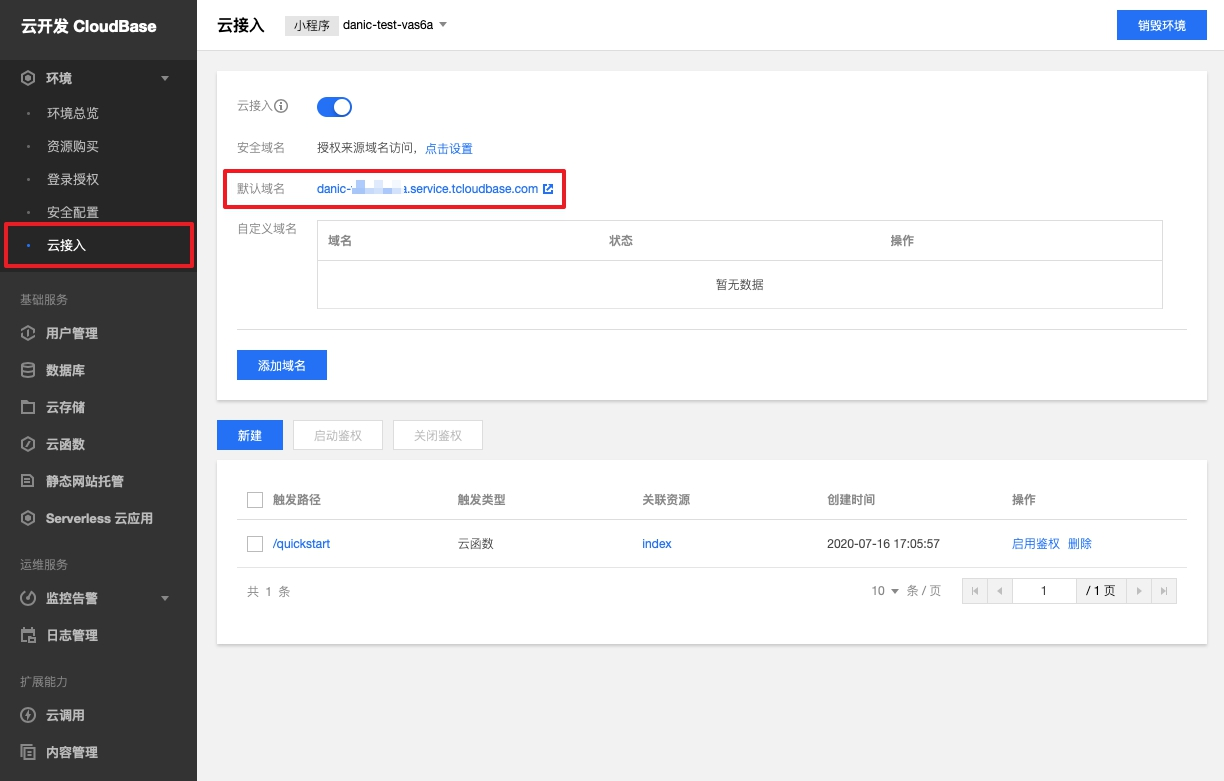
-
Using a replicated
xx.service.tcloudbase.com/quickstartyou can access a well-built student management system.