Builder mode
May 27, 2021 Design mode
Table of contents
Builder mode
Builder Pattern uses multiple simple objects to build into a complex object step by step. This type of design pattern belongs to the creation pattern and provides the best way to create objects.
A Builder class constructs the final object step by step. The Builder class is independent of other objects.
Introduced
Intent: Separating a complex build from its representing allows the same build process to create different represents.
The main solution: The main solution in software systems, sometimes faced with the creation of "a complex object", which is usually composed of various parts of the sub-objects with certain algorithms;
When to use: Some basic components do not change, and their combinations change frequently.
How to solve: will change and remain the same parting.
Key Code: Builder: Create and provide instances, Director: Manage dependencies on built instances.
Examples of applications: 1, go to KFC, hamburgers, cola, French fries, fried chicken wings, etc. are unchanged, and its combination is constantly changing, resulting in the so-called "package." 2 , StringBuilder in JAVA.
Pros: 1, the builder is independent and easy to expand. 2 , easy to control the details of the risk.
Cons: 1, the product must have common, limited scope. 2 , if the internal changes are complex, there will be a lot of construction classes.
Use scenarios: 1, objects that need to be generated have complex internal structures. 2 . The internal properties of the objects that need to be generated are interdependent.
Note: The difference with factory mode is that the builder mode pays more attention to the order in which parts are assembled.
Realize
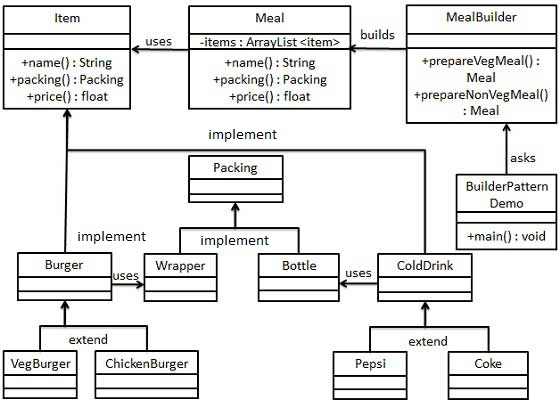
Let's assume a business case for a fast food restaurant, where a typical set menu can be a burger and a cold drink. B urgers can be vegetarian or chicken burgers, which are wrapped in cartons. Cold drinks can be Coca-Cola or Pepsi, and they're in bottles.
We'll create an Item interface that represents food items, such as hamburgers and cold drinks, and a physical class that implements the Item interface, as well as a Packing interface that represents food packaging and a solid class that implements the Packing interface, where hamburgers are wrapped in cartons and cold drinks are packed in bottles.
Then we create a Meal class, ArrayList with Item, and a MealBuilder that creates different types of Meal objects by combining Item. Builder Pattern Demo, our demo class uses MealBuilder to create a Meal.
Step 1
Create an interface that represents food entries and food packaging.
Item.java
public interface Item {
   public String name();
   public Packing packing();
   public float price();
}
Packing.java
public interface Packing {
   public String pack();
}
Step 2
Create an entity class that implements the Packing interface.
Wrapper.java
public class Wrapper implements Packing {

   @Override
   public String pack() {
      return "Wrapper";
   }
}
Bottle.java
public class Bottle implements Packing {

   @Override
   public String pack() {
      return "Bottle";
   }
}
Step 3
Create an abstract class that implements the Item interface, which provides the default functionality.
Burger.java
public abstract class Burger implements Item {

   @Override
   public Packing packing() {
      return new Wrapper();
   }

   @Override
   public abstract float price();
}
ColdDrink.java
public abstract class ColdDrink implements Item {

    @Override
 public Packing packing() {
       return new Bottle();
   }

   @Override
 public abstract float price();
}
Step 4
Create entity classes that extend Burger and ColdDrink.
VegBurger.java
public class VegBurger extends Burger {

   @Override
   public float price() {
      return 25.0f;
   }

   @Override
   public String name() {
      return "Veg Burger";
   }
}
ChickenBurger.java
public class ChickenBurger extends Burger {

   @Override
   public float price() {
      return 50.5f;
   }

   @Override
   public String name() {
      return "Chicken Burger";
   }
}
Coke.java
public class Coke extends ColdDrink {

   @Override
   public float price() {
      return 30.0f;
   }

   @Override
   public String name() {
      return "Coke";
   }
}
Pepsi.java
public class Pepsi extends ColdDrink {

   @Override
   public float price() {
      return 35.0f;
   }

   @Override
   public String name() {
      return "Pepsi";
   }
}
Step 5
Create a Meal class with the Item object defined above.
Meal.java
import java.util.ArrayList;
import java.util.List;

public class Meal {
   private List<Item> items = new ArrayList<Item>();

   public void addItem(Item item){
      items.add(item);
   }

   public float getCost(){
      float cost = 0.0f;
      for (Item item : items) {
         cost += item.price();
      }
      return cost;
   }

   public void showItems(){
      for (Item item : items) {
         System.out.print("Item : "+item.name());
         System.out.print(", Packing : "+item.packing().pack());
         System.out.println(", Price : "+item.price());
      }
   }
}
Step 6
Create a MealBuilder class, and the actual Builder class is responsible for creating the Meal object.
MealBuilder.java
public class MealBuilder {

   public Meal prepareVegMeal (){
      Meal meal = new Meal();
      meal.addItem(new VegBurger());
      meal.addItem(new Coke());
      return meal;
   }

   public Meal prepareNonVegMeal (){
      Meal meal = new Meal();
      meal.addItem(new ChickenBurger());
      meal.addItem(new Pepsi());
      return meal;
   }
}
Step 7
Buider PotternDemo uses MealBuider to demonstrate Builder Pattern.
BuilderPatternDemo.java
public class BuilderPatternDemo {
   public static void main(String[] args) {
      MealBuilder mealBuilder = new MealBuilder();

      Meal vegMeal = mealBuilder.prepareVegMeal();
      System.out.println("Veg Meal");
      vegMeal.showItems();
      System.out.println("Total Cost: " +vegMeal.getCost());

      Meal nonVegMeal = mealBuilder.prepareNonVegMeal();
      System.out.println("\n\nNon-Veg Meal");
      nonVegMeal.showItems();
      System.out.println("Total Cost: " +nonVegMeal.getCost());
   }
}
Step 8
Verify the output.
Veg Meal
Item : Veg Burger, Packing : Wrapper, Price : 25.0
Item : Coke, Packing : Bottle, Price : 30.0
Total Cost: 55.0


Non-Veg Meal
Item : Chicken Burger, Packing : Wrapper, Price : 50.5
Item : Pepsi, Packing : Bottle, Price : 35.0
Total Cost: 85.5